import numpy as np
import pandas as pd
import matplotlib
from matplotlib import pyplot as plt

import os
from sklearn import preprocessing
from sklearn.metrics import confusion_matrix
from sklearn.metrics import classification_report

import torch
import torch.nn as nn
from torch.utils.data.dataset import Dataset
from torch.utils.data import DataLoader

import rasterio as rio

import torchmetrics as tm

import torchvision.transforms as transforms11 Train a Convolutional Neural Network
11.1 Introduction
We are now ready to bring the components we have been discussing together to train a convolutional neural network (CNN) to differentiate land cover types using the EuroSatAllBands dataset. In contrast to the fully connected example, we will now train the model using the images as opposed to the band means. Let’s jump into the workflow.
11.2 Preparation
First, I import the required packages as normal including NumPy, Pandas, matplotlib, os, and scikit-learn. From torch.utils.data, I import the DataSet and DataLoader classes. To load in multiband geospatial raster data, I will use Rasterio. Assessment metrics will be implemented using torchmetrics. Lastly, I will apply data augmentations using torchvision.
I also set the device to the GPU. For training CNNs, it is generally best to use a GPU. Training on a CPU, especially when using a large dataset and/or a complex architecture, can be extremely slow or even intractable. For the remainder of this class, you will need access to a GPU in order to train models. As mentioned in prior modules, you can access GPUs using Google Colab, but there are some use limitations.
device = torch.device("cuda:0" if torch.cuda.is_available() else "cpu")
print(device)cuda:0I next set the folder path to the EuroSATallBands data to a variable, as described in the callout below. I then read in the data tables that were created in the DataSets and DataLoaders module, which are provided in the data/files/tables folder, as Pandas DataFrames. There are separate tables for the training, validation, and testing data. Columns in the table provide the image name, path to each image, class name, and class numeric code. I am not recreating these tables here since they were already generated in a prior module. You may want to go back and review the DataSets and DataLoaders module for a refresher if you are struggling with these concepts.
ImportantData Location
This chapter uses the multispectral version of the EuroSAT dataset (EuroSATallBands), which is too large to include in the book download and must be downloaded from the source listed in Table 2 (EuroSAT_MS.zip). By default, the code expects the uncompressed EuroSAT_MS folder, which contains one subfolder of images per class, to be saved in the data/files folder (data/files/EuroSAT_MS). If you saved the data elsewhere, set folder below to the folder’s location on your machine.
# Set this to the location of the uncompressed EuroSAT_MS folder on your machine.
folder = "data/files/EuroSAT_MS/"
train = pd.read_csv("data/files/tables/mytrain.csv")
test = pd.read_csv("data/files/tables/mytest.csv")
val = pd.read_csv("data/files/tables/myval.csv")
# The saved partitions (data/files/tables) store paths from the original machine, so point each
# image to its location in the EuroSATallBands folder.
for df in [train, test, val]:
df["fullpath"] = folder + df["class"] + "/" + df["file"]In order to normalize the data, I need to calculate the band means and standard deviations for the training samples. All of this code has already been explained in the DataSets and DataLoaders module, so I will not describe it in detail again here. Remember that it is generally best to normalize data using consistent means and standard deviations. Also, it is generally best to use only the training data to make these calculations to avoid a data leak. So, I will calculate the means and standard deviations from the training data, then use these values to normalize all three datasets. Here is a quick review of this process.
- I define a DataSet subclass that allows me to read the data in batches. This is so that I can make use of PyTorch to obtain the statistics and so that I can work with these data in mini-batches since the entire set is too large to process at once.
- I then instantiate an instance of the DataSet subclass with the training samples as input.
- I create a DataLoader to load the mini-batches. Note that the mini-batch size is set to 32 here. When reading entire images as opposed to band means, as I did for the fully connected neural network examples, it is not possible to load a large set of images at once unless you are using multiple GPUs and/or have a lot of VRAM available. You may need to experiment with an appropriate mini-batch size depending on your GPU hardware and available memory.
- I define a function to calculate the means and standard deviations across batches and aggregate the results. This function was adapted from code provided at the link that is commented out.
- I then run the function on the training DataLoader. Note that this may take several minutes to execute.
class EuroSat(Dataset):

    def __init__(self, df):
        super().__init__
        self.df = df

    def __getitem__(self, idx):
        image_name = self.df.iloc[idx, 1]
        label = self.df.iloc[idx, 3]
        label = np.array(label)
        source = rio.open(image_name)
        image = source.read()
        source.close()
        image = image.astype('float32')
        image = image[[1,2,3,4,5,6,7,8,11,12], :, :]
        image = torch.from_numpy(image)
        label = torch.from_numpy(label)
        label = label.long()
        return image, label

    def __len__(self):
        return len(self.df)
trainDS = EuroSat(train)
print(len(trainDS))16200trainDL = torch.utils.data.DataLoader(trainDS, batch_size=32, shuffle=True, sampler=None,
num_workers=0, pin_memory=True, drop_last=False)#https://www.binarystudy.com/2021/04/how-to-calculate-mean-standard-deviation-images-pytorch.html
def batch_mean_and_sd(loader, inChn):
cnt = 0
sums = torch.zeros(inChn, dtype=torch.float64)
sq_sums = torch.zeros(inChn, dtype=torch.float64)
for images, _ in loader:
images = images.double()
b, c, h, w = images.shape
cnt += b * h * w
sums += images.sum(dim=[0, 2, 3])
sq_sums += (images ** 2).sum(dim=[0, 2, 3])
mean = sums / cnt
std = torch.sqrt(sq_sums / cnt - mean ** 2)
return mean.float(), std.float()band_stats = batch_mean_and_sd(trainDL, 10)I am now ready to define the data pipeline to read the image chips and associated labels in mini-batches and train the CNN. I begin by defining the DataSet subclass. This is the same DataSet subclass definition that was used in the DataSets and DataLoaders module. However, I have added some transforms, which we will discuss shortly. This requires adding another input parameter (transform). If the argument associated with this parameter is not None, then transforms will be applied. Using random data augmentations is one means to potentially combat overfitting. This is commonly employed when training CNNs. Let’s review the key components in this DataSet subclass.
- The
__init__()constructor method defines the input parameters. In this case, the user will be expected to input a DataFrame, band means, band standard deviations, and a data transforms object. - The
__getitem__()method defines how each individual sample is loaded. This includes (1) reading the path to the image from the appropriate DataFrame column, (2) reading the numeric code from the appropriate DataFrame column and converting it to a NumPy array, (3) reading the image using Rasterio and the image name and path obtained from the DataFrame, (4) extracting out only the bands that I want to include as predictor variables, (5) normalizing the data by subtracting the band means then dividing by the band standard deviations, (6) converting the data to the 32-bit float type, (7) converting the NumPy arrays representing the image and labels to torch tensors, (8) converting the numeric label tensor to a long integer data type, (9) applying transforms if they are provided, and (10) returning the image and numeric label as torch tensors with the expected data types and shapes. - The
__len__()method returns the number of available samples.
class EuroSat(Dataset):

    def __init__(self, df, mnImg, sdImg, transform):
        self.df = df
        self.mnImg = mnImg
        self.sdImg = sdImg
        self.transform = transform

    def __getitem__(self, idx):
        image_name = self.df.iloc[idx, 1]
        label = self.df.iloc[idx, 3]
        label = np.array(label)
        source = rio.open(image_name)
        image = source.read()
        source.close()
        image = image[[1,2,3,4,5,6,7,8,11,12], :, :]
        image = np.subtract(image, self.mnImg)
        image = np.divide(image, self.sdImg)
        image = image.astype('float32')
        image = torch.from_numpy(image)
        label = torch.from_numpy(label)
        label = label.long()
        if self.transform is not None:
            image = self.transform(image)
        return image, label

    def __len__(self):
        return len(self.df)
The band means and standard deviations are converted to NumPy arrays. I then convert these data to the correct shape for use in the processing pipeline. Specifically, the band means and standard deviations arrays are converted to a shape of (10, 64, 64). This correlates to the number of channels and the length of the spatial dimensions.
bndMns = np.array(band_stats[0].tolist())
bndSDs = np.array(band_stats[1].tolist())
mnImg = np.repeat(bndMns[0], 64*64).reshape((64,64,1))
for b in range(1,len(bndMns)):
mnImg2 = np.repeat(bndMns[b], 64*64).reshape((64,64,1))
mnImg = np.dstack([mnImg, mnImg2])
mnImg = np.transpose(mnImg, (2,0,1))
sdImg = np.repeat(bndSDs[0], 64*64).reshape((64,64,1))
for b in range(1,len(bndSDs)):
sdImg2 = np.repeat(bndSDs[b], 64*64).reshape((64,64,1))
sdImg = np.dstack([sdImg, sdImg2])
sdImg = np.transpose(sdImg, (2,0,1))
print(mnImg.shape)(10, 64, 64)print(sdImg.shape)(10, 64, 64)I now define some transforms that will be used to apply random data augmentations as a means to potentially combat overfitting. The Compose() function from torchvision allows you to define a series of transforms as a single object. The series of transforms must be provided as a list. Here, I am applying random horizontal and vertical flips of the images. The p parameter relates to the likelihood of the random alteration being applied; with this set to 0.3, there is a 30% chance of each transformation being applied.
There are many possible transformations. I recommend taking a look at the torchvision documentation: https://pytorch.org/vision/stable/transforms.html. It is not always clear what transformations should be applied, how often they should be applied, and the level of augmentation. For example, it is possible to apply sharpening, blurring, contrast enhancement, and desaturation. How much the image and associated DN values are augmented will depend on the provided settings. I generally try not to use extreme alterations. It generally takes some experimentation to determine what settings are adequate for a specific task and/or dataset. Again, the goal here is to potentially reduce overfitting and improve generalization of the resulting model by adding more variability to the training set. This makes it harder for the network to memorize the training data.
myTransforms = transforms.Compose(
    [transforms.RandomHorizontalFlip(p=0.3),
    transforms.RandomVerticalFlip(p=0.3),]
    )
I now instantiate the DataSets and define the DataLoaders for the training and validation samples. In the training loop, the training samples will be used to train the model while the validation samples will be used to assess the model at the end of each training epoch. The testing samples will be used to assess the final model later in the module. They are not used within the training loop.
Both the training and validation datasets are being normalized using the statistics from the training data only in order to avoid a data leak. I am applying data augmentation transforms to the training data but not to the validation data since they will not be used to train the model or update the model parameters. It is not generally necessary or appropriate to apply random data augmentations to the validation and testing data.
In the DataLoader, I set the mini-batch size to 32, which worked well on my system. However, you may need to experiment with this to determine a mini-batch size appropriate for your device. Remember that you can use multiple GPUs, if multiple GPUs are available. This was discussed in a prior module. In such cases, you can generally use a larger mini-batch size. For the training data, I randomly shuffle the samples; however, this is not necessary for the validation data. I also drop the last mini-batch for each set since inconsistent mini-batch sizes can be an issue.
trainDS = EuroSat(train, mnImg, sdImg, transform=myTransforms)
valDS = EuroSat(val, mnImg, sdImg, transform=None)
trainDL = torch.utils.data.DataLoader(trainDS, batch_size=32, shuffle=True, sampler=None,
num_workers=0, pin_memory=True, drop_last=True)
valDL = torch.utils.data.DataLoader(valDS, batch_size=32, shuffle=False, sampler=None,
num_workers=0
, pin_memory=True, drop_last=True)11.3 Check Batches and Data
It is generally recommended to check the data before using it to train or validate a model. I have printed some summary metrics for a mini-batch of the training data and for a single image from this mini-batch. You can see that the shape of an image mini-batch is (32, 10, 64, 64). The dimension order is mini-batch, bands, height, and width. The shape of the labels is (32). This is a 1D tensor of 32 numeric codes, or one label for each image in the mini-batch. The data type of the DN values in the image bands is 32-bit float. For the individual image, the band means make sense since the data have been normalized to z-scores. Lastly, the range of class numeric codes, 0 to 9, makes sense; this is because there are 10 classes. The data type of the class codes is long integer. In short, all of this looks good.
batch = next(iter(trainDL))
images, labels = batch
print(f'Batch Image Shape: {images.shape}, Batch Label Shape: {labels.shape}')
Batch Image Shape: torch.Size([32, 10, 64, 64]), Batch Label Shape: torch.Size([32])print(f'Batch Image Data Type: {images.dtype}, Batch Label Data Type: {labels.dtype}')Batch Image Data Type: torch.float32, Batch Label Data Type: torch.int64print(f'Batch Image Band Means: {torch.mean(images, dim=(0,2,3))}')Batch Image Band Means: tensor([0.0550, 0.0578, 0.0822, 0.0811, 0.0325, 0.0147, 0.0271, 0.1847, 0.0796,
0.0177])print(f'Batch Label Minimum: {torch.min(labels, dim=0)}, Batch Label Maximum: {torch.max(labels, dim=0)}')Batch Label Minimum: torch.return_types.min(
values=tensor(0),
indices=tensor(6)), Batch Label Maximum: torch.return_types.max(
values=tensor(9),
indices=tensor(5))testImg = images[1]
testMsk = labels[1]
print(f'Image Shape: {testImg.shape}, Label Shape: {testMsk.shape}')Image Shape: torch.Size([10, 64, 64]), Label Shape: torch.Size([])print(f'Image Data Type: {testImg.dtype}, Label Data Type: {testMsk.dtype}')Image Data Type: torch.float32, Label Data Type: torch.int64I next plot a mini-batch of images with there associated labels. Again, this code was explored in the DataSets and DataLoaders module. It looks like the images are correctly associated with the classes. A few reminders about plotting the images. First, matplotlib expects the channels-last dimension ordering. So, I have to change the order of the dimensions using the permute() method. I also have to undo the normalization by multiplying by the standard deviation and adding the mean. The data also need to be scaled to either a 0 to 1 range or a 0 to 255 range. Here, I have used a 0 to 255 range and defined the data type as unsigned 8-bit integer. I also have defined a dictionary to map the class numeric codes to the class names, which are then used to define the labels in the plot.
In short, the data check out. So, I can move on to defining the CNN architecture.
def img_display(img, mnImg, sdImg):
    img = np.multiply(img, sdImg)
    img = np.add(img, mnImg)
    image_vis = img[[2,1,0],:,:]
    image_vis = image_vis.permute(1,2,0)
    image_vis = (image_vis.numpy()/4000)*255
    image_vis = image_vis.astype('uint8')
    return image_vis

dataiter = iter(trainDL)
images, labels = next(dataiter)
cover_types = {0: 'Annual Crop',
1: 'Forest',
2: 'Herb Veg',
3: 'Highway',
4: 'Industrial',
5: 'Pasture',
6: 'Perm Crop',
7: 'Residential',
8: 'River',
9: 'SeaLake'}
fig, axis = plt.subplots(4, 8, figsize=(15, 10))
for i, ax in enumerate(axis.flat):
with torch.no_grad():
image, label = images[i], labels[i]
ax.imshow(img_display(image, mnImg, sdImg)) # add image
ax.set(title = f"{cover_types[label.item()]}") # add label
ax.axis('off')
plt.show()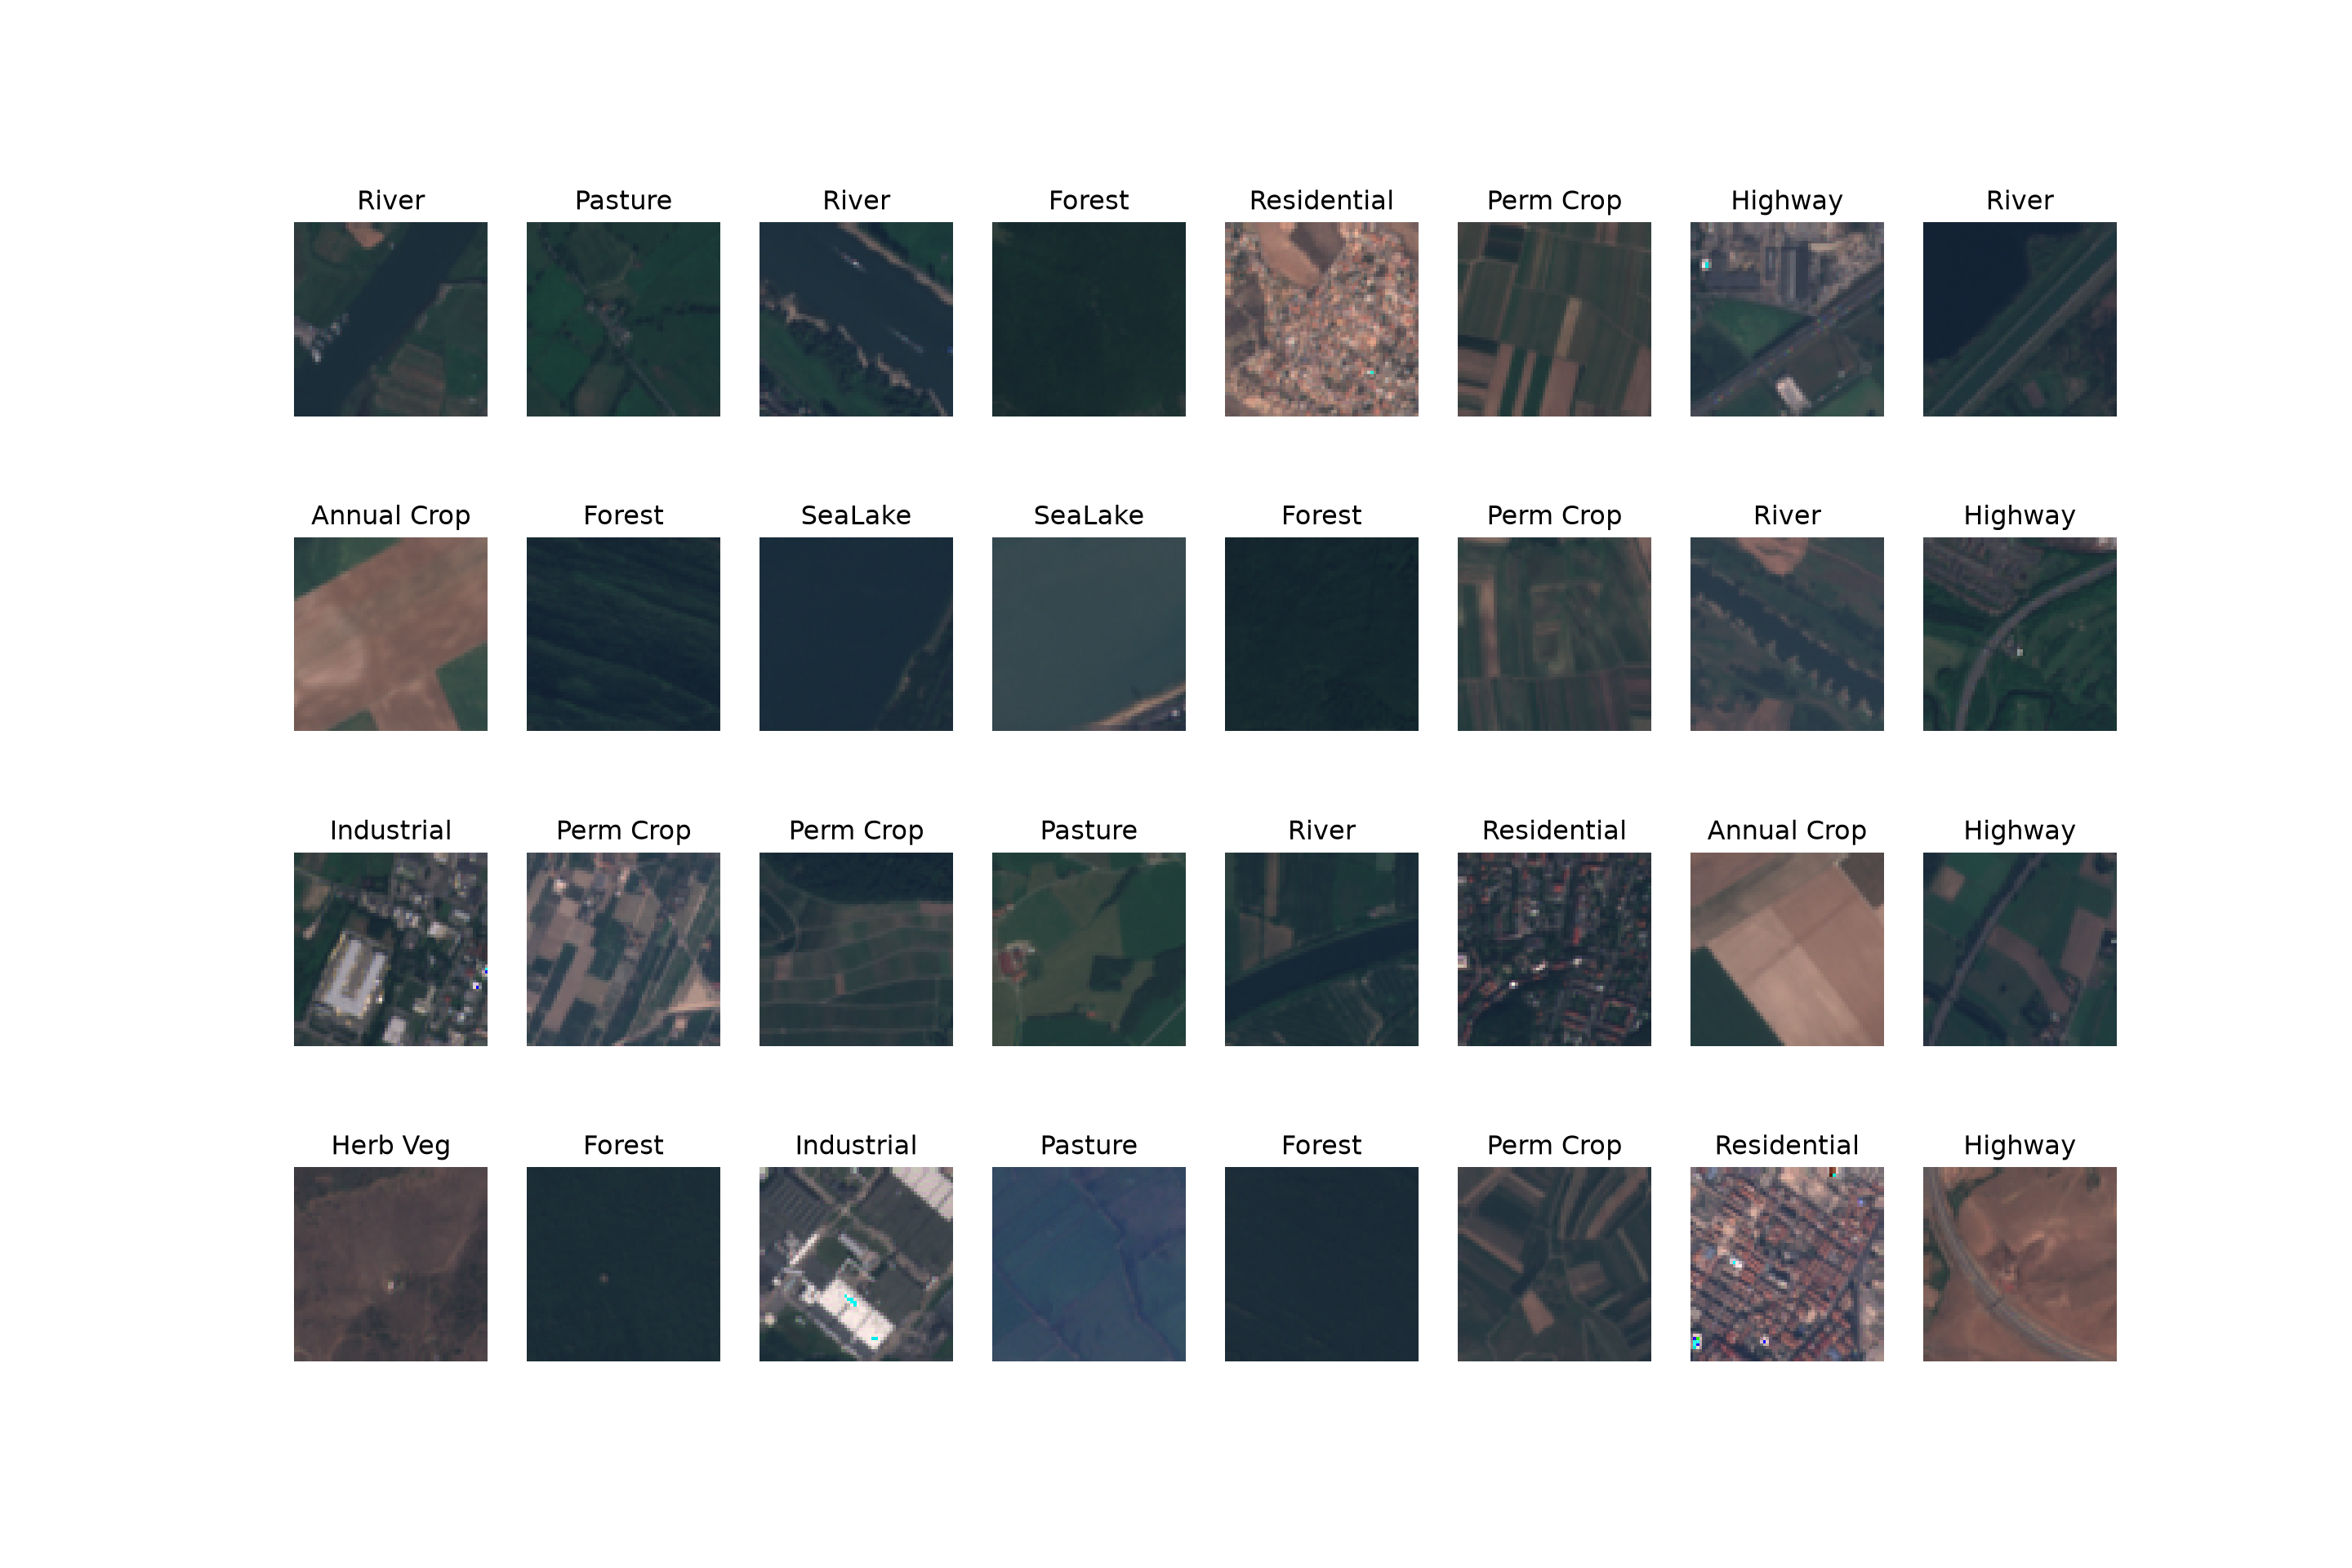
11.4 Define CNN Achitecture
As normal, I define the neural network architecture by subclassing nn.Module. This is the same architecture as was created in the prior module. A few reminders about how this is constructed.
- The
__init__()constructor method defines the parameters of the subclass. It accepts the number of classes to differentiate (inCls), input number of channels (inChn), number of output channels for each 2D convolution layer (outChn), number of nodes in the fully connected layers (fcChn), and the dimensions of the array after the last CNN max pooling operation is applied. - In the
__init__()constructor method, I define the structure of the CNN. I have broken this into two components, each of which are defined withinnn.Sequential(). The first component (cnnLyrs) defines the convolutional components while the second (fcLyrs) defines the fully connected layers. - The convolutional component of the architecture consists of the following:
2D Convolution –> Batch Normalization –> ReLU Activation –> Max Pooling –>
2D Convolution –> Batch Normalization –> ReLU Activation –> Max Pooling –>
2D Convolution –> Batch Normalization–> ReLU Activation –> Max Pooling –>
2D Convolution –> Batch Normalization –> ReLU Activation –> Max Pooling
So, there are 4 sequences of 2D Convolution, batch normalization, ReLU activation, and max pooling. In each nn.Conv2d() layer, the kernel size is (3,3), the step size is 1, and the padding is 1. This results in no reduction in the spatial dimensions of the array. The nn.MaxPool2d() layers all use a kernel size of (2,2) and a stride of 2, which will result in reducing the size of the array by half in the spatial dimensions. In this case, the sequence will be:
(64,64) –> (32,32) –> (16,16) –> (8,8) –> (4,4)
Only the nn.Conv2d() and nn.BatchNorm2d() layers have trainable parameters in this component of the model.
- In the fully connected component of the model, the sequence is as follows:
Fully Connected –> Batch Normalization –> ReLU Activation –> Fully Connected –> Batch Normalization –> ReLU Activation –> Fully Connected
The last fully connected layer is not followed by batch normalization and a ReLU activation since I want to output the class logits. I do not apply a softmax activation here since the loss function expects logits. The last nn.Linear() layer has an output size equal to the number of classes being differentiated. Also, I am using nn.BatchNorm1d() here as opposed to nn.BatchNorm2d() since I am now dealing with fully connected layers. Only the nn.Linear() and nn.BatchNorm1d() layers have trainable parameters in this component of the model.
- The
forward()method defines how data will pass through the network. It will first pass through the convolutional component, then be flattened, then pass through the fully connected layers. The flattening is accomplished using theview()method.
class myCNNSeq(nn.Module):
  def __init__(self, nCls, inChn, outChn, fcChn, lastDim):
    super().__init__()
    self.nCls = nCls
    self.inChn = inChn
    self.outChn = outChn
    self.fcChn = fcChn
    self.lastDim = lastDim

    self.cnnLyrs = nn.Sequential(
        nn.Conv2d(in_channels=inChn, out_channels=outChn[0], kernel_size=(3,3), padding=1),
        nn.BatchNorm2d(outChn[0]),
        nn.ReLU(inplace=True),
        nn.MaxPool2d(2,2),
        nn.Conv2d(in_channels=outChn[0], out_channels=outChn[1], kernel_size=(3,3), padding=1),
        nn.BatchNorm2d(outChn[1]),
        nn.ReLU(inplace=True),
        nn.MaxPool2d(2,2),
        nn.Conv2d(in_channels=outChn[1], out_channels=outChn[2], kernel_size=(3,3), padding=1),
        nn.BatchNorm2d(outChn[2]),
        nn.ReLU(inplace=True),
        nn.MaxPool2d(2,2),
        nn.Conv2d(in_channels=outChn[2], out_channels=outChn[3], kernel_size=(3,3), padding=1),
        nn.BatchNorm2d(outChn[3]),
        nn.ReLU(inplace=True),
        nn.MaxPool2d(2,2)
    )

    self.fcLyrs = nn.Sequential(
        nn.Linear(lastDim*lastDim*outChn[3], fcChn[0]),
        nn.BatchNorm1d(fcChn[0]),
        nn.ReLU(inplace=True),
        nn.Linear(fcChn[0], fcChn[1]),
        nn.BatchNorm1d(fcChn[1]),
        nn.ReLU(inplace=True),
        nn.Linear(fcChn[1], nCls)
    )

  def forward(self,x):
    x = self.cnnLyrs(x)
    x = x.view(-1, self.lastDim*self.lastDim*self.outChn[3])
    x = self.fcLyrs(x)
    return x
The getDim() function allows for determining the size of the array in the spatial dimensions for a given input size and for a given number of max pooling operations. This is used to determine the size of the array that will be flattened then provided as input to the fully connected component of the architecture.
def getDim(inDim, numBlks):
  x = inDim
  for i in range(1,numBlks+1,1):
    x = x/2
  return int(x)
I now instantiate an instance of the CNN. For this problem, the number of classes is 10 and the number of input channels is 10. I have set the output sizes, or number of learned kernels, to [10, 20, 30, 40]. This argument is provided as a list. The number of nodes in the fully connected layers are 256 and 512. Lastly, the size of the array at the end of the convolutional operations and prior to being flattened and fed into the fully connected component is calculated using the getDim() function, which accepts the original size of the image and the number of max pooling operations. Lastly, the model is moved to the device using the to() method.
model = myCNNSeq(nCls=10,
                inChn=10,
                outChn=[10,20,30,40],
                fcChn=[268,512],
                lastDim=getDim(64,4)).to(device)
11.5 Train the Model with Lightning
In Chapter 8, we explored PyTorch Lightning, and in Chapter 10, we defined a general LitClassifier LightningModule that can be used to train any scene classification architecture. Here, I use it to train the CNN defined above. The LightningModule defines the loss (cross entropy), the assessment metrics (overall accuracy, class-aggregated macro-averaged F1-score, and Cohen’s Kappa), and the optimizer (AdamW with a learning rate of 0.001). Since the class was defined in the prior chapter, I redefine it here so that this chapter can be run on its own.
Since this is a multiclass classification problem, I am using cross entropy (CE) loss. The implementation of this loss in PyTorch expects logits as opposed to probabilities; this is why I did not include a softmax activation as the final step in the CNN architecture. This loss can sometimes perform poorly, especially if the classes are highly imbalanced, which is not the case here. If classes are highly imbalanced, it is possible to include class weights in the loss metric computation. Alternatively, a different loss can be used, such as Dice or Tversky loss.
import lightning as L
from lightning.pytorch.callbacks import ModelCheckpoint
from lightning.pytorch.loggers import CSVLogger

class LitClassifier(L.LightningModule):
    def __init__(self, model, nCls, lr=1e-3):
        super().__init__()
        self.save_hyperparameters(ignore=["model"])
        self.model = model
        self.criterion = nn.CrossEntropyLoss()
        self.lr = lr
        metrics = tm.MetricCollection({
            "acc": tm.Accuracy(task="multiclass", num_classes=nCls),
            "f1": tm.F1Score(task="multiclass", num_classes=nCls, average="macro"),
            "kappa": tm.CohenKappa(task="multiclass", num_classes=nCls),
        })
        self.train_metrics = metrics.clone(prefix="train_")
        self.val_metrics = metrics.clone(prefix="val_")
        self.test_metrics = metrics.clone(prefix="test_")

    def forward(self, x):
        return self.model(x)

    def _shared_step(self, batch, metrics, stage):
        x, y = batch
        logits = self(x)
        loss = self.criterion(logits, y)
        metrics.update(logits, y)
        self.log(f"{stage}_loss", loss, on_step=False, on_epoch=True, prog_bar=True)
        self.log_dict(metrics, on_step=False, on_epoch=True, prog_bar=(stage == "val"))
        return loss

    def training_step(self, batch, batch_idx):
        return self._shared_step(batch, self.train_metrics, "train")

    def validation_step(self, batch, batch_idx):
        self._shared_step(batch, self.val_metrics, "val")

    def test_step(self, batch, batch_idx):
        self._shared_step(batch, self.test_metrics, "test")

    def predict_step(self, batch, batch_idx):
        x = batch[0] if isinstance(batch, (list, tuple)) else batch
        return torch.softmax(self(x), dim=1)

    def configure_optimizers(self):
        return torch.optim.AdamW(self.parameters(), lr=self.lr)
litModel = LitClassifier(model=model, nCls=10, lr=1e-3)I next define the Trainer. I will train the model for 50 epochs. As in Chapter 8, I use a ModelCheckpoint callback to save the model that provides the largest class-aggregated F1-score for the validation data and a CSVLogger to save the losses and metrics for each epoch. I also use bfloat16 mixed precision (precision="bf16-mixed") to reduce memory use and speed up training. If your GPU does not support bfloat16, use "16-mixed" or remove this argument.
checkpoint = ModelCheckpoint(monitor="val_f1", mode="max", save_top_k=1,
                             dirpath="data/output/cnnEuroSat/",
                             filename="best-{epoch:02d}-{val_f1:.4f}")
trainer = L.Trainer(
max_epochs=50,
accelerator="gpu",
devices=1,
precision="bf16-mixed",
logger=CSVLogger("data/output/", name="eurosat_cnn"),
callbacks=[checkpoint],
)The model is trained by calling fit() with the LightningModule and the training and validation DataLoaders defined above. If you choose to run this code, it will take some time to execute. On my machine it took several hours to train the network for 50 epochs. If you do not want to train the model, a trained model has been provided with the text; how to load it is demonstrated in the next section.
trainer.fit(litModel, train_dataloaders=trainDL, val_dataloaders=valDL)Once the network is trained, we can explore the training process using the logged losses and assessment metrics. The CSVLogger writes one row each time values are logged, so I group the rows by epoch to obtain one row per epoch, as demonstrated in Chapter 8.
logDF = pd.read_csv(f"{trainer.logger.log_dir}/metrics.csv")
logDF = logDF.groupby("epoch").first().reset_index()
The code below reads the training log provided with the text (data/models/cnnEurosatLogs.csv), which was written by the CSVLogger when the provided model was trained, and collapses it to one row per epoch.
resultsDF = pd.read_csv("data/models/cnnEurosatLogs.csv")
resultsDF = resultsDF.groupby("epoch").mean().reset_index()plt.rcParams['figure.figsize'] = [10, 10]
firstPlot = resultsDF.plot(x='epoch', y="train_loss")
resultsDF.plot(x='epoch', y="val_loss", ax=firstPlot)
plt.show()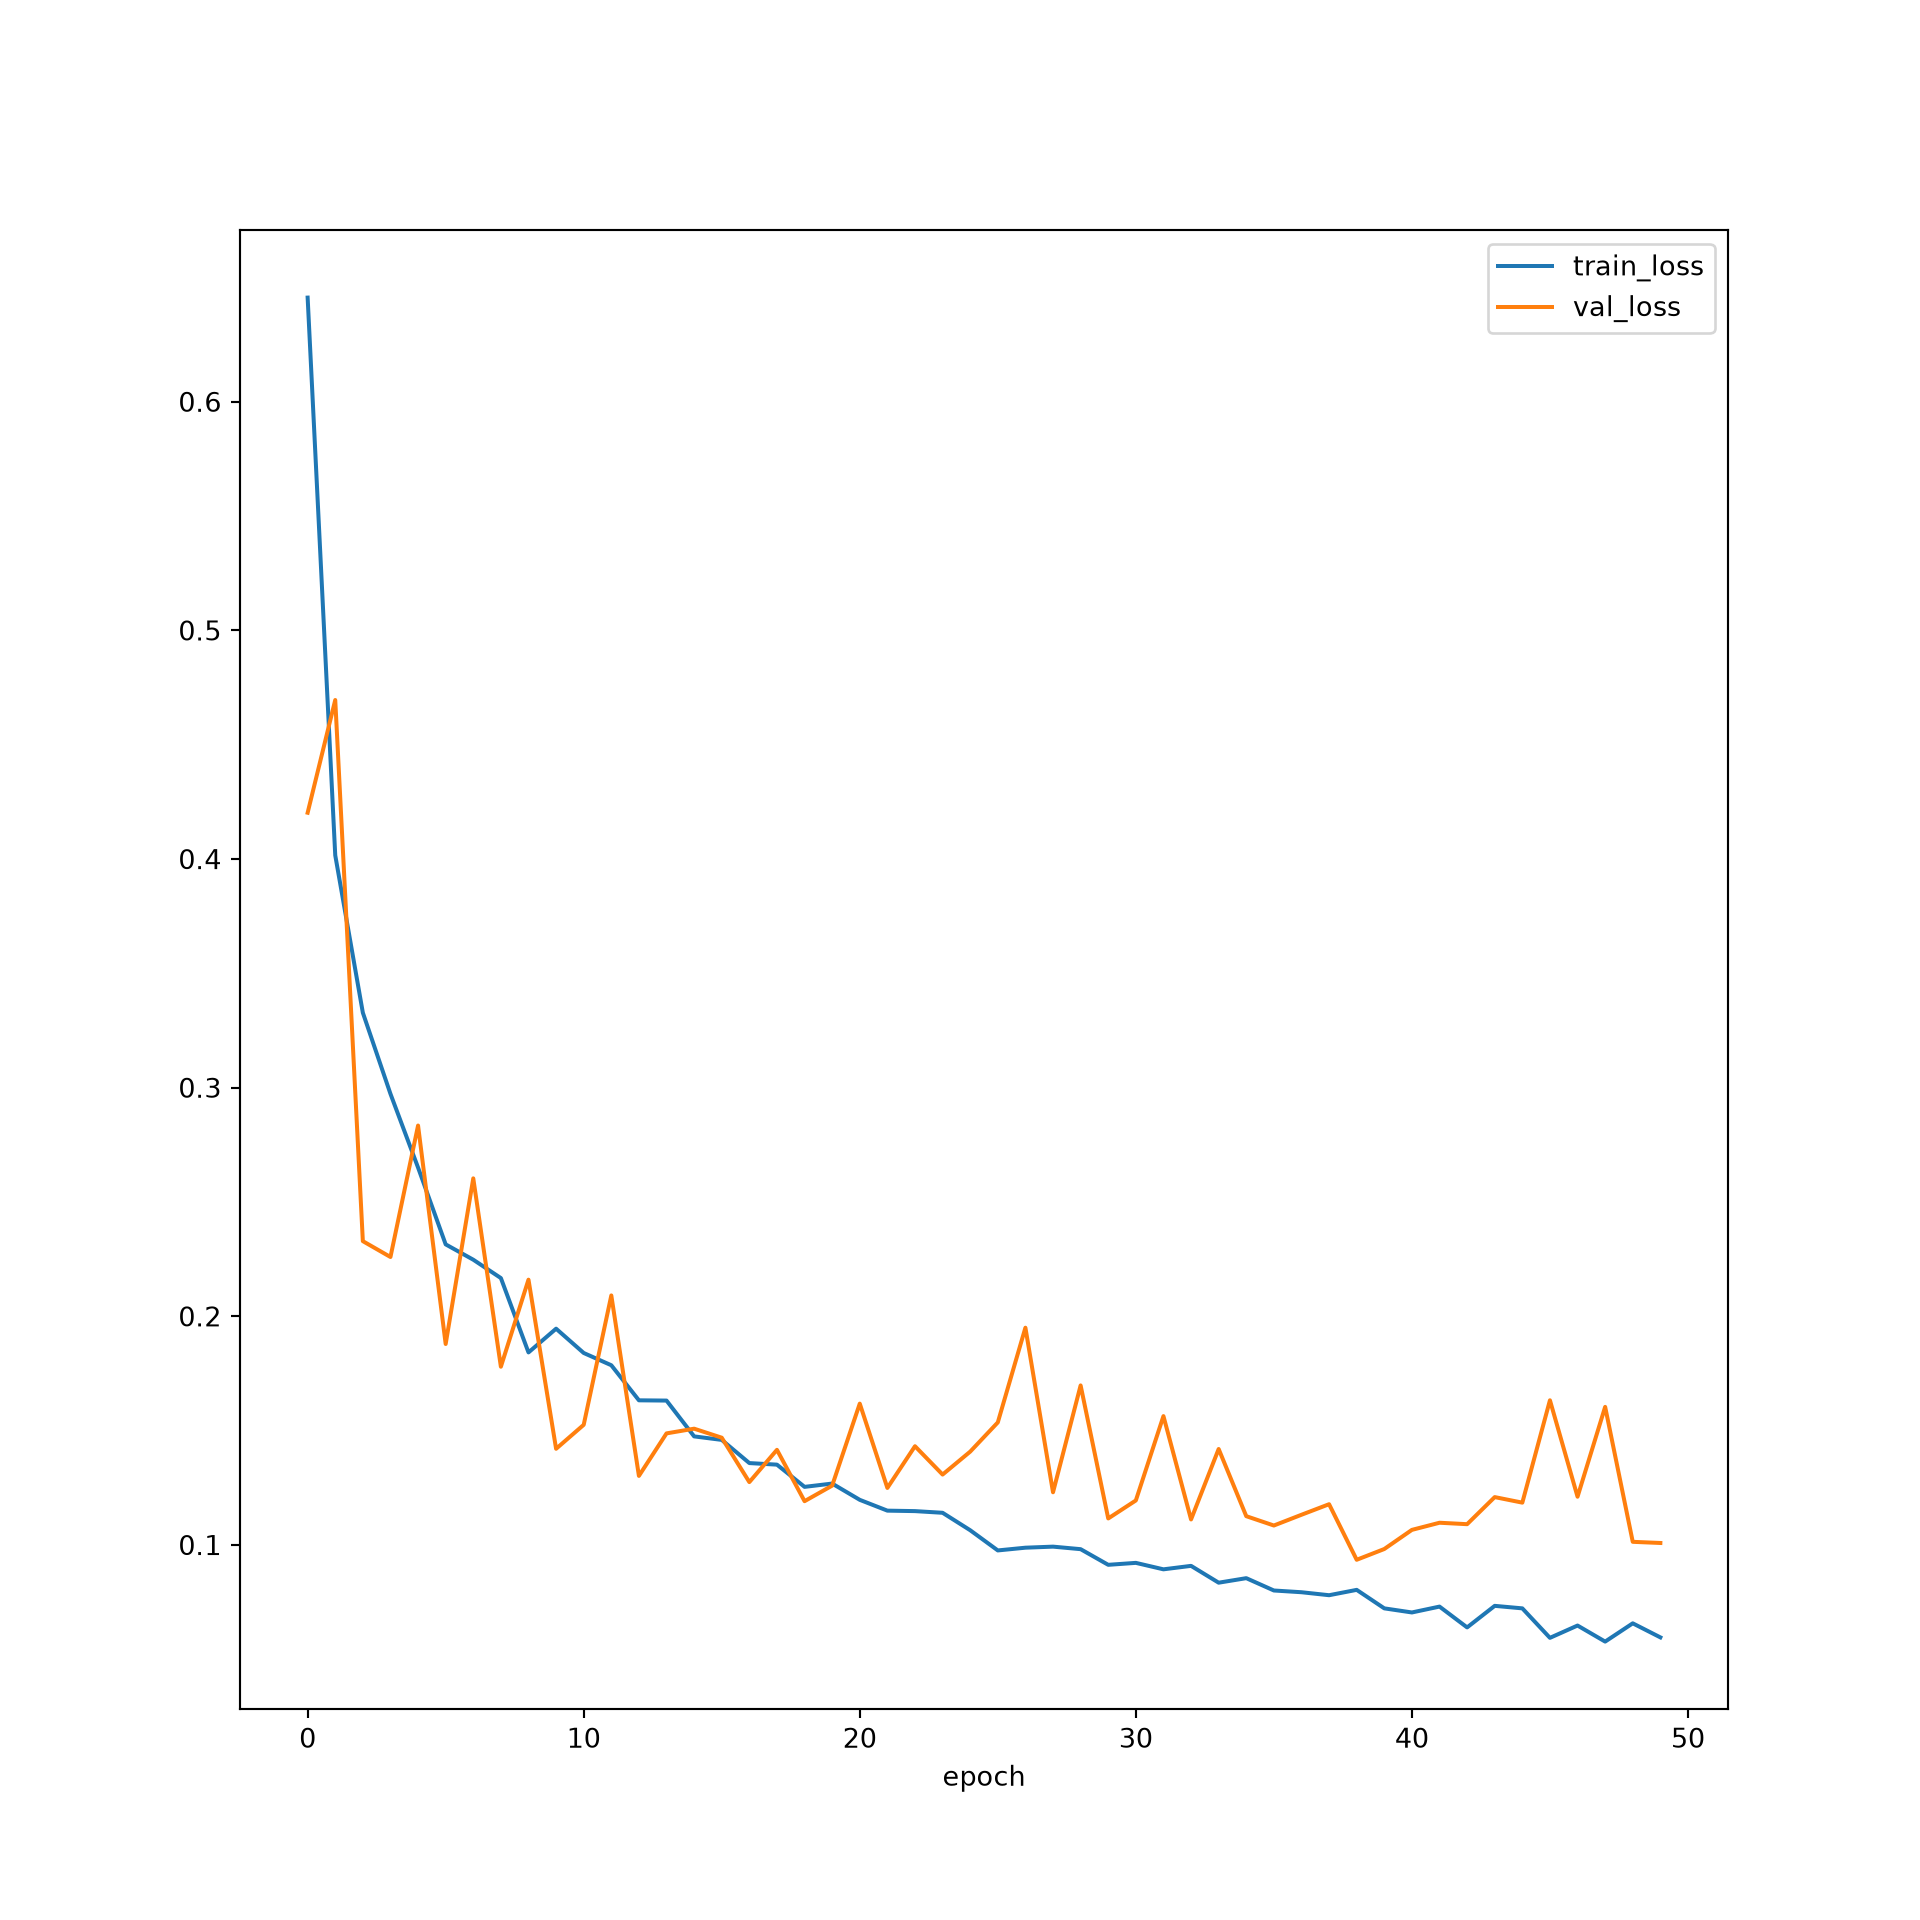
plt.rcParams['figure.figsize'] = [10, 10]
firstPlot = resultsDF.plot(x="epoch", y="train_f1")
resultsDF.plot(x='epoch', y="val_f1", ax=firstPlot)
plt.show()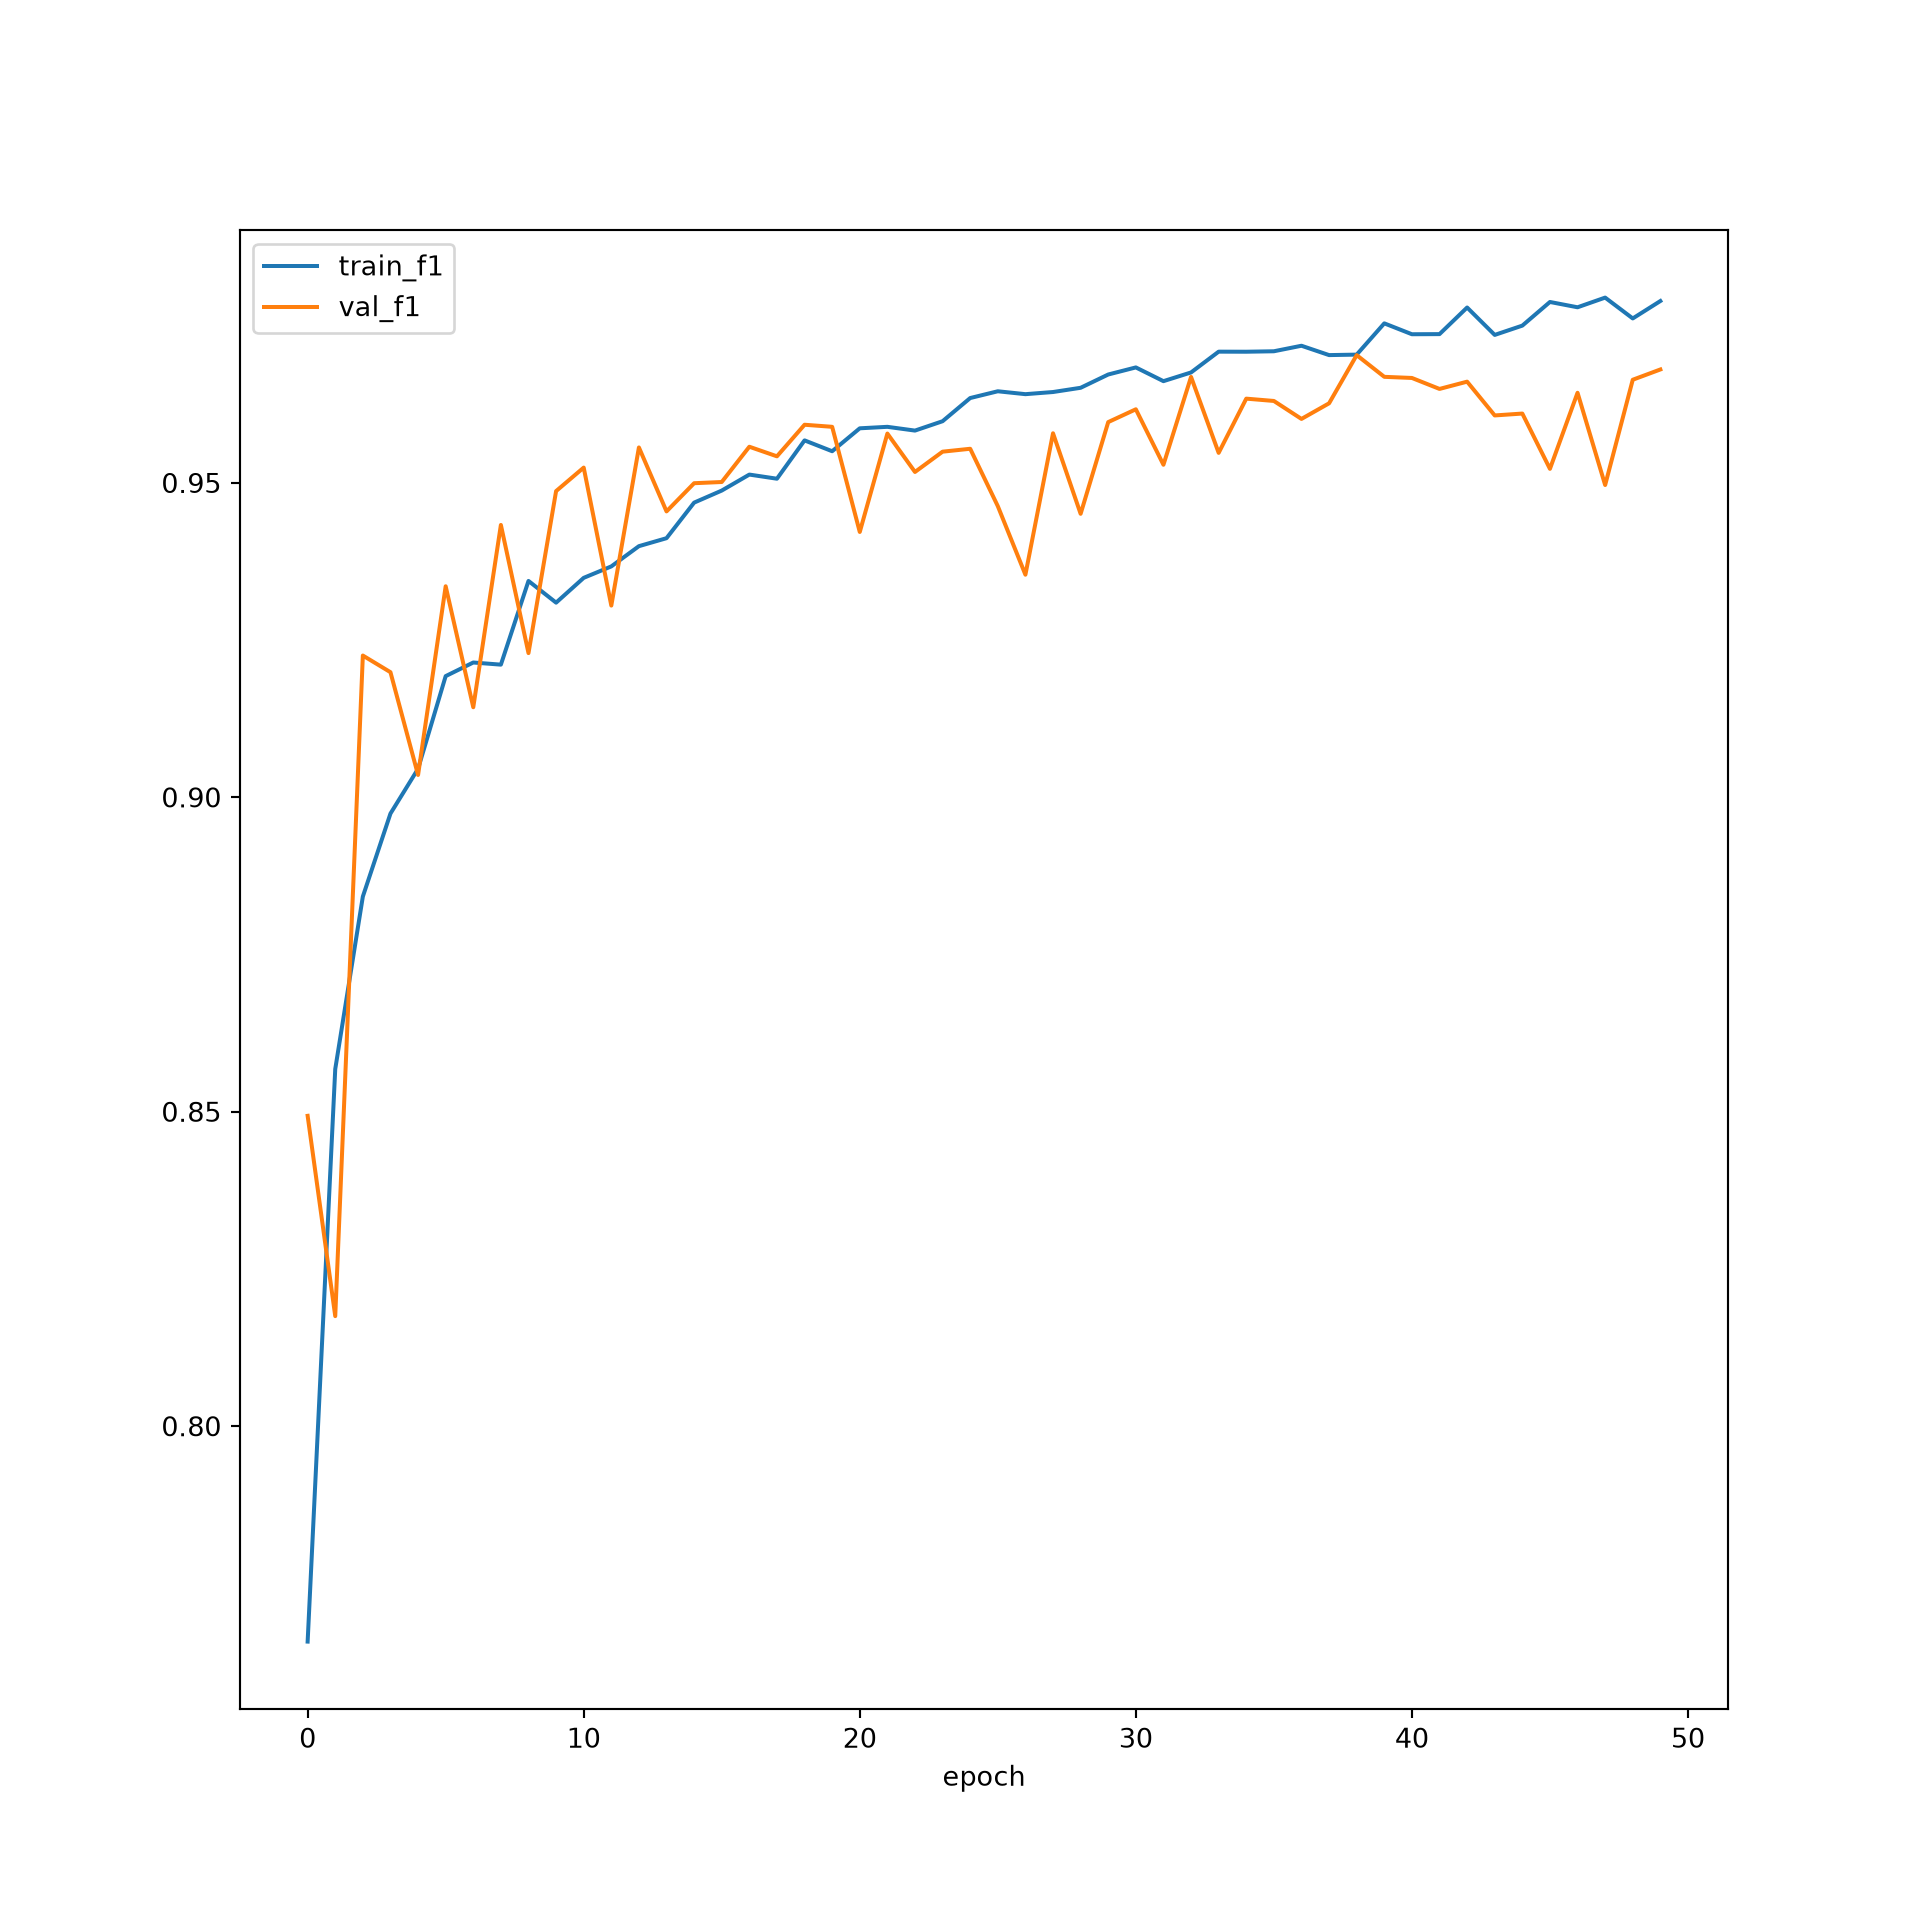
The model did not improve much after ~30 epochs based on the predictions to the validation data, suggesting that 50 epochs was long enough to train the model. The F1-scores suggest that the performance for the training data was still improving after 50 epochs. However, the results for the validation data leveled off after 30 epochs. The loss curves do not suggest overfitting. In short, the training process seems to have progressed smoothly. This was a fairly simple CNN, so it should not be expected that state-of-the-art performance would be obtained. However, the model did perform well in general. If the performance was not adequate, I could experiment with altering the training process or model architecture, such as using a different loss function, incorporating class weights, changing the data augmentations, using a learning rate scheduler, or increasing the number of convolutional layers or learned kernels, as discussed in Chapter 7.
11.6 Assess Model
Lastly, I will predict to the withheld testing set. If you trained the model above, the best checkpoint can be used by setting ckpt_path="best" when calling test(). Here, I instead load the parameters from the provided model file. Since the LightningModule stores the architecture as its model attribute, the saved parameters are loaded into that attribute. I then instantiate a DataSet and DataLoader for the testing data, without data augmentations, and call the test() method of a Trainer.
ckpt = torch.load("data/models/cnnEurosat.ckpt", map_location="cpu", weights_only=False)
state = {k.removeprefix("model."): v for k, v in ckpt["state_dict"].items()
         if k.startswith("model.")}

model = myCNNSeq(nCls=10, inChn=10, outChn=[10,20,30,40], fcChn=[268,512], lastDim=getDim(64,4))
model.load_state_dict(state)
litModel = LitClassifier(model=model, nCls=10)

testDS = EuroSat(test, mnImg, sdImg, transform=None)
testDL = torch.utils.data.DataLoader(testDS, batch_size=32, shuffle=False, num_workers=0)

trainer = L.Trainer(accelerator="gpu", devices=1, logger=False)
testResults = trainer.test(litModel, dataloaders=testDL)
In comparison to our fully connected model, I am generally seeing stronger performance. I achieve an overall accuracy of ~97%. Again, this is not state-of-the-art performance, but is still pretty good.
It is also possible to obtain class-level metrics. To do so, I use the predict() method of the Trainer, which returns the predicted class probabilities for each mini-batch from the predict_step() method. I concatenate the results, obtain the reference labels from the test DataFrame, and calculate the full confusion matrix and the class-level F1-score, precision, and recall using torchmetrics with the average parameter set to “none”.
probs = torch.cat(trainer.predict(litModel, dataloaders=testDL))
targets = torch.tensor(test.iloc[:len(probs), 3].to_numpy()).long()

cm = tm.ConfusionMatrix(task="multiclass", num_classes=10)
f1 = tm.F1Score(task="multiclass", num_classes=10, average="none")
precision = tm.Precision(task="multiclass", num_classes=10, average="none")
recall = tm.Recall(task="multiclass", num_classes=10, average="none")

print(cm(probs, targets))
print(f1(probs, targets))
print(precision(probs, targets))
print(recall(probs, targets))
11.7 Concluding Remarks
The goal of this chapter was to demonstrate the process of training and assessing a CNN for scene classification or scene labeling tasks. Using PyTorch Lightning, the training process was nearly identical to the process used to train the fully connected network in Chapter 8; only the architecture and the DataSet changed. Before moving on to discuss pixel-level classification, or semantic segmentation, in the next chapter we will explore some commonly used CNN architectures, specifically VGGNet, ResNet, and MobileNetV2, which can be easily implemented using torchvision.
11.8 Questions
- Why were random data augmentations applied to the training data but not to the validation or testing data?
- Explain the purpose of
transforms.Compose()and the p parameter used with the random flip transformations. - Why were the band means and standard deviations converted to tensors with a shape of (10, 64, 64) before being used within the DataSet subclass?
- What modifications to the image tensors were required before a mini-batch of images could be displayed using matplotlib?
- Explain how the
ModelCheckpointcallback was configured to save only the model that provided the largest class-aggregated F1-score for the validation data. What are the advantages of this approach in comparison to saving the model after every epoch? - Why were the saved parameters loaded into the
modelattribute of the LightningModule as opposed to the LightningModule itself? What does settingckpt_path="best"do when calling thetest()method of aTrainer? - Compare the performance of the CNN trained in this chapter to that of the fully connected network trained in Chapter 6. What explains the difference in performance?
- List four modifications to the architecture or training process that could be explored if the model did not perform adequately.
11.9 Exercises
Exercise 11.1: Train a CNN for a Scene Labeling Task
Introduction
The goals of this exercise are to train the CNN architecture defined in Exercise 10.1 using the data prepared in Exercise 5.1 and to assess the model using the withheld test data.
Deliverables
- A Quarto (.qmd) file containing all required code and answers to the questions and discussion prompts, and the HTML webpage rendered from it
Data
This exercise makes use of the PatternNet dataset and the training, validation, and test partitions that you created in Exercise 5.1. See Exercise 5.1 for a description of the dataset.
Tasks
Task 1: Prepare your data as defined in Exercise 5.1.
Task 2: Define and instantiate your model as defined in Exercise 10.1.
Task 3: Train the model using the following configuration:
- Use a mini-batch size of 32.
- Train the model for 25 epochs. Reading the JPEG files is the main bottleneck, so each epoch may take a couple of minutes, depending on your hardware.
- Use the AdamW optimizer with a learning rate of 1e-3.
- Use a cross entropy loss.
- Monitor the loss for the training and validation sets at the end of each training epoch.
- Monitor the overall accuracy and class-aggregated, macro-averaged F1-score for both the training and validation data.
- Save the model that provides the best F1-score for the validation data.
Task 4: Assess the model using the test set. Calculate overall accuracy and class-aggregated, macro-averaged recall, precision, and F1-score. Also, calculate the confusion matrix and the class-level precision, recall, and F1-score for all classes.
Task 5: Discuss the modeling results including:
- Learning process stability
- Evidence of overfitting
- Overall model performance on the training and validation sets
- Overall model performance on the test set
- Class-level performance on the test set
- Which classes were most confused or difficult to distinguish? Why might these classes be difficult to differentiate?
- The spatial resolution of the PatternNet images varies by class (see the patternnet_description.pdf file provided with the dataset). How might this affect what the model learns, and how well would you expect the model to perform on imagery with a single, consistent spatial resolution?