import numpy as np
import pandas as pd
import matplotlib
from matplotlib import pyplot as plt

import os

import cv2

import glob

import albumentations as A

import torch
import torch.nn as nn
from torch.nn import functional as F
from torch.utils.data.dataset import Dataset
from torch.utils.data import DataLoader

from torchinfo import summary

import torchmetrics as tm

from kornia import losses16 Train a UNet for Semantic Segmentation
16.1 Introduction
Now that we have covered building a UNet semantic segmentation architecture, we are ready to use it to make predictions at the pixel-level. Fortunately, you will see that the training and validation processes are very similar to the processes we have already explored for fully connected and convolutional neural networks for scene labeling.
As usual, I begin by reading in the needed libraries including NumPy, Pandas, matplotlib, os, and torch. In this example, I will use the OpenCV package (cv2) (https://pypi.org/project/opencv-python/) to read in the image data. I will use the Albumentations package (https://albumentations.ai/) to apply data augmentations, as I have found it to be better for semantic segmentation tasks in comparison to using the transformations available in torchvision. This is because the package does a good job of augmenting the pixel-level labels along with the image chips. For example, if the image is flipped, the mask will also be flipped to maintain alignment. I use torchinfo to obtain a summary of the architecture and torchmetrics to calculate assessment metrics. Lastly, the Kornia library (https://kornia.readthedocs.io/) is used to implement a multiclass Dice loss. I also use PyTorch Lightning to train the model, as introduced in Chapter 8.
I run this experiment on a GPU. This process could not be implemented on a CPU, as it is too computationally intensive. I have provided a trained model if you do not want to or cannot execute the training loop on your machine.
device = torch.device("cuda:0" if torch.cuda.is_available() else "cpu")
print(device)cuda:0In this example, I will attempt to build a model to classify general land cover classes from true color, or RGB, aerial orthophotography using the Landcover.ai dataset. This dataset consists of 41 orthophotos with a spatial resolution of between 25 and 50 cm for areas in Poland. Five classes are differentiated:
0 = Other
1 = Building
2 = Woodland
3 = Water
4 = Road
These data are introduced and described in the following publication and can be downloaded at https://landcover.ai.linuxpolska.com/.
Boguszewski, A., Batorski, D., Ziemba-Jankowska, N., Dziedzic, T. and Zambrzycka, A., 2021. “LandCover. ai: Dataset for automatic mapping of buildings, woodlands, water and roads from aerial imagery.” In Proceedings of the IEEE/CVF Conference on Computer Vision and Pattern Recognition (pp. 1102-1110).
16.2 Preparation
Before using these data, the provided orthophotos must be partitioned into smaller image and associated mask chips. The data originators have provided a script to accomplish this task that is included with the data download. The code below is an adapted version of that script. The OUTPUT_DIR folder, to which the chips are written, will be created as part of the execution. This script generates chips with a 512x512 pixel size. The produced chips will match the file names provided in the provided train.txt, val.txt, and test.txt files that are also provided with the data. I have not executed this code in the example since I have already generated the chips. However, you will need to run it in order to generate the image chips on your local machine. Note that we will explore generating our own image chips in a later module.
ImportantData Location
This chapter uses the Landcover.ai dataset, which is too large to include in the book download and must be downloaded from the source listed in Table 2. By default, the code expects the uncompressed data (the images and masks folders and the train.txt, val.txt, and test.txt files) to be saved in the data/files/landcover.ai.v1 folder and the image chips to be saved in the data/output/landcoverai_chips folder. If you saved the data elsewhere, set LCAI_DIR and OUTPUT_DIR below to the correct locations on your machine.
# Set this to the location of the uncompressed Landcover.ai data on your machine.
LCAI_DIR = "data/files/landcover.ai.v1/"
IMGS_DIR = LCAI_DIR + "images/"
MASKS_DIR = LCAI_DIR + "masks/"
# Folder to which the chips are written
OUTPUT_DIR = "data/output/landcoverai_chips/"

TARGET_SIZE = 512

img_paths = glob.glob(os.path.join(IMGS_DIR, "*.tif"))
mask_paths = glob.glob(os.path.join(MASKS_DIR, "*.tif"))

img_paths.sort()
mask_paths.sort()

os.makedirs(OUTPUT_DIR, exist_ok=True)
for i, (img_path, mask_path) in enumerate(zip(img_paths, mask_paths)):
    img_filename = os.path.splitext(os.path.basename(img_path))[0]
    mask_filename = os.path.splitext(os.path.basename(mask_path))[0]
    img = cv2.imread(img_path)
    mask = cv2.imread(mask_path)

    assert img_filename == mask_filename and img.shape[:2] == mask.shape[:2]

    k = 0
    for y in range(0, img.shape[0], TARGET_SIZE):
        for x in range(0, img.shape[1], TARGET_SIZE):
            img_tile = img[y:y + TARGET_SIZE, x:x + TARGET_SIZE]
            mask_tile = mask[y:y + TARGET_SIZE, x:x + TARGET_SIZE]

            if img_tile.shape[0] == TARGET_SIZE and img_tile.shape[1] == TARGET_SIZE:
                out_img_path = os.path.join(OUTPUT_DIR, "{}_{}.jpg".format(img_filename, k))
                cv2.imwrite(out_img_path, img_tile)

                out_mask_path = os.path.join(OUTPUT_DIR, "{}_{}_m.png".format(mask_filename, k))
                cv2.imwrite(out_mask_path, mask_tile)

            k += 1

    print("Processed {} {}/{}".format(img_filename, i + 1, len(img_paths)))
I next continue the preparation work by (1) creating a list of the class names, (2) saving the string representing the path to the folder in which I want to save results to a variable, and (3) reading in the provided train.txt, val.txt, and test.txt tables as Pandas DataFrames. I then add new “img” and “mask” columns to the data tables to store the full, local file path to the image chips and associated masks, respectively. The tables are read from the Landcover.ai folder, while the chips, which are stored as JPEG images and PNG masks in a single folder, are read from the folder to which they were written above.
CLASSES = ['background', 'building', 'woodlands', 'water', 'road']
# Set these to the folder containing the train.txt, val.txt, and test.txt files and the folder containing the chips.
LCAI_DIR = "data/files/landcover.ai.v1/"
CHIP_DIR = "data/output/landcoverai_chips/"
trainDF = pd.read_csv(LCAI_DIR + "train.txt", header=None, names=["file"])
trainDF["img"] = CHIP_DIR + trainDF['file'] + ".jpg"
trainDF["mask"] = CHIP_DIR + trainDF['file'] + "_m.png"valDF = pd.read_csv(LCAI_DIR + "val.txt", header=None, names=["file"])
valDF["img"] = CHIP_DIR + valDF['file'] + ".jpg"
valDF["mask"] = CHIP_DIR + valDF['file'] + "_m.png"testDF = pd.read_csv(LCAI_DIR + "test.txt", header=None, names=["file"])
testDF["img"] = CHIP_DIR + testDF['file'] + ".jpg"
testDF["mask"] = CHIP_DIR + testDF['file'] + "_m.png"trainDF.head() file ... mask
0 M-33-20-D-c-4-2_0 ... data/output/landcoverai_chips/M-33-20-D-c-4-2_...
1 M-33-20-D-c-4-2_1 ... data/output/landcoverai_chips/M-33-20-D-c-4-2_...
2 M-33-20-D-c-4-2_10 ... data/output/landcoverai_chips/M-33-20-D-c-4-2_...
3 M-33-20-D-c-4-2_100 ... data/output/landcoverai_chips/M-33-20-D-c-4-2_...
4 M-33-20-D-c-4-2_102 ... data/output/landcoverai_chips/M-33-20-D-c-4-2_...
[5 rows x 3 columns]I next subclass the Dataset class to build a subclass to read the image chips and associated masks. The key components are described below.
- Accepts an input DataFrame and a transforms object, which will be defined below using Albumentations.
- Reads in the image chips and masks with cv2. I also reorder the bands from BGR to RGB and convert the image to an unsigned 8-bit data type.
- Transforms are applied if they are defined, or if the transform parameter is not “None”. Transforms are applied to both the image and the associated mask (i.e., pixel-level labels).
- The images and masks are converted to tensors using the
from_numpy()function. - The image is converted to the channels-first convention. This is necessary because cv2 reads in data using the channels-last convention while PyTorch expects channels-first.
- The image data are converted to a float data type (32-bit) then divided by 255 to rescale the data from 0 to 255 to 0 to 1. This works because the original image digital number (DN) values are on an 8-bit radiometric scale.
- The image is converted to a long integer (64-bit) data type.
# Subclass and define custom dataset ===========================
class MultiClassSegDataset(Dataset):

    def __init__(self, df, transform=None,):
        self.df = df
        self.transform = transform

    def __getitem__(self, idx):

        image_name = self.df.iloc[idx, 1]
        mask_name = self.df.iloc[idx, 2]
        image = cv2.imread(image_name)
        image = cv2.cvtColor(image, cv2.COLOR_BGR2RGB)
        mask = cv2.imread(mask_name, cv2.IMREAD_UNCHANGED)
        image = image.astype('uint8')
        # Masks saved as 3-band images store the same codes in each band; keep one band
        if mask.ndim == 3:
            mask = mask[:,:,0]
        if(self.transform is not None):
            transformed = self.transform(image=image, mask=mask)
            image = transformed["image"]
            mask = transformed["mask"]
            image = torch.from_numpy(image)
            mask = torch.from_numpy(mask)
            image = image.permute(2, 0, 1)
            image = image.float()/255
            mask = mask.long()
        else:
            image = torch.from_numpy(image)
            mask = torch.from_numpy(mask)
            image = image.permute(2, 0, 1)
            image = image.float()/255
            mask = mask.long()
        return image, mask

    def __len__(self):
        return len(self.df)
Transforms are defined in the code blocks below using Albumentations. For the validation and testing data, the only applied transform is to add padding and/or resize the data so that they have a size of 512x512 pixels. This is not strictly necessary since all data should already have these dimensions.
For the training data, I will apply additional random transformations as a form of data augmentation in an attempt to combat overfitting. These include random changes to brightness and/or contrast, horizontal flips, vertical flips, and median blurring. The p parameter controls the likelihood or probability of these random augmentation being applied. There are some additional specific arguments for some of the transformations. If you are interested in further exploring what augmentations can be applied and the associated settings, please consult the Albumentations package documentation.
test_transform = A.Compose(
    [A.PadIfNeeded(min_height=512, min_width=512, border_mode=4), A.Resize(512, 512),]
)
train_transform = A.Compose(
[
A.PadIfNeeded(min_height=512, min_width=512, border_mode=4),
A.Resize(512, 512),
A.RandomBrightnessContrast(brightness_limit=0.3, contrast_limit=0.3, p=0.5),
A.HorizontalFlip(p=0.5),
A.VerticalFlip(p=0.5),
A.MedianBlur(blur_limit=3, p=0.1),
]
)I next initialize the DataSets for both the training and validation data using the appropriate transformations. Printing the length of the datasets, you can see that there are 7,470 training chips and 1,602 validation chips.
The DataLoaders are then defined. I use a mini-batch size of 8; however, you may need to change this setting depending on your available GPU hardware. I shuffle the training data but not the validation data. For both cases, I drop the last mini-batch.
I next print information about the data mini-batches. The image mini-batches have a shape of (8, 3, 512, 512) and a data type of 32-bit float while the masks have a shape of (8, 512, 512) and a data type of long integer (64-bit). The mask data could be represented using a shape of (8, 1, 512, 512); however, the loss metric expects the image channel to not be included.
Printing information about a single image, you can see the image shape is (3, 512, 512) and the data type is 32-bit float. A single mask has a shape of (512, 512) and a data type of 64-bit integer (long).
Lastly, I use matplotlib and the imshow() function to plot an example image and mask. Note the need to permute the bands since matplotlib expects a channels-last as opposed to channels-first configuration.
trainDS = MultiClassSegDataset(trainDF, transform=train_transform)
valDS = MultiClassSegDataset(valDF, transform=test_transform)
print("Number of Training Samples: " + str(len(trainDS)) + " Number of Testing Samples: " + str(len(valDS)))
Number of Training Samples: 7470 Number of Testing Samples: 1602trainDL = DataLoader(trainDS, batch_size=8, shuffle=True, sampler=None,
batch_sampler=None, num_workers=0, collate_fn=None,
pin_memory=False, drop_last=True, timeout=0,
worker_init_fn=None)
valDL = DataLoader(valDS, batch_size=8, shuffle=False, sampler=None,
batch_sampler=None, num_workers=0, collate_fn=None,
pin_memory=False, drop_last=True, timeout=0,
worker_init_fn=None)batch = next(iter(trainDL))
images, labels = batch
print(images.shape, labels.shape, type(images), type(labels), images.dtype, labels.dtype)torch.Size([8, 3, 512, 512]) torch.Size([8, 512, 512]) <class 'torch.Tensor'> <class 'torch.Tensor'> torch.float32 torch.int64testImg = images[1]
testMsk = labels[1]
print(testImg.shape, testImg.dtype, type(testImg), testMsk.shape,
testMsk.dtype, type(testMsk), testImg.min(),
testImg.max(), testMsk.min(), testMsk.max())torch.Size([3, 512, 512]) torch.float32 <class 'torch.Tensor'> torch.Size([512, 512]) torch.int64 <class 'torch.Tensor'> tensor(0.0510) tensor(1.) tensor(3) tensor(3)# Plot example image =====================================
plt.imshow(testImg.permute(1,2,0))
plt.show()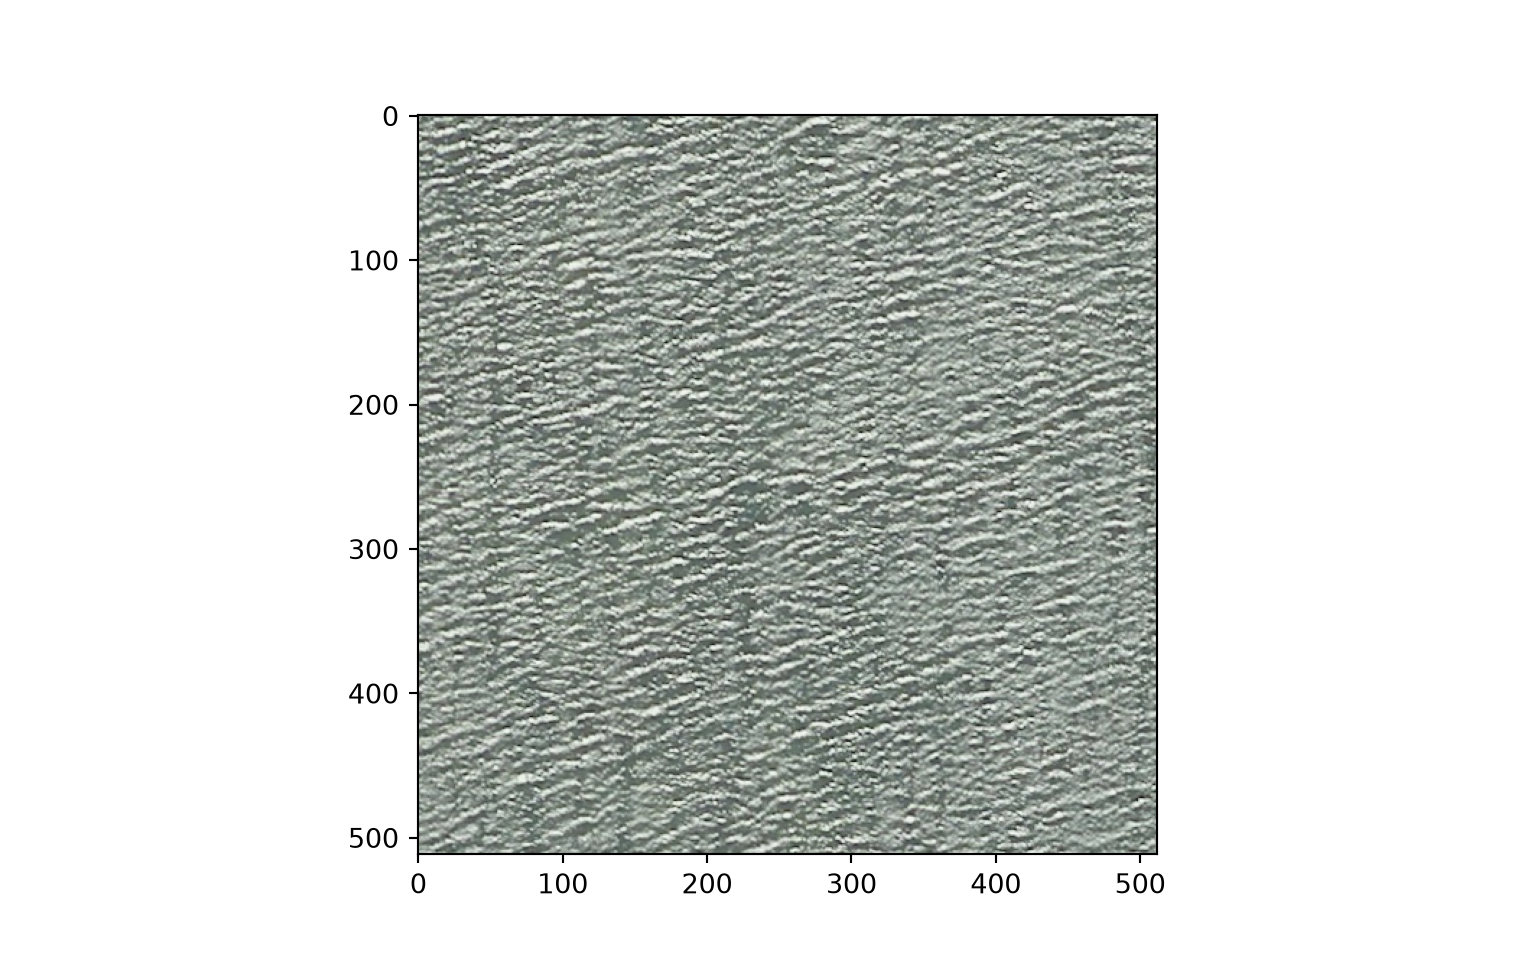
# Plot example image =====================================
plt.imshow(testMsk.unsqueeze(dim=0).permute(1,2,0))
plt.show()
16.3 Define UNet
I next define the UNet architecture by subclassing nn.Module. This is the same architecture that was built in the last module, so we will not discuss the specifics here. Once the architecture is defined, I instantiate an instance that outputs 16, 32, 64, and 128 feature maps in the encoder blocks; 512 feature maps in the bottleneck block; and 128, 64, 32, and 16 feature maps in the decoder block. The architecture expects 3 input channels and differentiate 5 classes. Lastly, I print a summary of the model when provided the input shape being used here. This model has over 5 million trainable parameters.
def double_conv(inChannels, outChannels):
  return nn.Sequential(
      nn.Conv2d(inChannels, outChannels, kernel_size=(3,3), stride=1, padding=1),
      nn.BatchNorm2d(outChannels),
      nn.ReLU(inplace=True),
      nn.Conv2d(outChannels, outChannels, kernel_size=(3,3), stride=1, padding=1),
      nn.BatchNorm2d(outChannels),
      nn.ReLU(inplace=True)
  )
def up_conv(inChannels, outChannels):
return nn.Sequential(
nn.ConvTranspose2d(inChannels, outChannels, kernel_size=(2,2), stride=2),
nn.BatchNorm2d(outChannels),
nn.ReLU(inplace=True)
)class myUNet(nn.Module):
def __init__(self, encoderChn, decoderChn, inChn, botChn, nCls):
super().__init__()
self.encoderChn = encoderChn
self.decoderChn = decoderChn
self.botChn = botChn
self.nCls = nCls
self.encoder1 = double_conv(inChn, encoderChn[0])
self.encoder2 = nn.Sequential(nn.MaxPool2d(kernel_size=2, stride=2),
double_conv(encoderChn[0], encoderChn[1]))
self.encoder3 = nn.Sequential(nn.MaxPool2d(kernel_size=2, stride=2),
double_conv(encoderChn[1], encoderChn[2]))
self.encoder4 = nn.Sequential(nn.MaxPool2d(kernel_size=2, stride=2),
double_conv(encoderChn[2], encoderChn[3]))
self.bottleneck = nn.Sequential(nn.MaxPool2d(kernel_size=2, stride=2),
double_conv(encoderChn[3], botChn))
self.decoder1up = up_conv(botChn, botChn)
self.decoder1 = double_conv(encoderChn[3]+botChn, decoderChn[0])
self.decoder2up = up_conv(decoderChn[0], decoderChn[0])
self.decoder2 = double_conv(encoderChn[2]+decoderChn[0], decoderChn[1])
self.decoder3up = up_conv(decoderChn[1], decoderChn[1])
self.decoder3 = double_conv(encoderChn[1]+decoderChn[1], decoderChn[2])
self.decoder4up = up_conv(decoderChn[2], decoderChn[2])
self.decoder4 = double_conv(encoderChn[0]+decoderChn[2], decoderChn[3])
self.classifier = nn.Conv2d(decoderChn[3], nCls, kernel_size=(1,1))
def forward(self, x):
#Encoder
encoder1 = self.encoder1(x)
encoder2 = self.encoder2(encoder1)
encoder3 = self.encoder3(encoder2)
encoder4 = self.encoder4(encoder3)
#Bottleneck
x = self.bottleneck(encoder4)
#Decoder
x = self.decoder1up(x)
x = torch.concat([x, encoder4], dim=1)
x = self.decoder1(x)
x = self.decoder2up(x)
x = torch.concat([x, encoder3], dim=1)
x = self.decoder2(x)
x = self.decoder3up(x)
x = torch.concat([x, encoder2], dim=1)
x = self.decoder3(x)
x = self.decoder4up(x)
x = torch.concat([x, encoder1], dim=1)
x = self.decoder4(x)
#Classifier head
x = self.classifier(x)
return xmodel = myUNet(encoderChn=[16,32,64,128], decoderChn=[128,64,32,16], inChn=3, botChn=512, nCls=5).to(device)summary(model, (8, 3,512,512))==========================================================================================
Layer (type:depth-idx) Output Shape Param #
==========================================================================================
myUNet [8, 5, 512, 512] --
├─Sequential: 1-1 [8, 16, 512, 512] --
│ └─Conv2d: 2-1 [8, 16, 512, 512] 448
│ └─BatchNorm2d: 2-2 [8, 16, 512, 512] 32
│ └─ReLU: 2-3 [8, 16, 512, 512] --
│ └─Conv2d: 2-4 [8, 16, 512, 512] 2,320
│ └─BatchNorm2d: 2-5 [8, 16, 512, 512] 32
│ └─ReLU: 2-6 [8, 16, 512, 512] --
├─Sequential: 1-2 [8, 32, 256, 256] --
│ └─MaxPool2d: 2-7 [8, 16, 256, 256] --
│ └─Sequential: 2-8 [8, 32, 256, 256] --
│ │ └─Conv2d: 3-1 [8, 32, 256, 256] 4,640
│ │ └─BatchNorm2d: 3-2 [8, 32, 256, 256] 64
│ │ └─ReLU: 3-3 [8, 32, 256, 256] --
│ │ └─Conv2d: 3-4 [8, 32, 256, 256] 9,248
│ │ └─BatchNorm2d: 3-5 [8, 32, 256, 256] 64
│ │ └─ReLU: 3-6 [8, 32, 256, 256] --
├─Sequential: 1-3 [8, 64, 128, 128] --
│ └─MaxPool2d: 2-9 [8, 32, 128, 128] --
│ └─Sequential: 2-10 [8, 64, 128, 128] --
│ │ └─Conv2d: 3-7 [8, 64, 128, 128] 18,496
│ │ └─BatchNorm2d: 3-8 [8, 64, 128, 128] 128
│ │ └─ReLU: 3-9 [8, 64, 128, 128] --
│ │ └─Conv2d: 3-10 [8, 64, 128, 128] 36,928
│ │ └─BatchNorm2d: 3-11 [8, 64, 128, 128] 128
│ │ └─ReLU: 3-12 [8, 64, 128, 128] --
├─Sequential: 1-4 [8, 128, 64, 64] --
│ └─MaxPool2d: 2-11 [8, 64, 64, 64] --
│ └─Sequential: 2-12 [8, 128, 64, 64] --
│ │ └─Conv2d: 3-13 [8, 128, 64, 64] 73,856
│ │ └─BatchNorm2d: 3-14 [8, 128, 64, 64] 256
│ │ └─ReLU: 3-15 [8, 128, 64, 64] --
│ │ └─Conv2d: 3-16 [8, 128, 64, 64] 147,584
│ │ └─BatchNorm2d: 3-17 [8, 128, 64, 64] 256
│ │ └─ReLU: 3-18 [8, 128, 64, 64] --
├─Sequential: 1-5 [8, 512, 32, 32] --
│ └─MaxPool2d: 2-13 [8, 128, 32, 32] --
│ └─Sequential: 2-14 [8, 512, 32, 32] --
│ │ └─Conv2d: 3-19 [8, 512, 32, 32] 590,336
│ │ └─BatchNorm2d: 3-20 [8, 512, 32, 32] 1,024
│ │ └─ReLU: 3-21 [8, 512, 32, 32] --
│ │ └─Conv2d: 3-22 [8, 512, 32, 32] 2,359,808
│ │ └─BatchNorm2d: 3-23 [8, 512, 32, 32] 1,024
│ │ └─ReLU: 3-24 [8, 512, 32, 32] --
├─Sequential: 1-6 [8, 512, 64, 64] --
│ └─ConvTranspose2d: 2-15 [8, 512, 64, 64] 1,049,088
│ └─BatchNorm2d: 2-16 [8, 512, 64, 64] 1,024
│ └─ReLU: 2-17 [8, 512, 64, 64] --
├─Sequential: 1-7 [8, 128, 64, 64] --
│ └─Conv2d: 2-18 [8, 128, 64, 64] 737,408
│ └─BatchNorm2d: 2-19 [8, 128, 64, 64] 256
│ └─ReLU: 2-20 [8, 128, 64, 64] --
│ └─Conv2d: 2-21 [8, 128, 64, 64] 147,584
│ └─BatchNorm2d: 2-22 [8, 128, 64, 64] 256
│ └─ReLU: 2-23 [8, 128, 64, 64] --
├─Sequential: 1-8 [8, 128, 128, 128] --
│ └─ConvTranspose2d: 2-24 [8, 128, 128, 128] 65,664
│ └─BatchNorm2d: 2-25 [8, 128, 128, 128] 256
│ └─ReLU: 2-26 [8, 128, 128, 128] --
├─Sequential: 1-9 [8, 64, 128, 128] --
│ └─Conv2d: 2-27 [8, 64, 128, 128] 110,656
│ └─BatchNorm2d: 2-28 [8, 64, 128, 128] 128
│ └─ReLU: 2-29 [8, 64, 128, 128] --
│ └─Conv2d: 2-30 [8, 64, 128, 128] 36,928
│ └─BatchNorm2d: 2-31 [8, 64, 128, 128] 128
│ └─ReLU: 2-32 [8, 64, 128, 128] --
├─Sequential: 1-10 [8, 64, 256, 256] --
│ └─ConvTranspose2d: 2-33 [8, 64, 256, 256] 16,448
│ └─BatchNorm2d: 2-34 [8, 64, 256, 256] 128
│ └─ReLU: 2-35 [8, 64, 256, 256] --
├─Sequential: 1-11 [8, 32, 256, 256] --
│ └─Conv2d: 2-36 [8, 32, 256, 256] 27,680
│ └─BatchNorm2d: 2-37 [8, 32, 256, 256] 64
│ └─ReLU: 2-38 [8, 32, 256, 256] --
│ └─Conv2d: 2-39 [8, 32, 256, 256] 9,248
│ └─BatchNorm2d: 2-40 [8, 32, 256, 256] 64
│ └─ReLU: 2-41 [8, 32, 256, 256] --
├─Sequential: 1-12 [8, 32, 512, 512] --
│ └─ConvTranspose2d: 2-42 [8, 32, 512, 512] 4,128
│ └─BatchNorm2d: 2-43 [8, 32, 512, 512] 64
│ └─ReLU: 2-44 [8, 32, 512, 512] --
├─Sequential: 1-13 [8, 16, 512, 512] --
│ └─Conv2d: 2-45 [8, 16, 512, 512] 6,928
│ └─BatchNorm2d: 2-46 [8, 16, 512, 512] 32
│ └─ReLU: 2-47 [8, 16, 512, 512] --
│ └─Conv2d: 2-48 [8, 16, 512, 512] 2,320
│ └─BatchNorm2d: 2-49 [8, 16, 512, 512] 32
│ └─ReLU: 2-50 [8, 16, 512, 512] --
├─Conv2d: 1-14 [8, 5, 512, 512] 85
==========================================================================================
Total params: 5,463,269
Trainable params: 5,463,269
Non-trainable params: 0
Total mult-adds (Units.GIGABYTES): 199.32
==========================================================================================
Input size (MB): 25.17
Forward/backward pass size (MB): 6392.12
Params size (MB): 21.85
Estimated Total Size (MB): 6439.14
==========================================================================================16.4 Train UNet
I am now ready to train the model. As noted at the beginning of the chapter, training a semantic segmentation model is not very different from training a fully connected or convolutional neural network for scene labeling. The main difference is that a label is predicted for each pixel as opposed to a single label for the entire image, so the targets are masks with a shape of (mini-batch, height, width) as opposed to a single label per image. Fortunately, the loss functions and torchmetrics assessment metrics accept these shapes.
I will train the model using PyTorch Lightning. Below, I define a general LitSegmenter LightningModule that can be used to train any semantic segmentation architecture that returns class logits for each pixel. We will reuse it in later chapters. It is very similar to the LitClassifier module from Chapter 10, with a few differences:
- The loss is provided as an argument so that different losses can be used. Here, I use a multiclass Dice loss provided by the Kornia package with macro-averaging, so each class has an equal influence on the loss. This loss metric expects logits as opposed to probabilities. This is fine since a softmax activation is not included as part of the architecture defined above.
- The
configure_optimizers()method defines the AdamW optimizer with an initial learning rate of 0.0001 and a one cycle learning rate scheduler with a maximum learning rate of 0.01. Settingthree_phase=Trueadds a third phase at the end of training in which the learning rate is reduced to a very small value. As discussed in Chapter 8, setting"interval": "step"causes the scheduler to be updated after each training mini-batch, and the total number of steps is obtained from theTrainer. - The assessment metrics are overall accuracy, class-aggregated macro-averaged F1-score, and Kappa. For semantic segmentation, the metrics are calculated from all of the pixels in all of the images in the mini-batch.
import lightning as L
from lightning.pytorch.callbacks import ModelCheckpoint, LearningRateMonitor
from lightning.pytorch.loggers import CSVLogger

class LitSegmenter(L.LightningModule):
    def __init__(self, model, nCls, criterion, lr=1e-4, maxLR=1e-2):
        super().__init__()
        self.save_hyperparameters(ignore=["model", "criterion"])
        self.model = model
        self.criterion = criterion
        self.lr = lr
        self.maxLR = maxLR
        metrics = tm.MetricCollection({
            "acc": tm.Accuracy(task="multiclass", num_classes=nCls, average="micro"),
            "f1": tm.F1Score(task="multiclass", num_classes=nCls, average="macro"),
            "kappa": tm.CohenKappa(task="multiclass", num_classes=nCls),
        })
        self.train_metrics = metrics.clone(prefix="train_")
        self.val_metrics = metrics.clone(prefix="val_")
        self.test_metrics = metrics.clone(prefix="test_")

    def forward(self, x):
        return self.model(x)

    def _shared_step(self, batch, metrics, stage):
        x, y = batch
        logits = self(x)
        loss = self.criterion(logits, y)
        metrics.update(logits, y)
        self.log(f"{stage}_loss", loss, on_step=False, on_epoch=True, prog_bar=True)
        self.log_dict(metrics, on_step=False, on_epoch=True, prog_bar=(stage == "val"))
        return loss

    def training_step(self, batch, batch_idx):
        return self._shared_step(batch, self.train_metrics, "train")

    def validation_step(self, batch, batch_idx):
        self._shared_step(batch, self.val_metrics, "val")

    def test_step(self, batch, batch_idx):
        self._shared_step(batch, self.test_metrics, "test")

    def predict_step(self, batch, batch_idx):
        x = batch[0] if isinstance(batch, (list, tuple)) else batch
        return torch.softmax(self(x), dim=1)

    def configure_optimizers(self):
        optimizer = torch.optim.AdamW(self.parameters(), lr=self.lr)
        scheduler = torch.optim.lr_scheduler.OneCycleLR(
            optimizer, max_lr=self.maxLR, three_phase=True,
            total_steps=self.trainer.estimated_stepping_batches)
        return {"optimizer": optimizer,
                "lr_scheduler": {"scheduler": scheduler, "interval": "step"}}
litModel = LitSegmenter(model=model, nCls=5, criterion=losses.DiceLoss(average="macro"),
lr=1e-4, maxLR=1e-2)I will train the model for 50 epochs and save the model that provides the best F1-score for the validation data using a ModelCheckpoint callback. I also use a LearningRateMonitor callback to log the learning rate so that the one cycle schedule can be verified, and I use bfloat16 mixed precision, which reduces the memory required to store the intermediate results for these large image chips.
checkpoint = ModelCheckpoint(monitor="val_f1", mode="max", save_top_k=1,
                             dirpath="data/output/unetLCAI/")
trainer = L.Trainer(
    max_epochs=50,
    accelerator="gpu",
    devices=1,
    precision="bf16-mixed",
    logger=CSVLogger("data/output/", name="landcoverai_unet"),
    callbacks=[checkpoint, LearningRateMonitor(logging_interval="step")],
)
trainer.fit(litModel, train_dataloaders=trainDL, val_dataloaders=valDL)
Running this training process will take some time. It took ~5 hours to execute on my machine with a single GPU. If you do not want to or cannot run this model on your machine, a trained model has been provided with the text.
16.5 Assess Model
Let’s now explore the results of the training process. First, I plot the losses for both the training and validation data over all 50 epochs. The model is generally doing a better job predicting the training data in comparison to the validation data, which is expected. However, it does not appear as if overfitting is an issue. Also, the loss curve has not leveled off yet, which suggests that training the model for longer or for more epochs might improve the results.
Similarly, the F1-score plot is not suggesting overfitting. Also, the metric seems to still be increasing after 50 epochs, which suggests that the model could be trained longer to potentially improve the results.
resultsDF = pd.read_csv("data/models/unetLCAILogs.csv")
# Lightning writes training metrics, validation metrics, and learning rates to separate rows; collapse to one row per epoch
resultsDF = resultsDF.groupby("epoch").mean().reset_index()plt.rcParams['figure.figsize'] = [10, 10]
firstPlot = resultsDF.plot(x='epoch', y="train_loss")
resultsDF.plot(x='epoch', y="val_loss", ax=firstPlot)
plt.show()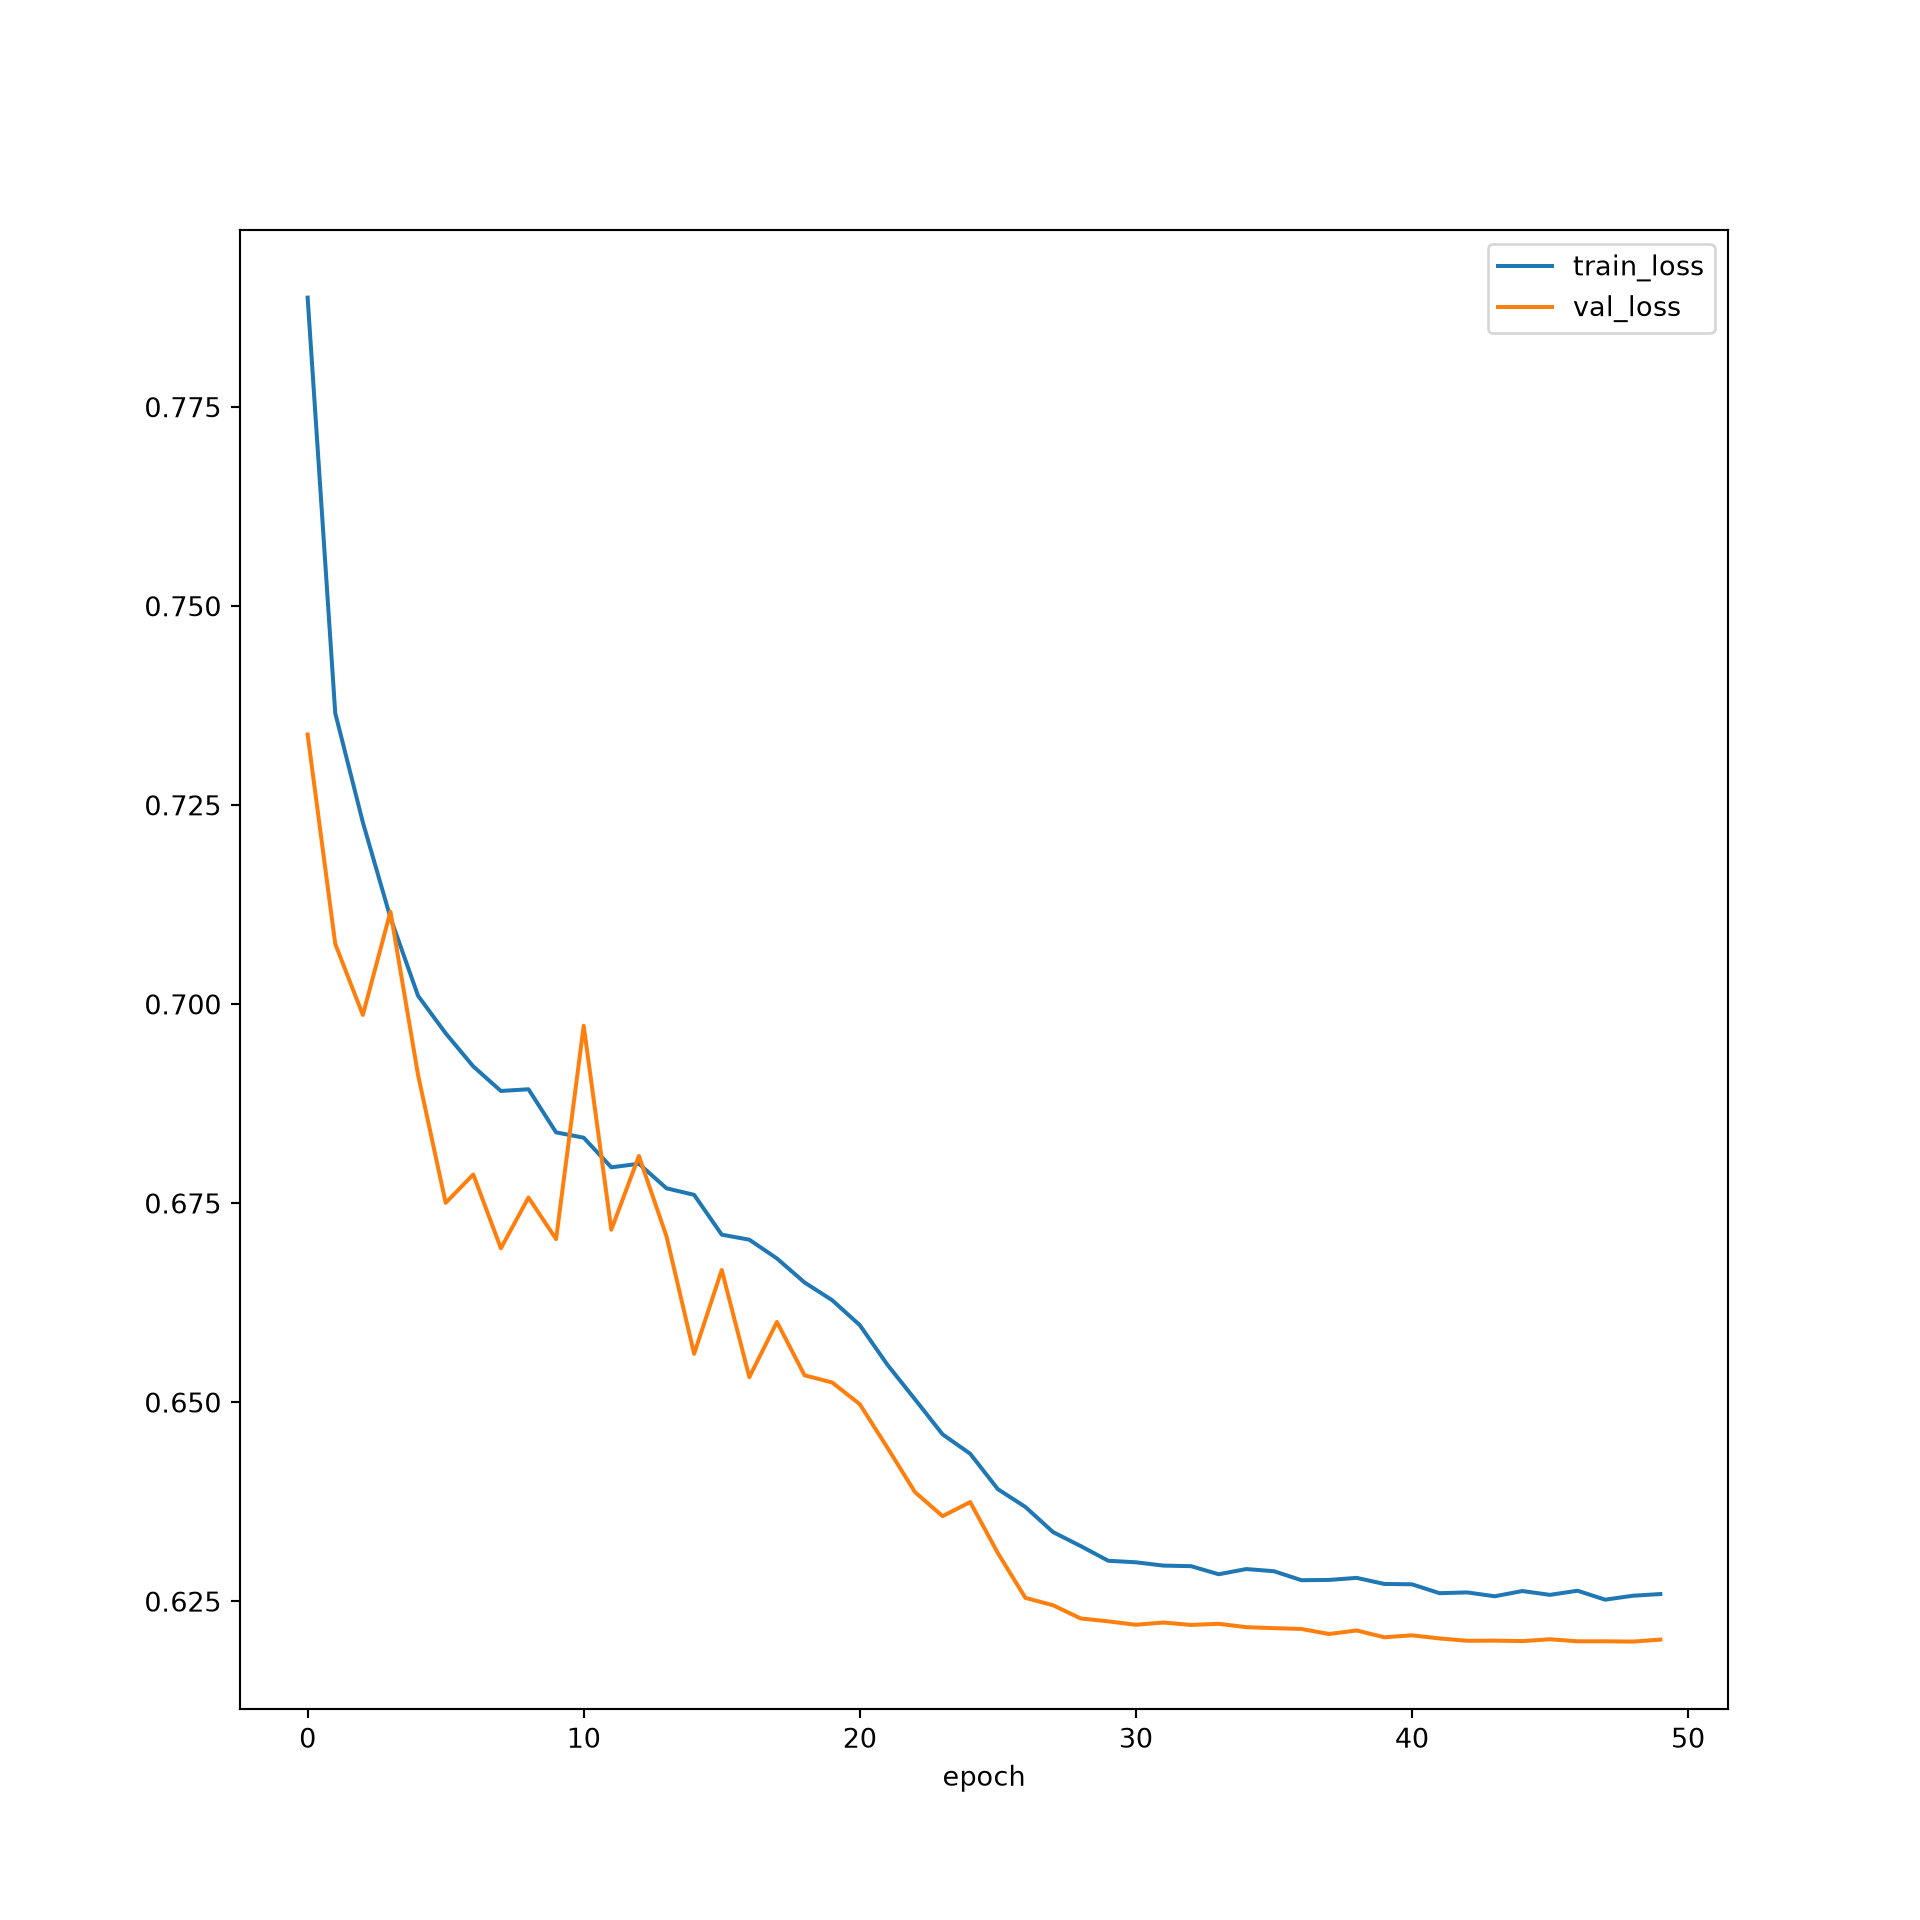
plt.rcParams['figure.figsize'] = [10, 10]
firstPlot = resultsDF.plot(x="epoch", y="train_f1")
resultsDF.plot(x='epoch', y="val_f1", ax=firstPlot)
plt.show()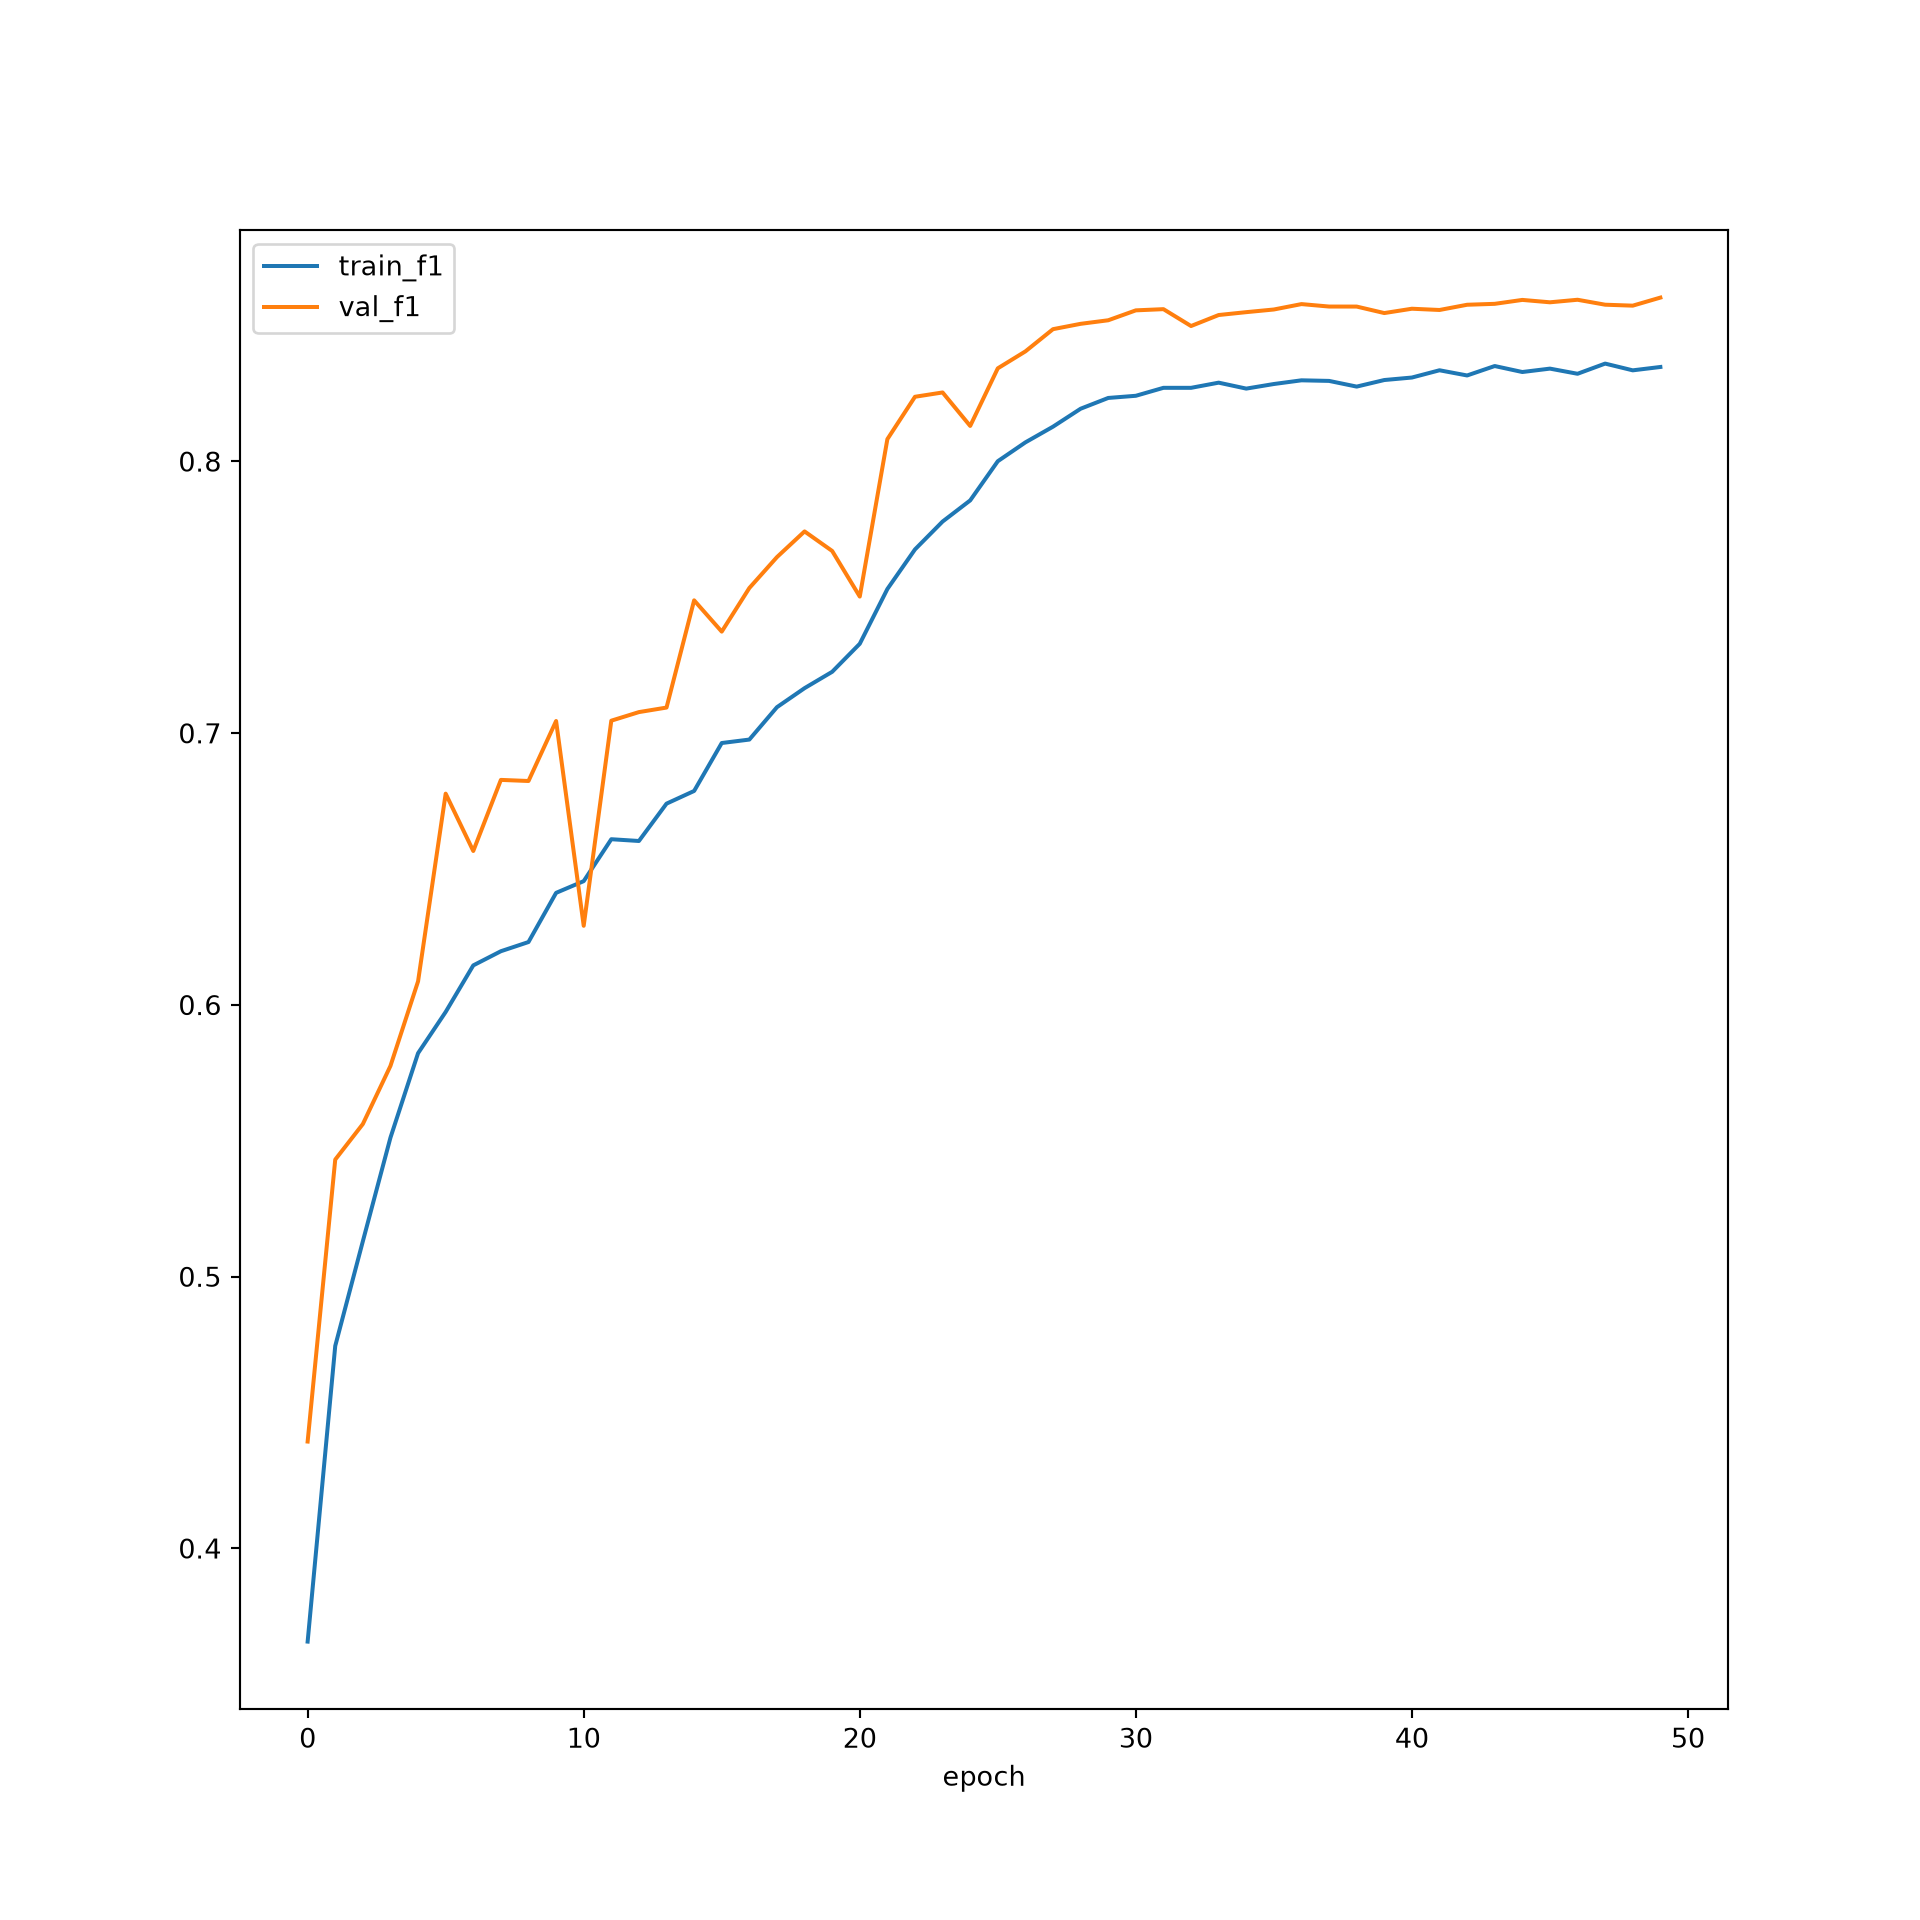
I will now validate the model using the withheld testing data. I re-instantiate the architecture and pass it to load_from_checkpoint(), which restores the saved parameters from the Lightning checkpoint file. Since the model and criterion arguments were excluded from the saved hyperparameters, they must be provided when the checkpoint is loaded. I then instantiate a DataSet for the testing data without the training augmentations, and define a DataLoader. Calling the test() method of a Trainer calculates the aggregated metrics defined in the LightningModule.
model = myUNet(encoderChn=[16,32,64,128], decoderChn=[128,64,32,16], inChn=3, botChn=512, nCls=5)
litModel = LitSegmenter.load_from_checkpoint("data/models/unetLCAI.ckpt",
                                             model=model, criterion=losses.DiceLoss(average="macro"),
                                             map_location="cpu")

testDS = MultiClassSegDataset(testDF, transform=test_transform)
testDL = DataLoader(testDS, batch_size=8, shuffle=False, num_workers=0)

trainer = L.Trainer(accelerator="gpu", devices=1, logger=False)
trainer.test(litModel, dataloaders=testDL)
To obtain class-level metrics, I calculate them in a loop over the test mini-batches. Since each mini-batch contains millions of pixels, I update the metrics within the loop as opposed to storing all of the predictions, which could exhaust the available memory. Note that I explicitly move the model to the GPU and place it in evaluation mode, which the Trainer would otherwise handle.
device = torch.device("cuda" if torch.cuda.is_available() else "cpu")
metricsCls = tm.MetricCollection({
    "f1": tm.F1Score(task="multiclass", num_classes=5, average="none"),
    "recall": tm.Recall(task="multiclass", num_classes=5, average="none"),
    "precision": tm.Precision(task="multiclass", num_classes=5, average="none"),
    "cm": tm.ConfusionMatrix(task="multiclass", num_classes=5),
}).to(device)

litModel = litModel.to(device).eval()
with torch.no_grad():
    for inputs, targets in testDL:
        inputs, targets = inputs.to(device), targets.to(device)
        metricsCls.update(litModel(inputs), targets)
results = metricsCls.compute()
for k, v in results.items():
    print(k, v)
The overall accuracy was pretty high (~90%). However, the class-level F1-score, recall, and precision suggest that some classes were more difficult to predict. For example, the F1-score was lowest for the building (1) and road (4) classes. This could be because these classes were not as abundant in the dataset. Investigating the confusion matrix, you can see that there was some confusion between the background (0) and woodland (2) classes and also the roads (4) and background (0) classes.
16.6 Concluding Remarks
You have now seen how to train a semantic segmentation model to classify each individual pixel in an image. Fortunately, the training and validation process is not that different from those implemented for fully connected neural networks and convolutional neural networks for scene labeling, which were discussed in the prior chapters, and Lightning allowed us to reuse nearly the same training code.
In the next chapter, we will explore how to define UNets that use VGGNet-16, ResNet, or MobileNetV2 architectures in the encoder.
16.7 Questions
- Why was the albumentations package used to apply data augmentations as opposed to the transforms available in torchvision?
- What were the shapes and data types of the image and mask mini-batches used to train the UNet? Why does the mask mini-batch not include a channels dimension?
- When reading images with OpenCV (cv2), why must the band order be changed and the dimensions permuted before the data are used with PyTorch?
- Describe the one cycle learning rate scheduler used in this chapter, including the effect of setting
three_phase=True. Why was the scheduler configured with"interval": "step"in the LightningModule? - Does the multiclass Dice loss implemented in Kornia expect logits or probabilities? Why does this matter for the design of the architecture? What does setting
average="macro"do? - How does training a semantic segmentation model differ from training a scene labeling model? Which components of the
LitSegmenterLightningModule differ from theLitClassifierLightningModule? - The building and road classes had the lowest class-level F1-scores. Suggest reasons why these classes were more difficult to map.
- The training and validation loss curves had not leveled off after 50 epochs. What does this suggest, and what would you do next?
16.8 Exercises
Exercise 16.1: Train a UNet to Map Surface Mines
Introduction
The goal of this exercise is to apply the workflow from this chapter to a new semantic segmentation problem: mapping surface mine disturbance from historic topographic maps. You will build a DataSet subclass and DataLoaders, train the UNet architecture defined in this chapter using PyTorch Lightning, and assess the model using withheld test data.
Deliverables
- A Quarto (.qmd) file containing all required code and answers to the questions and discussion prompts, and the HTML webpage rendered from it
Data
This exercise uses the topoDLMini dataset, a subset of the topoDL dataset, which is provided as a separate download (topoDLMini.zip) in the download menu in the sidebar. We recommend saving the uncompressed topoDLMini folder in the data/files folder (data/files/topoDLMini). The dataset is also used in Chapter 21.
The chips were derived from scanned historic United States Geological Survey (USGS) 1:24,000-scale topographic maps, and the masks were generated from mapped surface mine extents. Each image chip is a 256x256 pixel, three-band (red, green, and blue), 8-bit PNG file. Each mask is a single-band, 256x256 pixel PNG file in which background pixels are coded as 0 and surface mine pixels are coded as 255. The data are organized as follows:
- The train, val, and test folders contain the training, validation, and testing chips, respectively.
- Each of these folders contains an images and a masks folder, and each of these is further divided into a background folder, containing chips with no mine pixels, and a positive folder, containing chips with at least one mine pixel. Each mask has the same file name as its associated image chip.
- The trainDF.csv, valDF.csv, and testDF.csv tables list the chips in each partition. The “chpN” column provides the file name of each chip, and the “division” column indicates whether the chip is a “Background” or “Positive” chip.
The training set contains 1,000 background and 1,000 positive chips, and the validation and testing sets each contain 250 background and 250 positive chips.
Tasks
Task 1: Read the three tables as Pandas DataFrames and add columns containing the full path to each image chip and mask. Report the number of background and positive chips in each partition.
Task 2: Build a DataSet subclass that meets the following criteria:
- Accepts a Pandas DataFrame and an optional Albumentations transform, which must be applied to the image and mask together.
- Reads the image chips and masks using OpenCV (cv2), converting the images from BGR to RGB band order.
- Returns each image as a tensor with a shape of (3, 256, 256) and a 32-bit float data type, rescaled from 0 to 1.
- Returns each mask as a tensor with a shape of (256, 256) and a long integer data type, in which background pixels are coded as 0 and mine pixels are coded as 1.
Task 3: Define a set of training augmentations (e.g., horizontal and vertical flips and 90-degree rotations), instantiate the training, validation, and testing DataSets (with augmentations applied to the training data only), and define DataLoaders with a mini-batch size of 16, shuffling the training data. Print summary information for a mini-batch to confirm the shapes, data types, and value ranges of the images and masks, and plot several images with their masks.
Task 4: Instantiate the myUNet architecture from this chapter for 3 input channels and 2 classes, and wrap it in the LitSegmenter LightningModule from this chapter. Train the model for 25 epochs using a Dice loss or cross entropy loss, the AdamW optimizer with a one cycle learning rate schedule, a ModelCheckpoint callback that saves the model with the largest validation F1-score, and a CSVLogger. Save all outputs to the data/output folder.
Task 5: Plot the training and validation losses and F1-scores by epoch.
Task 6: Load the best model and assess it using the test data. Report the overall accuracy, macro-averaged F1-score, confusion matrix, and the precision, recall, and F1-score for the surface mine class. Plot the image chips, reference masks, and predicted masks for several test chips, including some background-only chips.
Task 7: Discuss your results. Is there evidence of overfitting? How well does the model map surface mines, and what types of errors does it make? Which features on the topographic maps might be confused with surface mines, and why?