import numpy as np
import pandas as pd
from matplotlib import pyplot as plt
import os
import math
import cv2

import torch
import torch.nn as nn
from torch.utils.data.dataset import Dataset
from torch.utils.data import DataLoader

import albumentations as A

import segmentation_models_pytorch as smp

import torchmetrics as tm

import rasterio as rio
from rasterio.plot import show21 Segmentation Models Package
21.1 Introduction
I feel that it is valuable to be able to define model architectures from scratch by subclassing nn.Module. However, there are many architectures available for different use cases and problem types. Also, you may want to have additional flexibility, such as the ability to change backbones or initialize using parameters obtained using pre-training. Also, some modern architectures can be very complicated and difficult to build from scratch. So, it would be desirable to have access to libraries that provide a wide variety of architectures and that offer flexibility. For semantic segmentation tasks, the Segmentation Models package provides these functionalities. This package is available at https://github.com/qubvel/segmentation_models.pytorch. We will explore the PyTorch implementation of this package specifically; however, there is also a Keras/Tensorflow version available: https://github.com/qubvel/segmentation_models.
Segmentation Models provides access to a wide variety of semantic segmentation architectures including UNet, UNet++, MANet, LinkNet, FPN, PSPNet, PAN, DeepLabv3, and DeepLabv3+. In this chapter, the demonstration will use DeepLabv3+. This package also provides a large number of CNN architectures that can be used as the encoder or backbone component of the semantic segmentation architecture including ResNet, ResNeXt, DenseNet, Inception, MobileNet, VGG, and Mix Vision Transformer. Pre-trained weights generated from different datasets are available. The number of different pre-trained weight sets available vary between the available CNN backbone architectures.
The DeepLabv3+ architecture is conceptualized in Figure 21.1. In the encoder, a CNN backbone that uses atrous (dilated) convolution in its final stages reduces the spatial dimensions of the input by a factor of 16 as opposed to 32. The output of the backbone is passed to an atrous spatial pyramid pooling (ASPP) module, which was discussed in Chapter 18, to capture context at multiple spatial scales. The decoder is much simpler than the UNet decoder. The ASPP output is upsampled by a factor of 4 and concatenated with lower-level feature maps from the backbone, at 1/4 of the input resolution, that have been passed through a 1x1 convolution to reduce their number of channels. The result is passed through a 3x3 convolution and upsampled by a factor of 4 to the original spatial resolution.
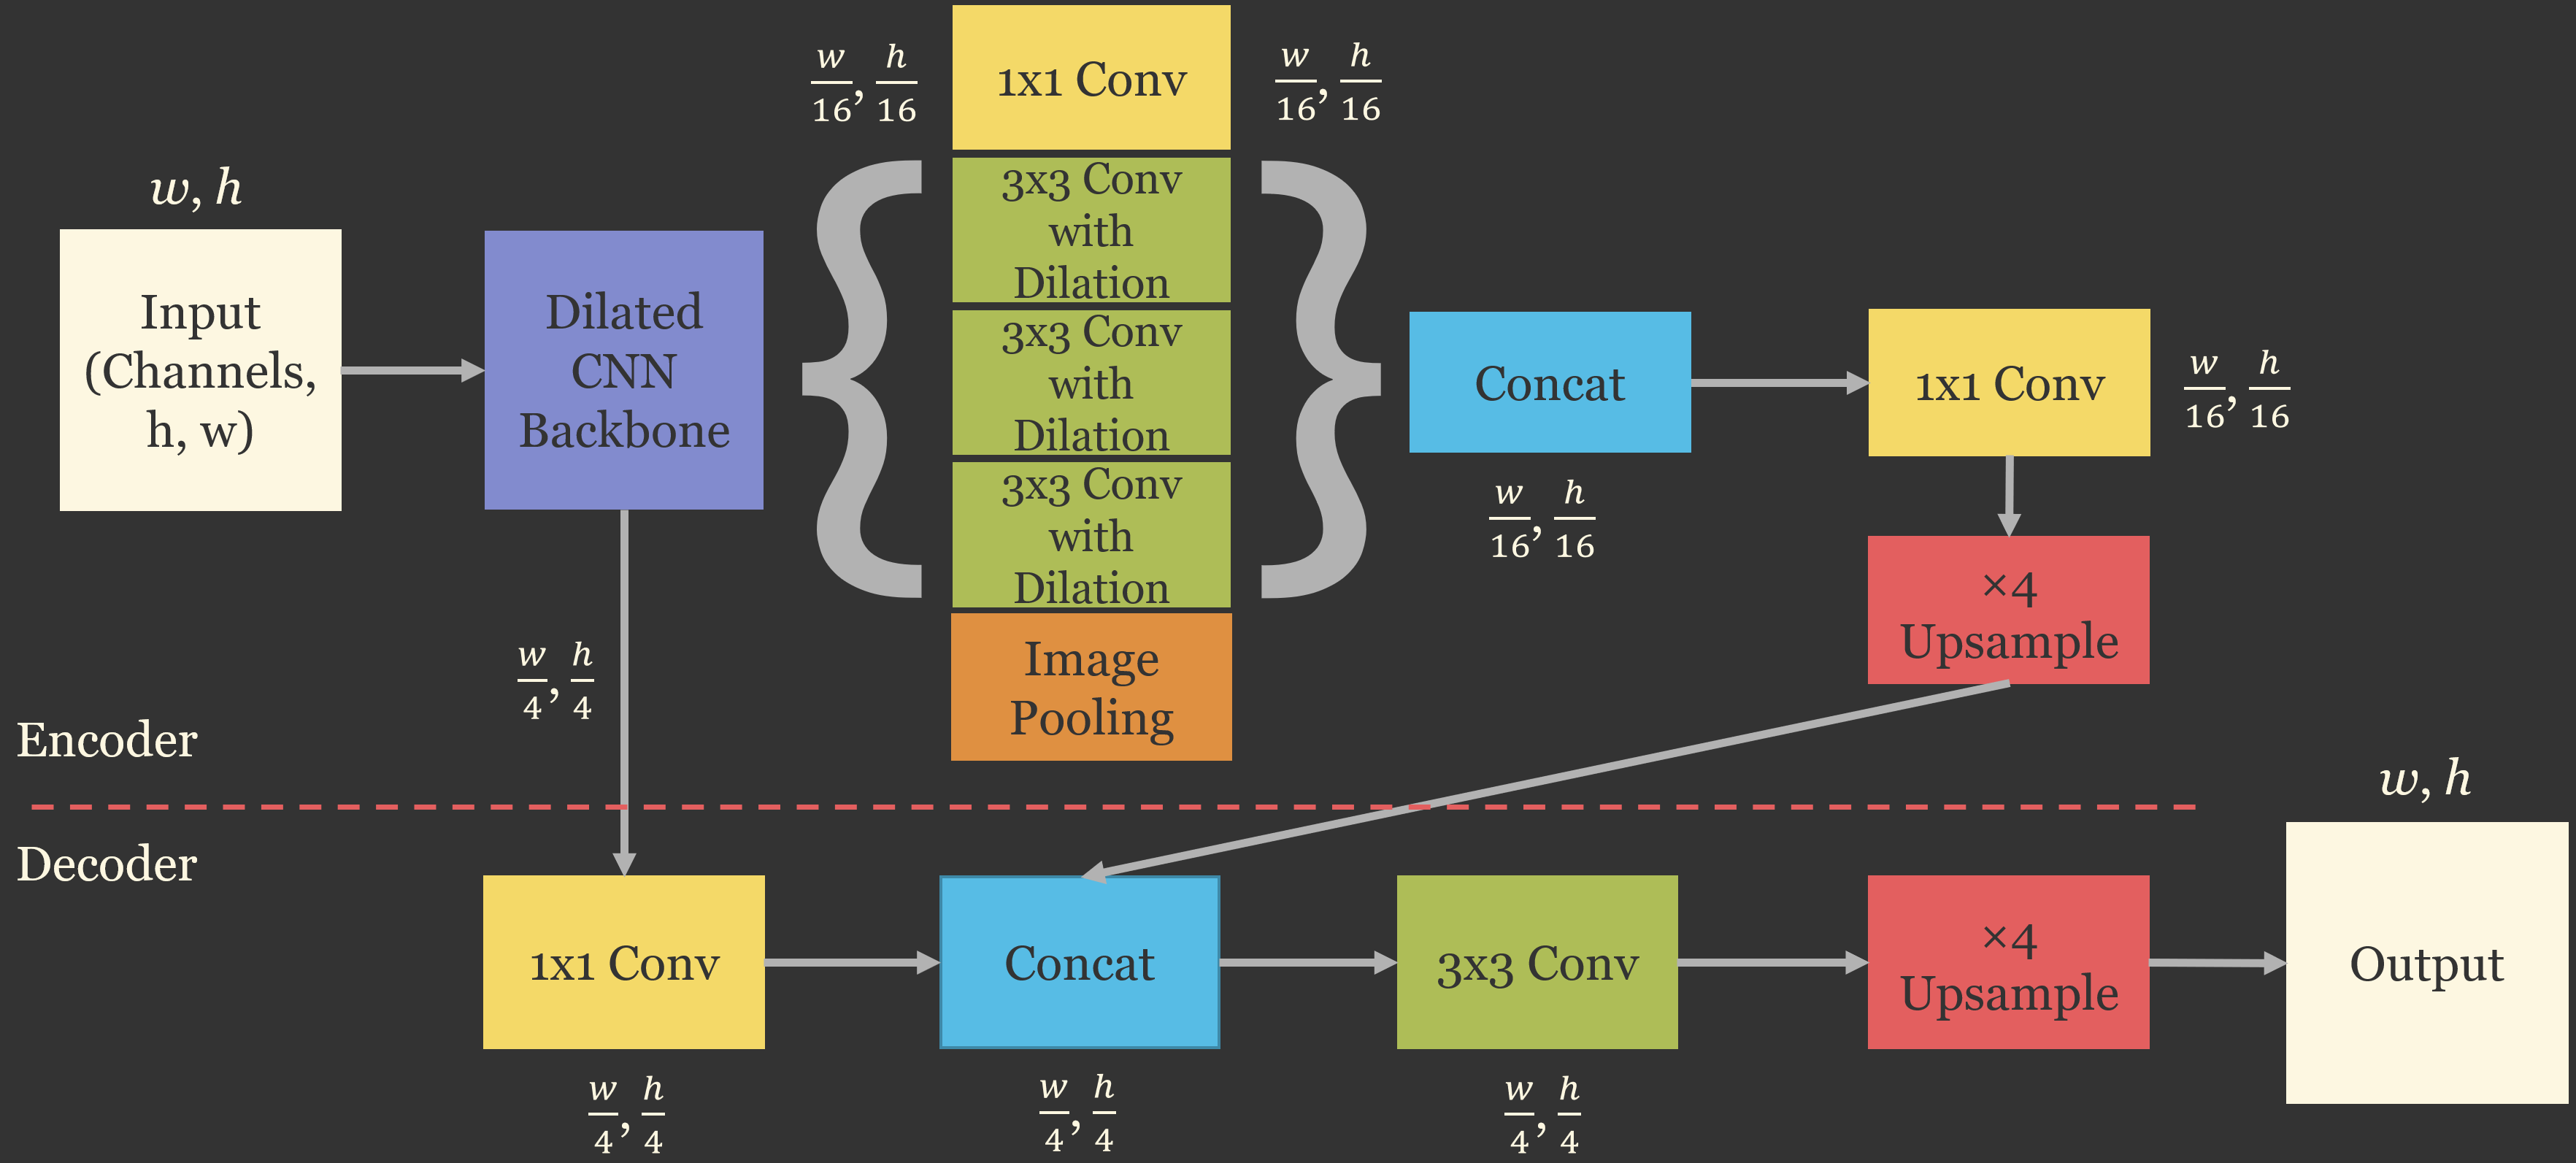
The user also has the ability to customize the architecture, and the settings available vary. For the DeepLabv3+ model, the user can specify which encoder to use, the number of stages or blocks in the encoder, if and which pre-trained weights to use, atrous rates, number of input channels, and number of classes being differentiated. There are also auxiliary parameters associated with the classification head auxiliary output component of the model. Interestingly, you can use pre-trained weights even if the number of current input channels is different from the data used to develop the pre-trained weights.
Outside of models, encoders, and pre-trained weights, this package also provides access to additional loss and assessment metrics applicable to semantic segmentation. It also provides methods to simplify the training loop.
21.2 Preparation
In this example, we will explore the binary classification problem of extracting surface mine extents from topographic maps using the topoDLMini dataset, a subset of the topoDL dataset. The training, validation, and testing chips were generated using the static chip workflow described in Chapter 20: the masks were generated from the mapped mine extents, chips were generated using the “Divided” mode so that background-only chips are stored separately from chips that contain mine pixels, and the chips in each partition were listed in a table.
I import the standard data science packages: NumPy, Pandas, and matplotlib. I also import os for working with file paths, math, and OpenCV (cv2) for reading in the image data. For the deep learning-specific tasks, I read in torch, Albumentations, torchmetrics, and Segmentation Models. Rasterio will be used to read the geospatial raster data for inference at the end of the training process. I also set the device to my available GPU. As in the prior CNN-based modules, the training process presented here is too computationally intensive for CPU-based computation.
device = torch.device("cuda:0" if torch.cuda.is_available() else "cpu")
print(device)cuda:0I next read in the CSV files that are provided with the topoDL dataset and contain information for each chip in the training, testing, and validation datasets as Pandas dataframes. Printing the lengths of these dataframes provides the number of available chips or samples in each partition. Checking the column names, the path to the image chip is housed in the 3rd column while the path to the mask is housed in the 4th column. The “division” column notes whether the chip was a background-only sample or if it contained some pixels mapped to the positive class.
ImportantData Location
This chapter uses the topoDLMini dataset, a subset of the topoDL dataset, which is provided as a separate download (topoDLMini.zip) in the download menu in the sidebar. By default, the code expects the uncompressed topoDLMini folder to be saved in the data/files folder (data/files/topoDLMini). If you saved the data elsewhere, set folder below to the folder’s location on your machine.
# Set this to the folder containing the topoDL chips and the trainDF.csv, valDF.csv, and testDF.csv files.
folder = "data/files/topoDLMini/"
train = pd.read_csv(folder + "trainDF.csv")
val = pd.read_csv(folder + "valDF.csv")
test = pd.read_csv(folder + "testDF.csv")

# The tables store paths from the computer on which the chips were created, so point each
# chip and mask to its location in the folder defined above.
for df, split in [(train, "train"), (val, "val"), (test, "test")]:
    chip = df["division"].str.lower() + "/" + df["chpN"]
    df["chpPath"] = folder + split + "/images/" + chip
df["mskPth"] = folder + split + "/masks/" + chiplen(train)
len(val)
len(test)500train.columnsIndex(['Unnamed: 0', 'chpN', 'division', 'chpPath', 'mskPth'], dtype='str')On issue with the training set is that there is a large number of background-only chips. To deal with class imbalance, I will only use a subsample of the available background-only chips. This is accomplished by separating the background-only and presence samples into separate dataframes, sampling 200 background chips from the larger set without replacement, and merging the presence and subset of background-only chips into a new dataframe. This subset will be used to train the model.
train.groupby(['division'])['division'].count()division
Background 1000
Positive 1000
Name: division, dtype: int64trainP = train.query('division == "Positive"')
trainB = train.query("division == 'Background'")
trainB = trainB.sample(n=200, replace=False)
train2 = pd.concat([trainP, trainB])train2.groupby(['division'])['division'].count()division
Background 200
Positive 1000
Name: division, dtype: int64I next define a DataSet subclass to read in and convert the image chips and associated masks to tensors. Here are a few notes about the DataSet subclass.
- The path to the image chip is read from the third column (index 2).
- The path to the mask is read from the fourth column (index 3).
- Since cv2 reads images using a channels-last configuration, I must use
permute()to convert the tensors to channels-first. - The model will expect the image mini-batches to have a shape of (Mini-Batch, Channels, Height, Width), a 32-bit float data type, and be scaled from 0 to 1. To rescale the 8-bit data, the values are divided by 255.
- The model will expect the mask mini-batches to have a shape of (Mini-Batch, Height, Width), a long integer data type, and have unique codes for each class. In this case, the original data assigns 255 to the surface disturbance class and 0 to the background. Dividing by 255 rescales the data from 0 to 1 where 1 indicates the positive case and 0 indicates the background.
# Subclass and define custom dataset ===========================
class SegData(Dataset):

    def __init__(self, df, transform=None):
        self.df = df
        self.transform = transform

    def __getitem__(self, idx):
        image_name = self.df.iloc[idx, 3]
        mask_name = self.df.iloc[idx, 4]
        image = cv2.imread(image_name)
        image = cv2.cvtColor(image, cv2.COLOR_BGR2RGB)
        mask = cv2.imread(mask_name, cv2.IMREAD_UNCHANGED)
        image = image.astype('uint8')
        mask = mask.astype('uint8')
        mask = np.expand_dims(mask, axis=2)

        if(self.transform is not None):
            transformed = self.transform(image=image, mask=mask)
            image = transformed["image"]
            mask = transformed["mask"]
            image = torch.from_numpy(image)
            mask = torch.from_numpy(mask)
            image = image.permute(2, 0, 1)
            image = image.float()/255
            mask = mask.permute(2, 0, 1)
            mask = mask.float()/255
            mask = mask.squeeze().long()
        else:
            image = torch.from_numpy(image)
            mask = torch.from_numpy(mask)
            image = image.permute(2, 0, 1)
            image = image.float()/255
            mask = mask.permute(2, 0, 1)
            mask = mask.float()/255
            mask = mask.squeeze().long()
        return image, mask
    def __len__(self):
        return len(self.df)
The Albumentations package is used to define data augmentations to potentially reduce overfitting. Specifically, random changes to brightness and contrast are applied along with random horizontal and vertical flips and median blurring.
train_transform = A.Compose(
    [
        A.RandomBrightnessContrast(brightness_limit=0.3, contrast_limit=0.3, p=0.5),
        A.HorizontalFlip(p=0.5),
        A.VerticalFlip(p=0.5),
        A.MedianBlur(blur_limit=3, p=0.1),
    ]
)
I next instantiate the training and validation DataSet instances with the data augmentations applied to only the training data. The DataLoaders are defined using a mini-batch size of 16, which worked on my architecture. You may need to change this based on your resources.
trainDS = SegData(train2, transform=train_transform)
valDS = SegData(val, transform=None)
print("Number of Training Samples: " + str(len(trainDS)) + " Number of Validation Samples: " + str(len(valDS)))
Number of Training Samples: 1200 Number of Validation Samples: 500trainDL = torch.utils.data.DataLoader(trainDS, batch_size=16, shuffle=True, num_workers=0, drop_last=True)
valDL = torch.utils.data.DataLoader(valDS, batch_size=16, shuffle=False, num_workers=0, drop_last=True)I plot information about the mini-batches and an individual image and associated mask as checks. The generated mini-batches and individual images have the correct shapes and data types.
I then plot an image and associated mask. I must permute the bands since matplotlib expects the data to be in a channels-last as opposed to channels-first configuration. It looks like these data are being read and converted to tensors correctly.
batch = next(iter(trainDL))
images, labels = batch
print(images.shape, labels.shape, type(images), type(labels), images.dtype, labels.dtype)
torch.Size([16, 3, 256, 256]) torch.Size([16, 256, 256]) <class 'torch.Tensor'> <class 'torch.Tensor'> torch.float32 torch.int64testImg = images[1]
testMsk = labels[1]
print(testImg.shape, testImg.dtype, type(testImg), testMsk.shape,
testMsk.dtype, type(testMsk), testImg.min(),
testImg.max(), testMsk.min(), testMsk.max())torch.Size([3, 256, 256]) torch.float32 <class 'torch.Tensor'> torch.Size([256, 256]) torch.int64 <class 'torch.Tensor'> tensor(0.) tensor(1.) tensor(0) tensor(0)trainDSP = SegData(trainP, transform=None)
trainDLP = torch.utils.data.DataLoader(trainDSP, batch_size=16, shuffle=True, num_workers=0, drop_last=True)
batch = next(iter(trainDLP))
images, labels = batch
testImg = images[1]
testMsk = labels[1]# Plot example image =====================================
plt.imshow(testImg.permute(1,2,0))
plt.show()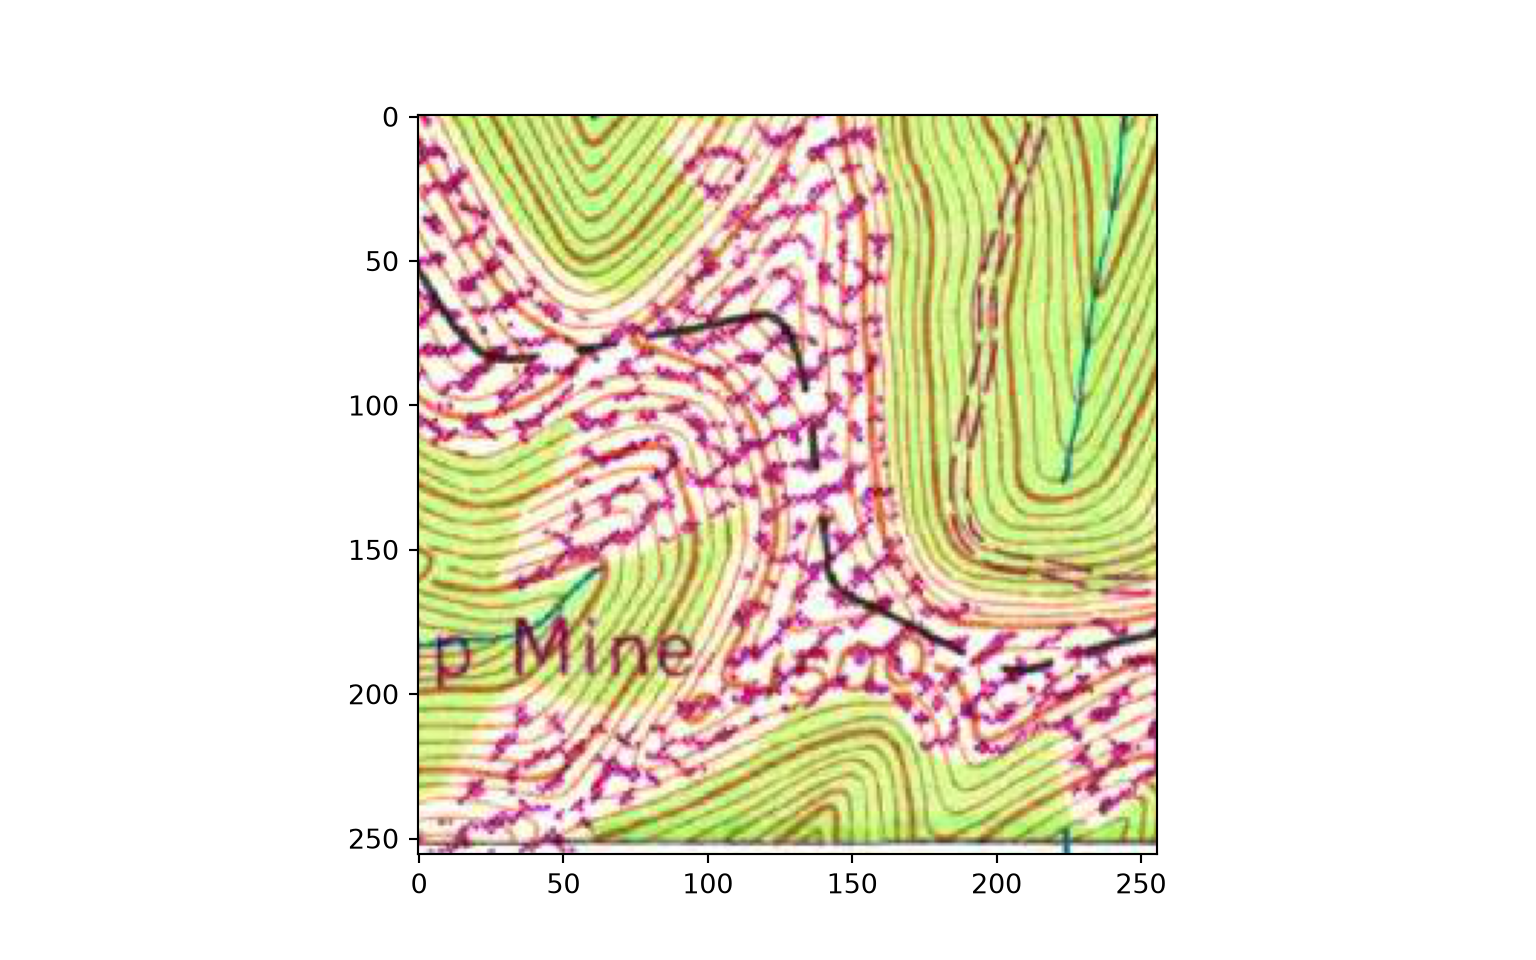
# Plot example image =====================================
plt.imshow(testMsk.unsqueeze(dim=0).permute(1,2,0))
plt.show()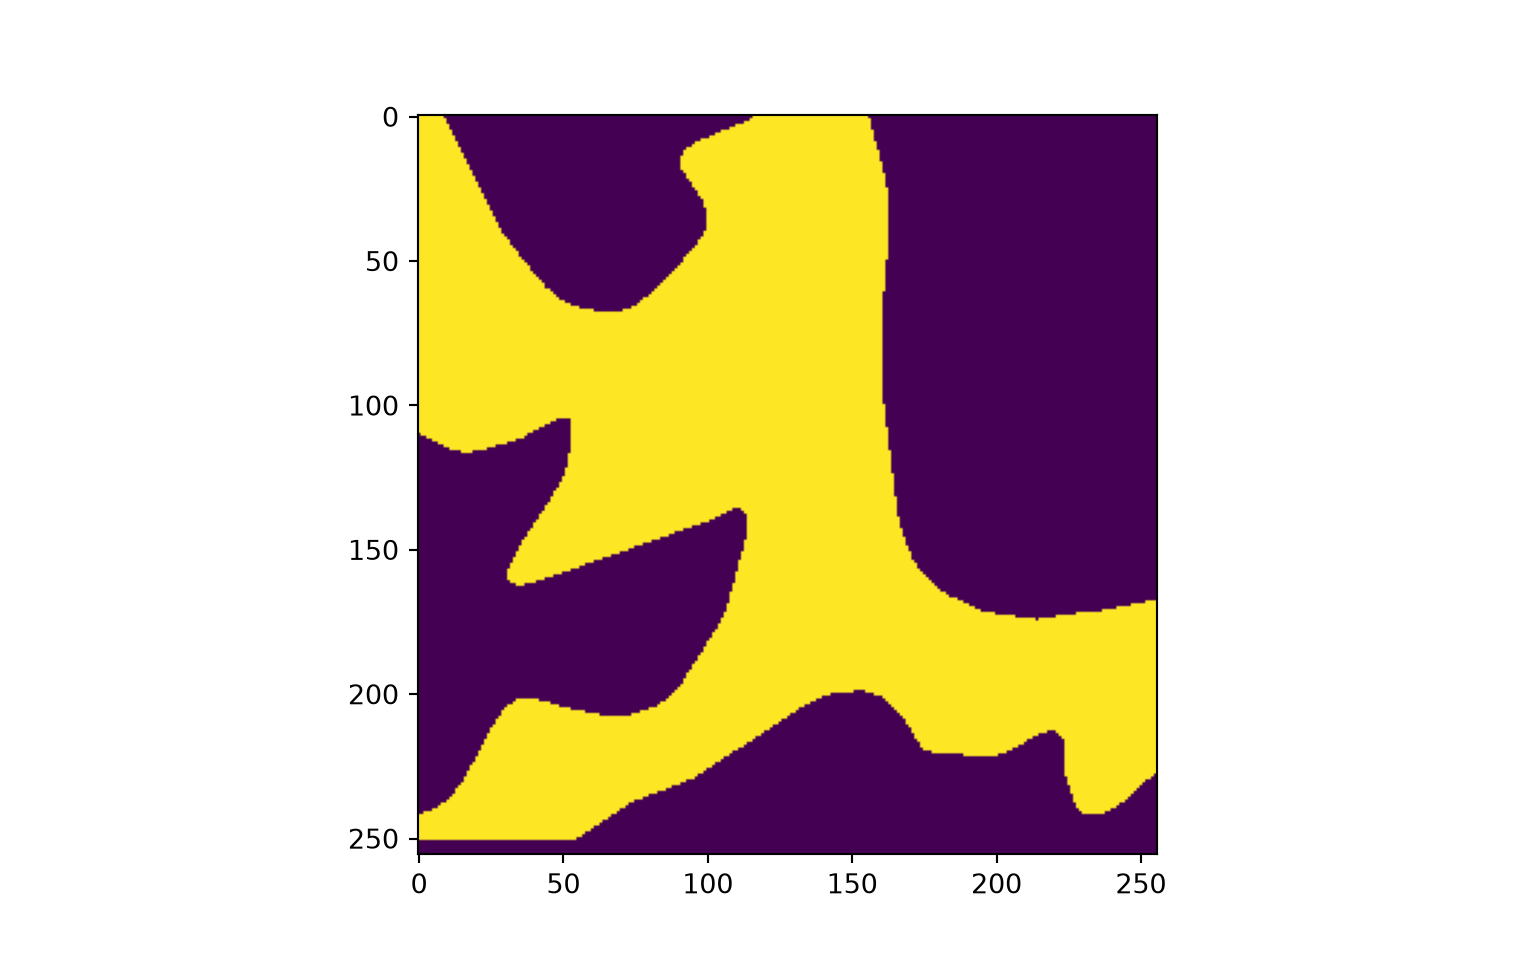
21.3 DeepLabv3+
The DeepLabv3+ semantic segmentation architecture is initiated using the DeepLabV3Plus() function from Segmentation Models. Since the Segmentation Models package includes this architecture, this function can be called to instantiate an instance of DeepLabv3+ as opposed to building it on your own by subclassing nn.Module. I specify the name of the encoder (ResNet-18, “resnet18”), and I do not instantiate using pre-trained weights since this is a very different problem than the ImageNet classification problem. No activation function (i.e., softmax) is used so that raw logits are delivered.
Since this is a binary classification problem, I could define the model to return only a logit for the positive class or logits for both the positive and background classes. In this example, I have chosen to treat the problem the same as a multiclass classification problem, so logits will be returned for both the positive and background class.
encoder = "resnet18"
encoder_weights = None
activation = None
model = smp.DeepLabV3Plus(
encoder_name=encoder,
encoder_weights=encoder_weights,
classes=2,
activation=activation,
).to(device)21.4 Train Model
The Segmentation Models package provides some tools to simplify training. However, since any Segmentation Models architecture is an nn.Module subclass that returns class logits, it can be trained using the LitSegmenter LightningModule defined in Chapter 16 without any changes. Here, I use the Dice loss provided by Segmentation Models (smp.losses.DiceLoss). Since this is a binary problem framed as a two-class problem, the model returns two logits for each pixel, so I use the "multiclass" mode, which expects logits with a shape of (N, C, H, W) and masks of class indices with a shape of (N, H, W). Setting from_logits=True indicates that the model returns logits, so a softmax activation is applied within the loss. The Dice loss is calculated for each class and then averaged, so the positive class contributes equally to the loss even though it makes up a small proportion of the pixels. This makes the Dice loss less sensitive to class imbalance than cross entropy loss, which is calculated per pixel and is therefore dominated by the background class. I use the AdamW optimizer with the default learning rate. For this example, I override the configure_optimizers() method so that a constant learning rate is used as opposed to the one cycle policy. I monitor the overall accuracy, class-aggregated macro-averaged F1-score, and Kappa statistic, and the model is only saved if the class-aggregated F1-score improves for the validation data.
import lightning as L
from lightning.pytorch.callbacks import ModelCheckpoint
from lightning.pytorch.loggers import CSVLogger

class LitSegmenter(L.LightningModule):
    def __init__(self, model, nCls, criterion, lr=1e-3):
        super().__init__()
        self.save_hyperparameters(ignore=["model", "criterion"])
        self.model = model
        self.criterion = criterion
        self.lr = lr
        metrics = tm.MetricCollection({
            "acc": tm.Accuracy(task="multiclass", num_classes=nCls, average="micro"),
            "f1": tm.F1Score(task="multiclass", num_classes=nCls, average="macro"),
            "kappa": tm.CohenKappa(task="multiclass", num_classes=nCls),
        })
        self.train_metrics = metrics.clone(prefix="train_")
        self.val_metrics = metrics.clone(prefix="val_")
        self.test_metrics = metrics.clone(prefix="test_")

    def forward(self, x):
        return self.model(x)

    def _shared_step(self, batch, metrics, stage):
        x, y = batch
        logits = self(x)
        loss = self.criterion(logits, y)
        metrics.update(logits, y)
        self.log(f"{stage}_loss", loss, on_step=False, on_epoch=True, prog_bar=True)
        self.log_dict(metrics, on_step=False, on_epoch=True, prog_bar=(stage == "val"))
        return loss

    def training_step(self, batch, batch_idx):
        return self._shared_step(batch, self.train_metrics, "train")

    def validation_step(self, batch, batch_idx):
        self._shared_step(batch, self.val_metrics, "val")

    def test_step(self, batch, batch_idx):
        self._shared_step(batch, self.test_metrics, "test")

    def predict_step(self, batch, batch_idx):
        x = batch[0] if isinstance(batch, (list, tuple)) else batch
        return torch.softmax(self(x), dim=1)

    def configure_optimizers(self):
        return torch.optim.AdamW(self.parameters(), lr=self.lr)
In this example, all parameters are trainable since none have been frozen. If you initialize the model using pre-trained weights, the default behavior is that all parameters will also be updateable. If you want to freeze the encoder, you can use the functions below, which were obtained at the commented-out URL. Since the Segmentation Models architectures store the encoder as the encoder attribute, freezing it only requires setting the requires_grad property of its parameters to False.
#https://github.com/qubvel/segmentation_models.pytorch/issues/79
def freeze_encoder(model):
    for param in model.encoder.parameters():
        param.requires_grad = False

def unfreeze(model):
    for param in model.parameters():
        param.requires_grad = True
criterion = smp.losses.DiceLoss(mode="multiclass", from_logits=True)
litModel = LitSegmenter(model=model, nCls=2, criterion=criterion, lr=1e-3)
checkpoint = ModelCheckpoint(monitor="val_f1", mode="max", save_top_k=1,
dirpath="data/output/ssTopoDL/")
trainer = L.Trainer(max_epochs=50, accelerator="gpu", devices=1, precision="bf16-mixed",
logger=CSVLogger("data/output/", name="topodl_deeplab"),
callbacks=[checkpoint])
trainer.fit(litModel, train_dataloaders=trainDL, val_dataloaders=valDL)If you choose to train the model, it will take some time. It took roughly half an hour to run on my machine with a single GPU. We have provided a trained model if you want to run the later code without training the model.
Once the model training is completed, I explore the training process by plotting the training and validation losses over the training epochs and the training and validation F1-scores. The log was written by Lightning’s CSVLogger, which records the training and validation metrics for each epoch on separate rows, so I first collapse the table to one row per epoch.
resultsDF = pd.read_csv("data/models/smTopoDLLogs.csv")
# Lightning writes training and validation metrics to separate rows for each epoch; collapse to one row per epoch
resultsDF = resultsDF.groupby("epoch").mean().reset_index()plt.rcParams['figure.figsize'] = [10, 10]
firstPlot = resultsDF.plot(x='epoch', y="train_loss")
resultsDF.plot(x='epoch', y="val_loss", ax=firstPlot)
plt.show()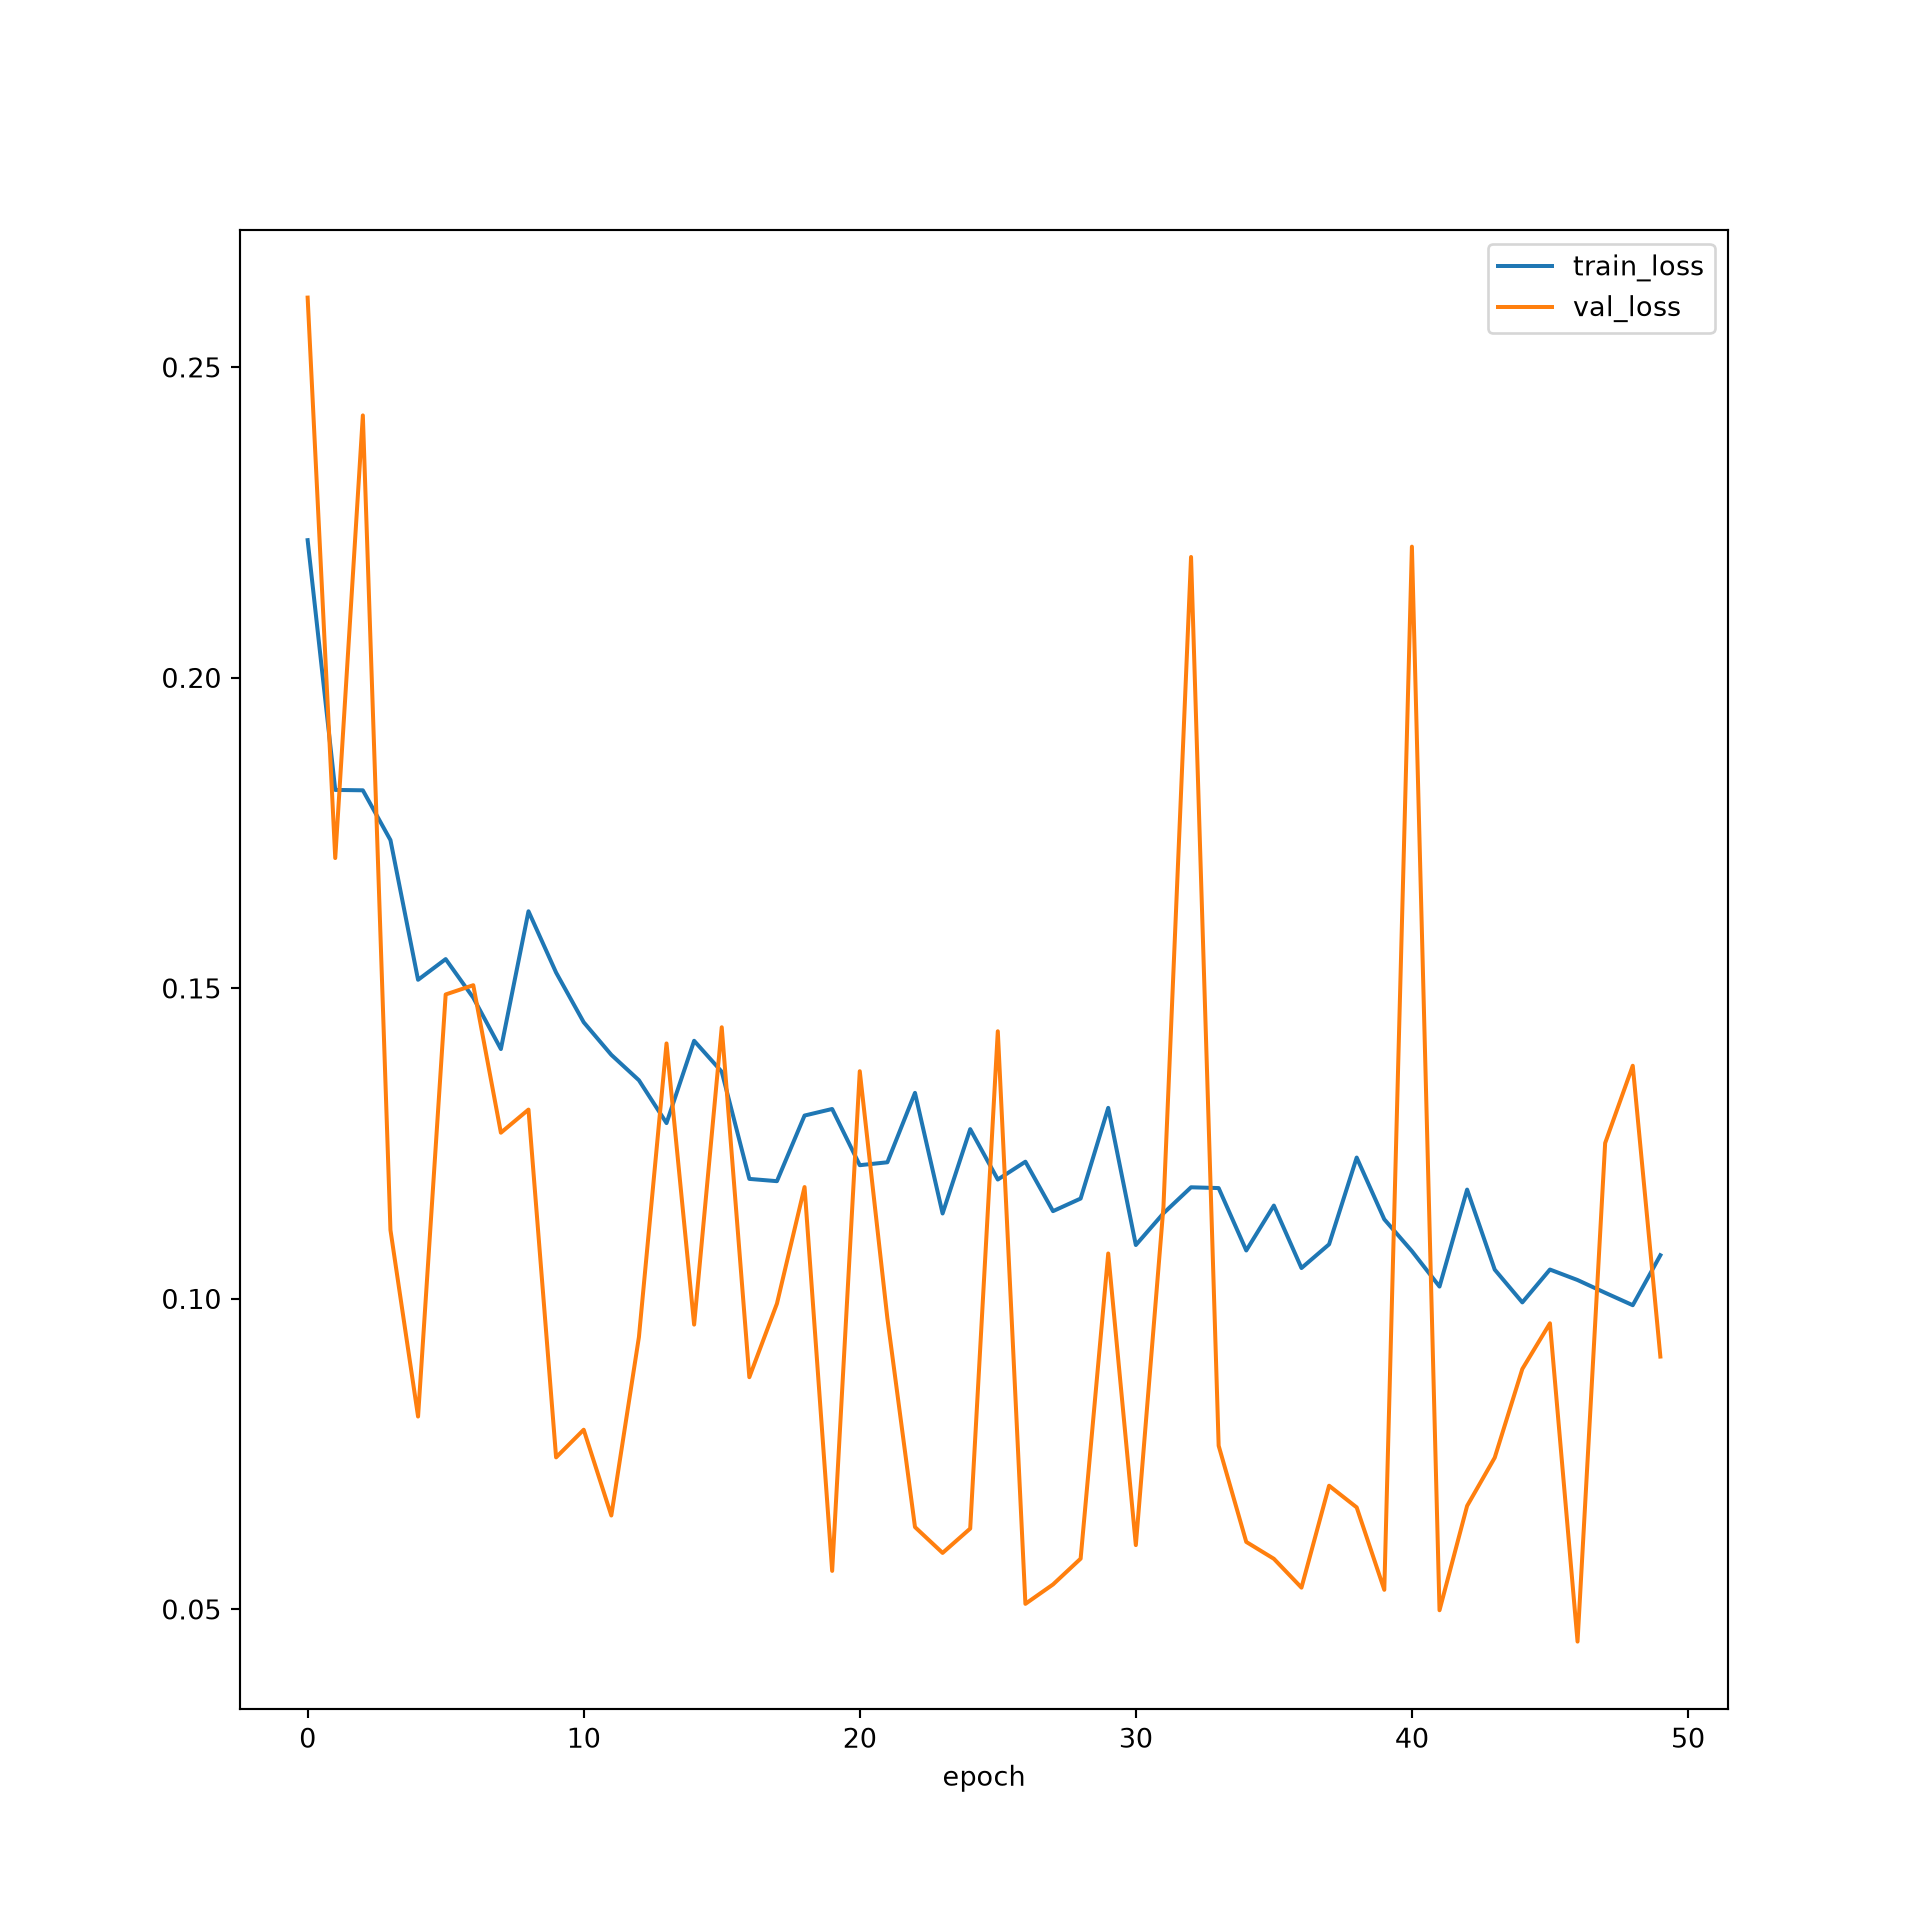
plt.rcParams['figure.figsize'] = [10, 10]
firstPlot = resultsDF.plot(x="epoch", y="train_f1")
resultsDF.plot(x='epoch', y="val_f1", ax=firstPlot)
plt.show()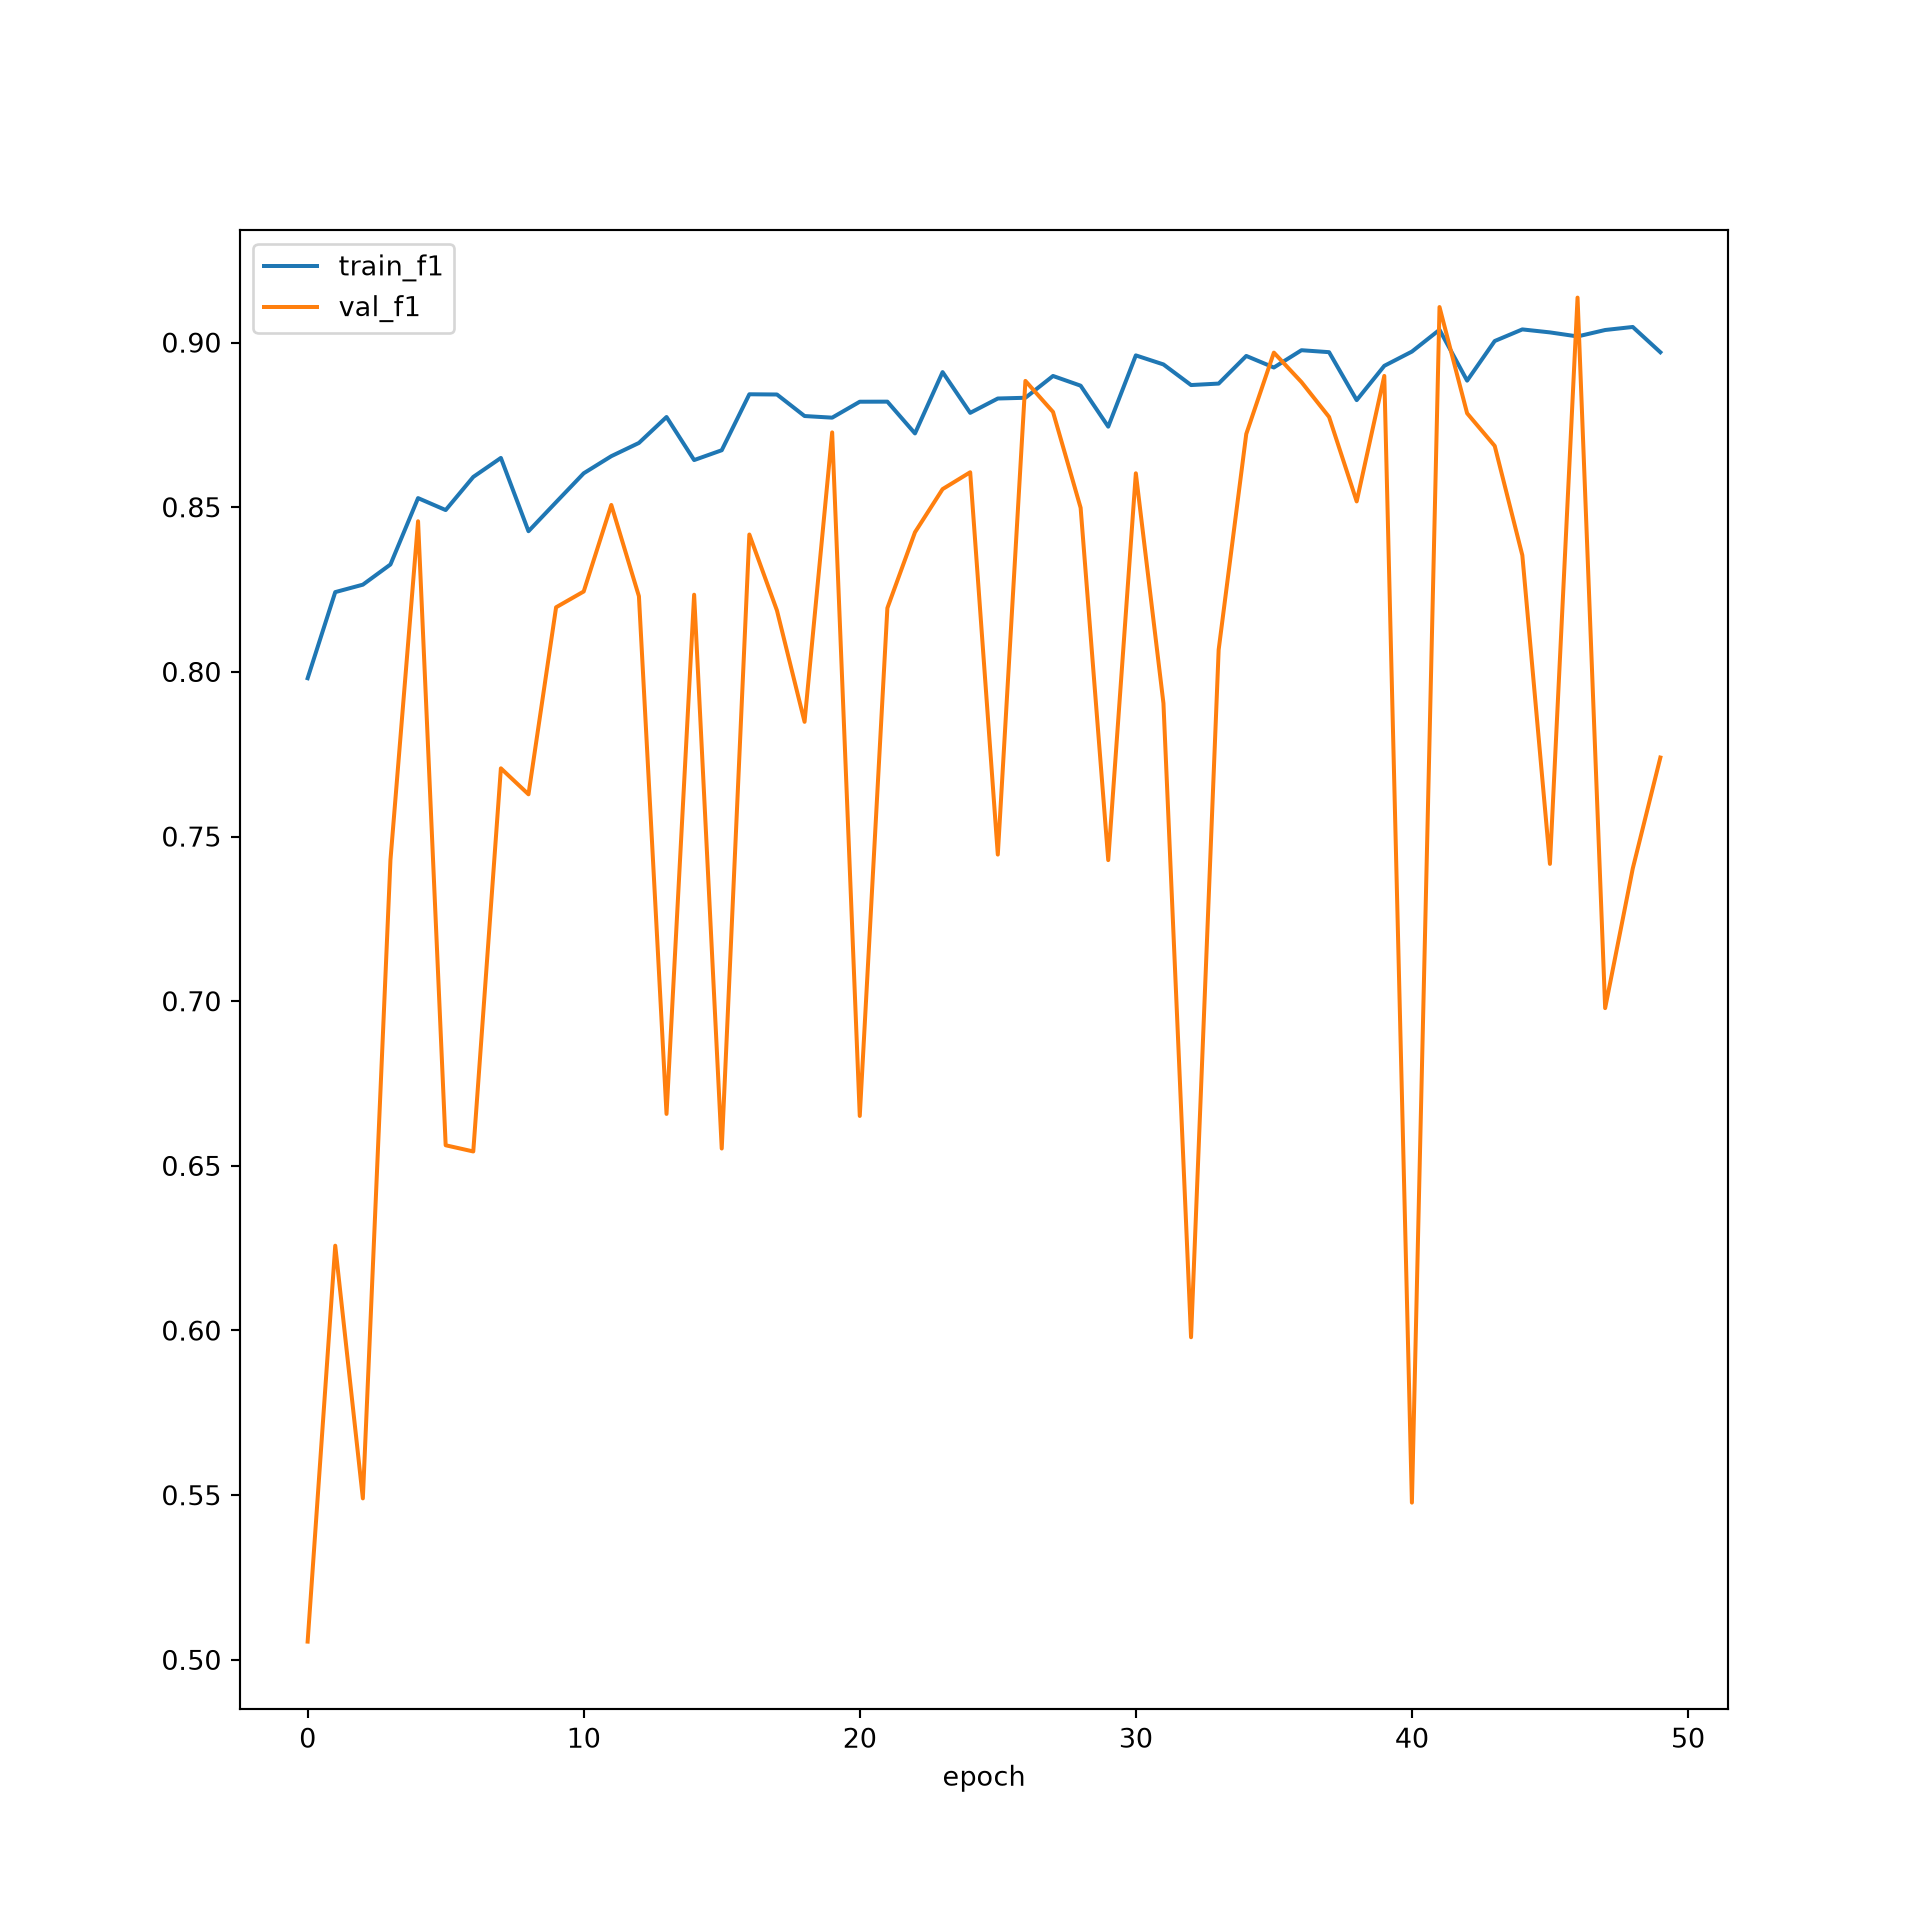
21.5 Assess Model
Once the model is trained, it can be used to perform inference on new data. I will demonstrate assessing the model using the withheld testing data. This involves the following steps:
- Redefine the model, load the learned parameters from disk, and wrap the model in the LightningModule.
- Instantiate a DataSet and DataLoader for the testing data.
- Calculate the aggregated assessment metrics using the
test()method of aTrainer. - Calculate class-level metrics by looping over the test mini-batches and updating torchmetrics metrics.
model = smp.DeepLabV3Plus(
    encoder_name=encoder,
    encoder_weights=encoder_weights,
    classes=2,
    activation=activation,
)
litModel = LitSegmenter.load_from_checkpoint("data/models/smTopoDL.ckpt",
                                             model=model,
                                             criterion=smp.losses.DiceLoss(mode="multiclass", from_logits=True),
                                             map_location="cpu")

testDS = SegData(test, transform=None)
testDL = torch.utils.data.DataLoader(testDS, batch_size=16, shuffle=False, num_workers=0)

trainer = L.Trainer(accelerator="gpu", devices=1, logger=False)
trainer.test(litModel, dataloaders=testDL)
Testing: |          | 0/? [00:00<?, ?it/s]
Testing: |          | 0/? [00:00<?, ?it/s]
Testing DataLoader 0:   0%|          | 0/32 [00:00<?, ?it/s]
Testing DataLoader 0:   3%|3         | 1/32 [00:00<00:10,  3.02it/s]
Testing DataLoader 0:   6%|6         | 2/32 [00:00<00:07,  4.01it/s]
Testing DataLoader 0:   9%|9         | 3/32 [00:00<00:06,  4.47it/s]
Testing DataLoader 0:  12%|#2        | 4/32 [00:00<00:05,  4.97it/s]
Testing DataLoader 0:  16%|#5        | 5/32 [00:00<00:05,  5.10it/s]
Testing DataLoader 0:  19%|#8        | 6/32 [00:01<00:05,  4.83it/s]
Testing DataLoader 0:  22%|##1       | 7/32 [00:01<00:04,  5.09it/s]
Testing DataLoader 0:  25%|##5       | 8/32 [00:01<00:04,  5.18it/s]
Testing DataLoader 0:  28%|##8       | 9/32 [00:01<00:04,  5.35it/s]
Testing DataLoader 0:  31%|###1      | 10/32 [00:01<00:03,  5.52it/s]
Testing DataLoader 0:  34%|###4      | 11/32 [00:01<00:03,  5.57it/s]
Testing DataLoader 0:  38%|###7      | 12/32 [00:02<00:03,  5.59it/s]
Testing DataLoader 0:  41%|####      | 13/32 [00:02<00:03,  5.62it/s]
Testing DataLoader 0:  44%|####3     | 14/32 [00:02<00:03,  5.51it/s]
Testing DataLoader 0:  47%|####6     | 15/32 [00:02<00:03,  5.49it/s]
Testing DataLoader 0:  50%|#####     | 16/32 [00:02<00:02,  5.56it/s]
Testing DataLoader 0:  53%|#####3    | 17/32 [00:03<00:02,  5.54it/s]
Testing DataLoader 0:  56%|#####6    | 18/32 [00:03<00:02,  5.53it/s]
Testing DataLoader 0:  59%|#####9    | 19/32 [00:03<00:02,  5.56it/s]
Testing DataLoader 0:  62%|######2   | 20/32 [00:03<00:02,  5.55it/s]
Testing DataLoader 0:  66%|######5   | 21/32 [00:03<00:02,  5.44it/s]
Testing DataLoader 0:  69%|######8   | 22/32 [00:04<00:01,  5.48it/s]
Testing DataLoader 0:  72%|#######1  | 23/32 [00:04<00:01,  5.46it/s]
Testing DataLoader 0:  75%|#######5  | 24/32 [00:04<00:01,  5.49it/s]
Testing DataLoader 0:  78%|#######8  | 25/32 [00:04<00:01,  5.48it/s]
Testing DataLoader 0:  81%|########1 | 26/32 [00:04<00:01,  5.48it/s]
Testing DataLoader 0:  84%|########4 | 27/32 [00:04<00:00,  5.51it/s]
Testing DataLoader 0:  88%|########7 | 28/32 [00:05<00:00,  5.54it/s]
Testing DataLoader 0:  91%|######### | 29/32 [00:05<00:00,  5.50it/s]
Testing DataLoader 0:  94%|#########3| 30/32 [00:05<00:00,  5.49it/s]
Testing DataLoader 0:  97%|#########6| 31/32 [00:05<00:00,  5.52it/s]
Testing DataLoader 0: 100%|##########| 32/32 [00:05<00:00,  5.65it/s]
Testing DataLoader 0: 100%|##########| 32/32 [00:05<00:00,  5.61it/s]
────────────────────────────────────────────────────────────────────────────────────────────────────────────────────────
       Test metric             DataLoader 0
────────────────────────────────────────────────────────────────────────────────────────────────────────────────────────
        test_acc            0.9818803668022156
         test_f1            0.9246048331260681
       test_kappa           0.8492140769958496
        test_loss           0.04001356288790703
────────────────────────────────────────────────────────────────────────────────────────────────────────────────────────
[{'test_loss': 0.04001356288790703, 'test_acc': 0.9818803668022156, 'test_f1': 0.9246048331260681, 'test_kappa': 0.8492140769958496}]
metricsCls = tm.MetricCollection({
"f1": tm.F1Score(task="multiclass", num_classes=2, average="none"),
"recall": tm.Recall(task="multiclass", num_classes=2, average="none"),
"precision": tm.Precision(task="multiclass", num_classes=2, average="none"),
"cm": tm.ConfusionMatrix(task="multiclass", num_classes=2),
}).to(device)
litModel = litModel.to(device).eval()
with torch.no_grad():
for inputs, targets in testDL:
inputs, targets = inputs.to(device), targets.to(device)
metricsCls.update(litModel(inputs), targets)
for k, v in metricsCls.compute().items():
print(k, v)cm tensor([[30367278, 253343],
[ 340401, 1806978]], device='cuda:0')
f1 tensor([0.9903, 0.8589], device='cuda:0')
precision tensor([0.9889, 0.8770], device='cuda:0')
recall tensor([0.9917, 0.8415], device='cuda:0')Generally, the assessment suggests strong model performance. This is expected since the pattern representing surface mining is very unique or differentiable from the background features.
21.6 Spatial Prediction
Once a model is trained, it can be used to infer back to entire image extents as opposed to individual image chips. We explored making spatial predictions using the Landcover.ai dataset in Chapter 19. Here, I will demonstrate the same process for this classification problem. I first define a topographic map that I want to predict to that was included as part of the testing datasets. Plotting the topographic map, you can see that some surface disturbance extents are present.
testImg = "data/files/other/KY_Dorton_708542_1954_24000_geo.tif"src = rio.open(testImg)
rio.plot.show(src)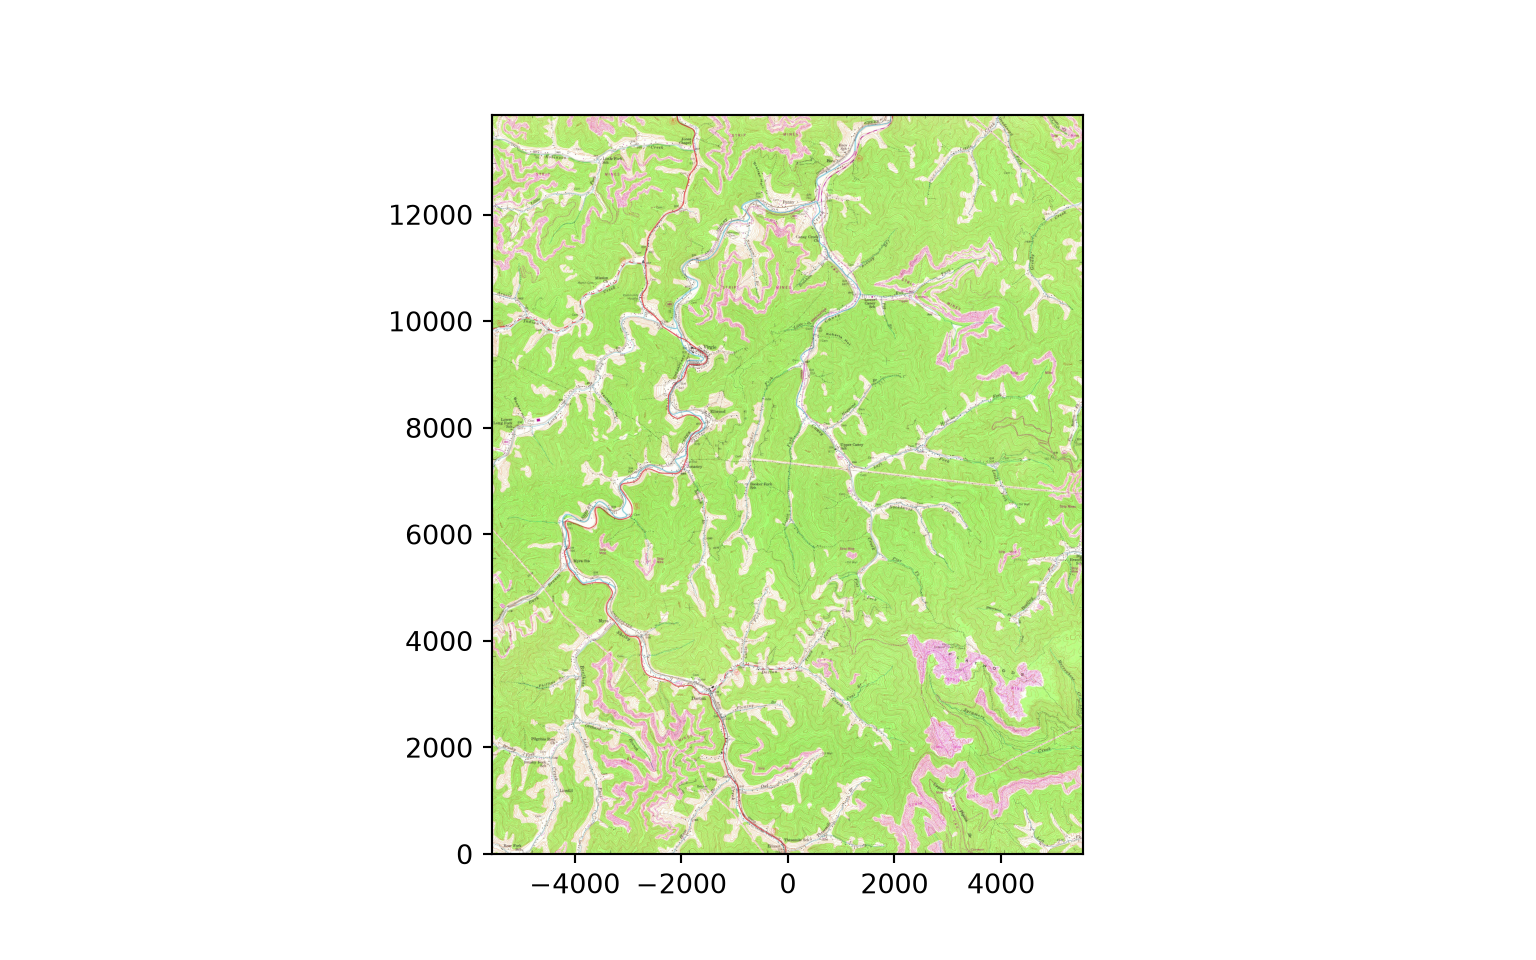
src.close()I next redefine the geoInfer() function that was explored in Chapter 19 that can make predictions on overlapping image chips, crop off outer rows and columns of pixels, and merge the predictions back to a single raster file that is georeferenced and has an associated coordinate reference system. I then use this function and the trained model to predict the example topographic map. The function uses the model object, so I first extract the trained DeepLabv3+ model from the LightningModule loaded from the checkpoint above and move it to the device. If the model is not loaded from the checkpoint, the randomly initialized parameters will be used, and the prediction will be meaningless.
def geoInfer(image_in, pred_out, chip_size, stride_x, stride_y, crop, n_channels):

    #Read in topo map and convert to tensor===========================
    image1 = cv2.imread(image_in)
    image1 = cv2.cvtColor(image1, cv2.COLOR_BGR2RGB)
    image1 = image1.astype('uint8')
    image1 = torch.from_numpy(image1)
    image1 = image1.permute(2, 0, 1)
    image1 = image1.float()/255
    t_arr = image1

    #Make blank grid to write predictions two with same height and width as topo===========================
    image2 = cv2.imread(image_in)
    image2 = cv2.cvtColor(image2, cv2.COLOR_BGR2RGB)
    image2 = image2.astype('uint8')
    image2 = torch.from_numpy(image2)
    image2 = image2.permute(2, 0, 1)
    image2 = image2.float()/255
    p_arr = image2[0, :, :]
    p_arr[:,:] = 0

    #Predict to entire topo using overlapping chips, merge back to original extent=============
    size = chip_size
    stride_x = stride_x
    stride_y = stride_y
    crop = crop
    n_channels = n_channels

    across_cnt = t_arr.shape[2]
    down_cnt = t_arr.shape[1]
    tile_size_across = size
    tile_size_down = size
    overlap_across = stride_x
    overlap_down = stride_y
    across = math.ceil(across_cnt/overlap_across)
    down = math.ceil(down_cnt/overlap_down)
    across_seq = list(range(0, across, 1))
    down_seq = list(range(0, down, 1))
    across_seq2 = [(x*overlap_across) for x in across_seq]
    down_seq2 = [(x*overlap_down) for x in down_seq]
    #Loop through row/column combinations to make predictions for entire image
    for c in across_seq2:
        for r in down_seq2:
            c1 = c
            r1 = r
            c2 = c + size
            r2 = r + size
            #Default
            if c2 <= across_cnt and r2 <= down_cnt:
                r1b = r1
                r2b = r2
                c1b = c1
                c2b = c2
            #Last column
            elif c2 > across_cnt and r2 <= down_cnt:
                r1b = r1
                r2b = r2
                c1b = across_cnt - size
                c2b = across_cnt + 1
            #Last row
            elif c2 <= across_cnt and r2 > down_cnt:
                r1b = down_cnt - size
                r2b = down_cnt + 1
                c1b = c1
                c2b = c2
            #Last row, last column
            else:
                c1b = across_cnt - size
                c2b = across_cnt + 1
                r1b = down_cnt - size
                r2b = down_cnt + 1
            ten1 = t_arr[0:n_channels, r1b:r2b, c1b:c2b]
            ten1 = ten1.to(device).unsqueeze(0)
            model.eval()
            with torch.no_grad():
              ten2 = model(ten1)
            m = nn.Softmax(dim=1)
            pr_probs = m(ten2)
            ten_p = torch.argmax(pr_probs, dim=1).squeeze(1)
            ten_p = ten_p.squeeze()
            #print("executed for " + str(r1) + ", " + str(c1))
            if(r1b == 0 and c1b == 0): #Write first row, first column
                p_arr[r1b:r2b-crop, c1b:c2b-crop] = ten_p[0:size-crop, 0:size-crop]
            elif(r1b == 0 and c2b == across_cnt+1): #Write first row, last column
                p_arr[r1b:r2b-crop, c1b+crop:c2b] = ten_p[0:size-crop, 0+crop:size]
            elif(r2b == down_cnt+1 and c1b == 0): #Write last row, first column
                p_arr[r1b+crop:r2b, c1b:c2b-crop] = ten_p[crop:size+1, 0:size-crop]
            elif(r2b == down_cnt+1 and c2b == across_cnt+1): #Write last row, last column
                p_arr[r1b+crop:r2b, c1b+crop:c2b] = ten_p[crop:size, 0+crop:size+1]
            elif((r1b == 0 and c1b != 0) or (r1b == 0 and c2b != across_cnt+1)): #Write first row
                p_arr[r1b:r2b-crop, c1b+crop:c2b-crop] = ten_p[0:size-crop, 0+crop:size-crop]
            elif((r2b == down_cnt+1 and c1b != 0) or (r2b == down_cnt+1 and c2b != across_cnt+1)): # Write last row
                p_arr[r1b+crop:r2b, c1b+crop:c2b-crop] = ten_p[crop:size, 0+crop:size-crop]
            elif((c1b == 0 and r1b !=0) or (c1b ==0 and r2b != down_cnt+1)): #Write first column
                p_arr[r1b+crop:r2b-crop, c1b:c2b-crop] = ten_p[crop:size-crop, 0:size-crop]
            elif (c2b == across_cnt+1 and r1b != 0) or (c2b == across_cnt+1 and r2b != down_cnt+1): # write last column
                p_arr[r1b+crop:r2b-crop, c1b+crop:c2b] = ten_p[crop:size-crop, 0+crop:size]
            else: #Write middle chips
                p_arr[r1b+crop:r2b-crop, c1b+crop:c2b-crop] = ten_p[crop:size-crop, crop:size-crop]

    #Read in a GeoTIFF to get CRS info=======================================
    image3 = rio.open(image_in)
    profile1 = image3.profile.copy()
    image3.close()
    profile1["driver"] = "GTiff"
    profile1["dtype"] = "uint8"
    profile1["count"] = 1
    profile1["PHOTOMETRIC"] = "MINISBLACK"
    profile1["COMPRESS"] = "NONE"

    pr_out = p_arr.cpu().numpy().round().astype('uint8')

    #Write out result========================================================
    with rio.open(pred_out, "w", **profile1) as f:
        f.write(pr_out,1)

    torch.cuda.empty_cache()
model = litModel.model.to(device).eval()
geoInfer(image_in=testImg,
pred_out="data/output/topo_prediction.tif",
chip_size=256, stride_x=128, stride_y=128, crop=50, n_channels=3)Lastly, I read the prediction back in and display it using matplotlib. The result look pretty good. If you want to explore the output in more detail and compare it to the input topographic map, I would suggest using a GIS software, such as ArcGIS Pro or QGIS.
#https://www.earthdatascience.org/courses/use-data-open-source-python/intro-raster-data-python/raster-data-processing/classify-plot-raster-data-in-python/
from matplotlib.colors import ListedColormap, BoundaryNorm
from matplotlib.patches import Patch

clsOut = rio.open("data/output/topo_prediction.tif", )
clsOutA = clsOut.read().squeeze()
src.close()
print(np.max(clsOutA.shape))6827classes = list(np.unique(clsOutA).astype('int'))
classColors = ['gray', 'red']
classNames = ['background', 'mining']
clsBounds = BoundaryNorm([-.5, .5, 1.5], 2)
colorMap = ListedColormap(classColors)
f, ax = plt.subplots(figsize=(10,5))
im = ax.imshow(clsOutA, cmap = colorMap, norm=clsBounds)
ax.set(title="Mining")
ax.legend(handles=[Patch(facecolor=c, edgecolor="black", label=n) for c, n in zip(classColors, classNames)],
loc="center left", bbox_to_anchor=(1, 0.5))
ax.set_axis_off()
plt.show()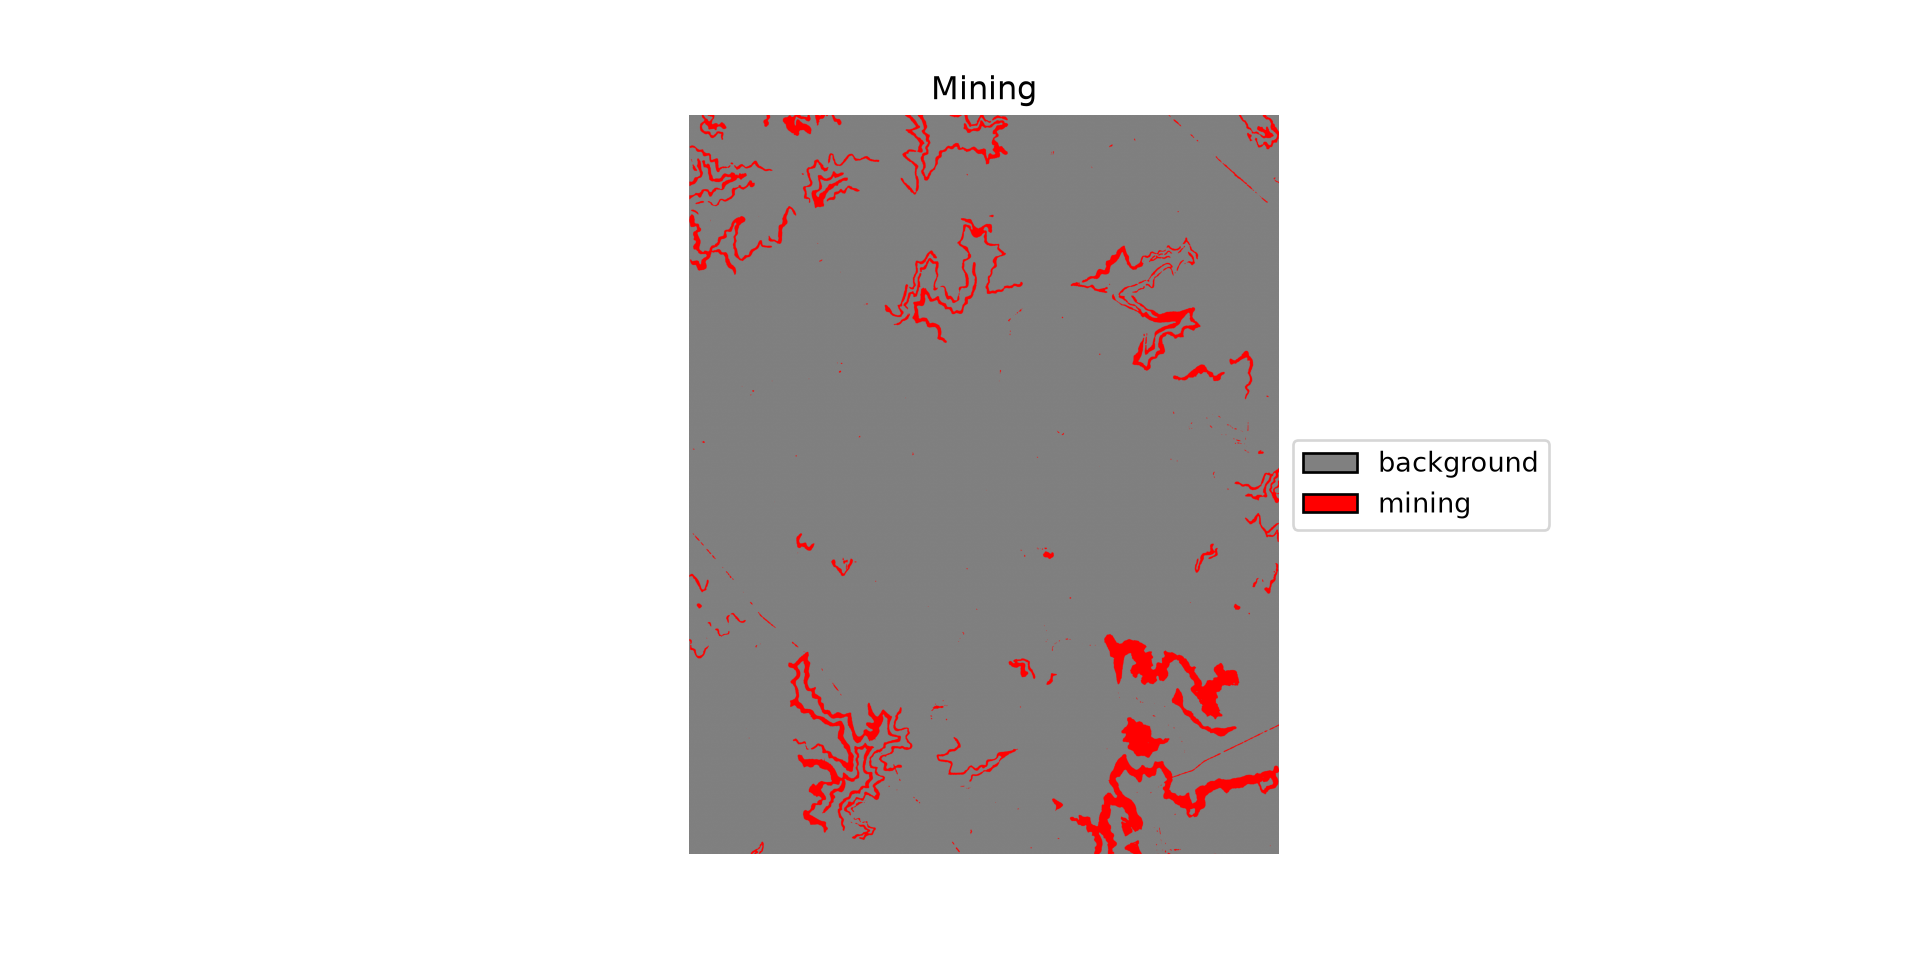
21.7 Using Variable Learning Rates
Before we end this chapter, I want to describe how to use different base learning rates for different components of a Segmentation Models architecture. When using a pre-trained backbone as an encoder but not freezing it during training, it has generally been suggested that using a lower learning rate for the encoder relative to the decoder and classification head can be beneficial. The idea is that, since the encoder was initialized using pre-trained parameters, it requires less dramatic parameter updates than the decoder, which was initialized using random parameters. In my own experimentation, when using the same learning rate for all components of a model, I have generally struggled with unstable training processes when fine-tuning a pre-trained encoder, as evident by loss and/or assessment metric results that vary greatly between epochs for the validation data. Using lower learning rates for the pre-trained but unfrozen encoder components has generally helped stabilize my training processes. In short, I highly recommend using variable learning rates for different components of the architecture if you are using pre-trained parameters.
As discussed in Chapter 13, different learning rates are implemented using optimizer parameter groups, which are lists of dictionaries that define the parameters in each group and the associated learning rate. Segmentation Models architectures store their components as the encoder, decoder, and segmentation_head attributes, and the encoder components are named according to the backbone architecture; for a ResNet encoder, these are conv1, bn1, and layer1 through layer4. If you are not sure how the components are named, they can be listed using the model’s named_children() method. In the example, I use a learning rate of 1e-6 for the stem and the first two encoder stages, 1e-5 for the third and fourth encoder stages, and 1e-4 for the decoder and classification head. It is important that every trainable parameter be included in exactly one group; if a component, such as the encoder stem, is omitted, its parameters will not be updated.
To use the parameter groups with Lightning, I override the configure_optimizers() method of the LightningModule. As demonstrated in Chapter 13, schedulers can also be used with parameter groups, and the stated learning rates then serve as base learning rates that the scheduler adjusts. Optimizers that implement adaptive learning rates, such as RMSProp and Adam, momentum, and weight decay can also be used with parameter groups.
model = smp.Unet(
  encoder_name="resnet34",
  encoder_weights="imagenet",
  classes=5,
  activation=None)

print([name for name, _ in model.encoder.named_children()])

class LitSegmenterVarLR(LitSegmenter):
    def configure_optimizers(self):
        m = self.model
        groups = [
            {"params": list(m.encoder.conv1.parameters()) + list(m.encoder.bn1.parameters()),
             "lr": 1e-6, "name": "enc_stem"},
            {"params": m.encoder.layer1.parameters(), "lr": 1e-6, "name": "enc_layer1"},
            {"params": m.encoder.layer2.parameters(), "lr": 1e-6, "name": "enc_layer2"},
            {"params": m.encoder.layer3.parameters(), "lr": 1e-5, "name": "enc_layer3"},
            {"params": m.encoder.layer4.parameters(), "lr": 1e-5, "name": "enc_layer4"},
            {"params": m.decoder.parameters(), "lr": 1e-4, "name": "decoder"},
            {"params": m.segmentation_head.parameters(), "lr": 1e-4, "name": "head"},
        ]
        return torch.optim.AdamW(groups)

litModel = LitSegmenterVarLR(model=model, nCls=5,
                             criterion=smp.losses.DiceLoss(mode="multiclass", from_logits=True))
21.8 Concluding Remarks
We highly encourage you to explore the Segmentation Models library. It offers an easy and intuitive means to implement a variety of semantic segmentation architectures and pre-trained CNN encoder backbones. Since Segmentation Models architectures are standard nn.Module subclasses, they can be trained using the same Lightning code used throughout this text. In Chapter 25, and also using Segmentation Models, we will explore the use of a transformer-based encoder, SegFormer, for a UNet architecture. Before doing so, we will explore instance segmentation, in which individual objects, as opposed to only classes, are differentiated.
21.9 Questions
- List three semantic segmentation architectures and three encoder backbones made available by the Segmentation Models package.
- Explain how class imbalance was addressed when preparing the topoDL training set in this chapter.
- In the original topoDL masks, surface mine disturbance was coded to 255 and the background to 0. Why were the masks divided by 255, and what data type and shape were the masks converted to?
- The surface mine mapping problem was framed as a two-class problem as opposed to a one-class problem. Explain how this choice impacts the number of output channels and the choice of loss function.
- Why were pre-trained ImageNet weights not used to initialize the DeepLabv3+ encoder in this example?
- Explain why using lower learning rates for a pre-trained, unfrozen encoder than for the decoder and classification head may stabilize the training process.
- Explain how different base learning rates are assigned to different components of an architecture when instantiating a PyTorch optimizer.
- Explain how the
geoInfer()function generates a spatial prediction for an entire topographic map, including the roles of overlapping chips and cropping.
21.10 Exercises
Exercise 21.1: Build a Custom Training Function for Semantic Segmentation
Introduction
The goal of this exercise is to build a custom function to instantiate, train, and evaluate a semantic segmentation model using Segmentation Models.
Deliverables
- A Quarto (.qmd) file containing all required code and answers to the questions and discussion prompts, and the HTML webpage rendered from it
Tasks
Task 1: Create a custom function to train a model. The function should meet the following criteria:
- The function must accept DataSets for the training and validation sets.
- The user should be able to define the number of input channels and the number of classes being predicted. Design the function for a multiclass problem.
- It should internally instantiate training and validation DataLoaders with a user-defined mini-batch size. The function should allow the user to choose whether to shuffle the training data and whether to drop the last mini-batch from both DataLoaders.
- The user should be able to select between cross entropy or Dice loss (you can use the Dice loss implemented by Segmentation Models).
- The user should be able to choose between a UNet or DeepLabv3+ architecture as implemented with Segmentation Models.
- The user should be able to choose from a set of available encoder backbones including ResNet-18, ResNet-34, ResNet-50, MobileNet-v2, and DenseNet-121.
- The user should be able to select from the following optimizers: stochastic gradient descent (SGD), RMSProp, or AdamW.
- The user should be able to set learning rates for each encoder block, the decoder, and the classification head separately.
- The user should be able to choose to use pre-trained ImageNet weights within the encoder.
- The user should be able to freeze or unfreeze the encoder.
- The function should implement a one cycle learning rate policy in which the user can define the maximum learning rate.
- The function should write the following to disk:
- The best model (as defined by the epoch that provided the highest F1-score for the validation data) as a .pt file.
- A CSV log file that provides the following information for each epoch: epoch number, training loss, training overall accuracy, training class-aggregated macro-averaged F1-score, validation loss, validation overall accuracy, and validation class-aggregated macro-averaged F1-score.
- A CSV file that summarizes the user’s settings including:
- Number of training epochs
- Mini-batch size
- Number of input channels
- Number of classes differentiated
- Total number of training samples
- Base architecture used
- Encoder backbone used
- Whether or not the encoder was frozen
- Loss used
- Optimizer used
- Base learning rates for the different components of the model
- Whether or not a one cycle learning rate policy was used
- If a one cycle learning rate policy was used, the maximum learning rate
Task 2: Test the function by training a model for a few epochs on a semantic segmentation dataset. For simplicity, you can choose a semantic segmentation dataset made available by torchvision.